Release Notes for TallyPrime and TallyPrime Edit Log Release 4.1 | What’s New!
TallyPrime and TallyPrime Edit Log Release 4.1 bring great delight to you with the following offerings:
The provision to update MSME UDYAM number for a company and its MSME suppliers. You also have the option to quickly gather details of all unpaid bills to MSME suppliers, and easily comply with section 43b(h) of the Income Tax Act.
The facility to generate the list of all online sales in a return period, as per the changes introduced in GSTR-1.
MSME
With the new MSME feature, both MSMEs and businesses trading with MSMEs can identify MSME status and track pending bills for timely payments. Moreover, buyers from MSMEs can quickly file their Form MSME 1 with complete details of overdue MSME payments. Further to comply with 43b(h) of income tax act, a buyer can instantly generate the list of bills.
Registered MSME Businesses can:
Set up UDYAM Registration Details received from the department. They can also alter the details and keep track of all such alterations along with the applicable dates.
Print invoices with UDYAM Registration Details, to inform buyers about your MSME status.
Get details of due or overdue receivables quickly and send reminders to receive payments on time.
Businesses trading with MSMEs can:
Set up MSME status of suppliers.
Identify bills related to MSMEs and make payments before the due date to avoid interest.
Get information related to MSMEs with overdue payments readily and report the same in Form MSME-1.
Get details of all unpaid bills to MSMEs to arrive at the deductions not allowed as per 43b(h) of income tax act.
Details of Online Sales Through e-Commerce Summary Report
For businesses doing online sales through e-Commerce operators, such as Amazon, Myntra and Flipkart, some changes have been introduced in GSTR-1, related to the reporting of online sales.
To support these changes, TallyPrime Release 4.1 has come up with an e-Commerce Summary to highlight:
Taxable values and breakup of tax amounts, such as IGST, CGST, SGST, and Cess
GSTIN-wise sales for the e-Commerce operators
Thereby, this report will help you in easily entering the relevant details on the GST portal.
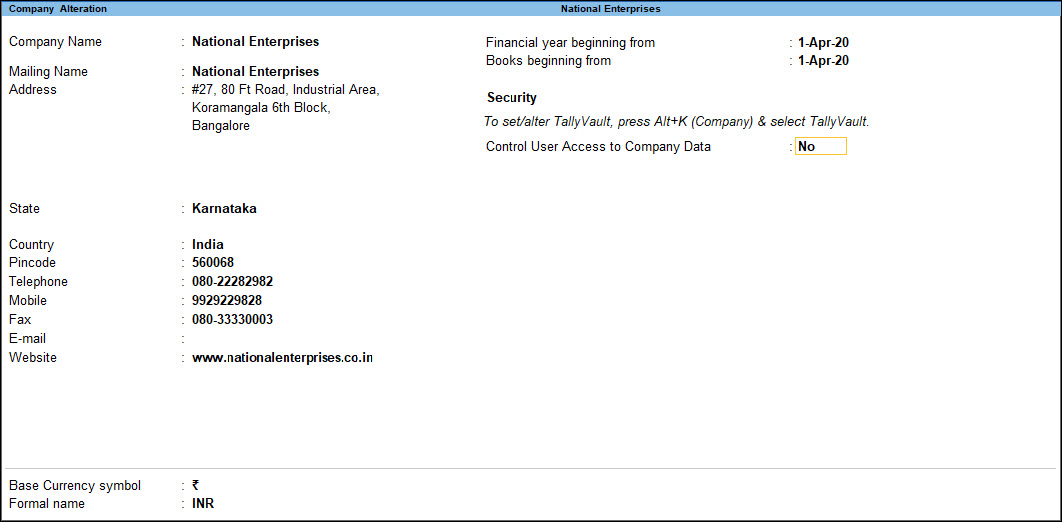
If you have maintained your books of accounts prior to the current financial year, you can add all of the back-dated transactions to your company in TallyPrime. Let us assume that you started your business in 1-Jun-2019 and have maintained your business transactions since then. However, you created a company in TallyPrime on 1-May-2019. By default, the books and financial years in TallyPrime are both set to 1-Apr-2020.
To allow entries of transactions in TallyPrime starting 1-Jun-2019, you will need to update the financial year information of the company.
Press Alt+K (Company) > Alter.
In the Company Alteration screen, update the Financial year beginning from as 1-Apr-2019 and the Books beginning from date as 1-Jun-2019.
Accept the screen. As always, you can press Ctrl+A to save.
You can change the Books beginning date in the Company Alteration screen anytime to make back-dated entries up to 1-Apr-2019 for the financial year 2019-2020.
If your company address, phone number, or any other contact information was not provided earlier or has changed, you can update such details in TallyPrime. Any changes made to these details will be reflected accordingly in your reports and printed invoices.
Press Alt+K (Company) > Alter.
In the Company Alteration screen, make the necessary changes.
Accept the screen. As always, you can press Ctrl+A to save.
If you do not need the company anymore, you can delete the company as well.
Press Alt+K (Company) > Alter.
In the Company Alteration screen, press Alt+D. The company will be deleted permanently.
If you want to access the business transactions recorded in the company at a later time, you can take a backup of the company before you delete it. Note that once you delete the company, you cannot retrieve it, and therefore keeping a back up of the company data is recommended.
Maintaining your business transactions on a day-to-day basis is critical to your business. To keep a record of all your business transactions, you need to first create a company in TallyPrime. Through the company, you can also view and update all your transaction entries, as needed, and go through the financial reports based on the transactions that you maintain.
Create company: To create the company, just enter the company name, address and other details, such as financial year, security, and base currency information. Once you have created your company, based on your business preferences, you can use the accounting, inventory, payroll, and taxation features. You can also specify the tax registration details as applicable, such as GST, VAT, Excise, TCS, or TDS, which can be accounted for your transactions.
Security: All the business transactions that you maintain in the company remain safe. You can enable additional security options for your company to prevent unauthorised access to your transaction records.
If you have more than one user accessing your company, you can set up security for each user based on their roles.
You can create an account in TallyPrime for each user. Based on the user’s roles, you can access to the tasks the user can perform.
Multiple companies: Do you have more than one business? If yes, you can create multiple companies in TallyPrime, maintain transactions separately for each business, and also manage the returns for each company accordingly.
Group company: If you are maintaining multiple companies, you can get a consolidated view of such business reports by using the Group Company feature. Viewing the financial reports separately for each business and consolidating the accounts manually can be a tedious task.
Once you have set up your company in TallyPrime based on your business requirements, you can record and manage your day-to-day transactions, and track them – even remotely.
Create a Company to Record Business Transactions
You need to create a company to keep record of all your business transactions and view related financial reports. To create the company, just enter the company name and address and update other details, such as contact and financial year information.
In this section
Create a company
Set up company features
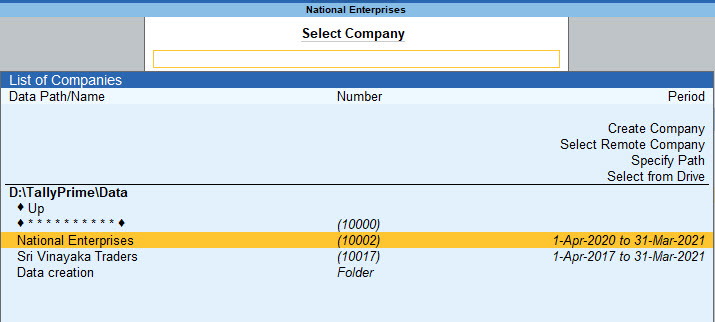
Load company
Create a company
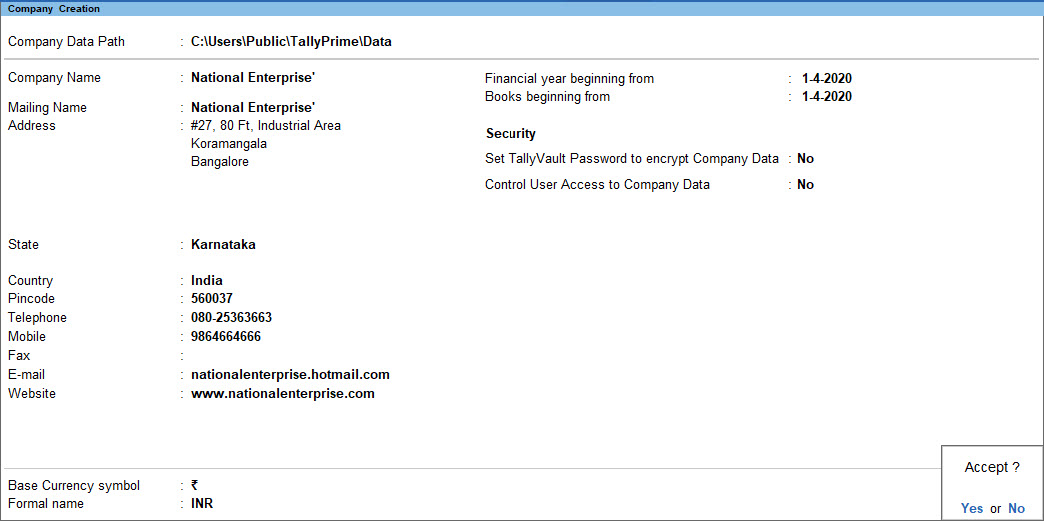
On launching TallyPrime, select CreateCompany.
If you already have one company open and would like to create another company, press Alt+K (Company) > Create.
Provide the Company details.
Enter the Name, Mailing name, and Address. For more information, click here.
By default, your company data will be saved in the location specified under Company Data Path, which is the same as the folder where TallyPrime is installed.
Enter the State, Country, and other contact details. A sample image is shown below. These details can be printed on your invoices, if needed. For more information, click here.
Accept the screen. As always, you can press Ctrl+A to save the details and create the company. You can set up the remaining company details (steps 3 and 4 below) anytime later.
The name of new union territory Dadra & Nagar Haveli and Daman & Diu is provided in Release 6.6.3. All masters with Daman & Diu and Dadra & Nagar Haveli are automatically updated with the name of new union territory. The state/union territory name before merger is captured in State (before reorganisation) field. Retaining the pre-merger state/union territory name helps in managing transactions and tax returns from that period.
Set up financial year details and security options.
Financial year beginning from: TallyPrime pre-fills this field based on the date settings of your computer and the Country selected in the Company Creation screen. For more information, click here.
Books beginning from: By default, TallyPrime fills this field with the Financial year beginning from date. You can update this, as needed. Say you started your business and have maintained all business transactions since 1-Oct-2020. You can update the Books beginning from date to 1-Oct-2020, while the financial year will be 1-Apr-2020.
Enable Edit Log: This is optional, available from TallyPrime Release 2.1 onwards. You can enable Set Edit Log applicability under F12 and enable Edit Log for the Company. This will help you to view Edit Log for the future activities that you will perform in masters and transactions.
Furthermore, Company-level activities such as enabling or disabling the Edit Log feature, data migration, or data split that affect the Edit Log report of masters and transactions will be recorded in the Edit Log report under Company.
Security: This is optional. You can enable security features such as TallyVault and User controls for your company anytime later.
If you do not see the Security option, press F12 (Configure) > set the following options to Yes:
Use TallyVault Password to encrypt Company Data
Use User Access Control
For more information, click here.
Specify the Base Currency Information.
You can set up the base currency depending on the currency used in your business to record transactions.
To view all the options related to base currency, press F12 (Configure) > set Provide Additional Base Currency details to Yes.
Accept the Company Creation screen. As always, you can press Ctrl+A to save.
Saving the company takes you to the Company Features screen, which displays that the company is created successfully.
Set up company features
As you create a company in TallyPrime, you can set up the necessary features, either now or anytime later, based on your business needs. The basic minimum key features required for you to start recording your business transactions are enabled and displayed by default. To view other features in the Company Features screen
Set the Show more features option to Yes.
Set the Show all features option to Yes.
Features
Description
Accounting
Maintain Accounts
This option is set to Yes, by default. Setting it to No will disable accounting-related options for your company.
Enable Bill-wise entry
Enable this option to display the option Maintain balances bill-by-bill created under sundry debtors and creditors.
When you enter details of sales and purchases with the bill-wise option activated, TallyPrime prompts you to identify the invoice with an appropriate reference number.
The reference number can then be used to allocate payments to the correct invoice to maintain an accurate account of outstanding.
Bill-wise details for non-trading accounts are useful when one needs to track either an installment to be paid or a loan amount to be received over a certain period.
Enable Cost Centres
Set Show more features to Yes to view this option.
Used for maintaining and allocating expenses to cost centres.
Enable Interest Calculation
Set Show more features to Yes to view this option.
Enable this option to calculate interest automatically based on the interest rate and the style of calculation specified.
This is useful when interest rates change from time to time.
Inventory
Maintain Inventory
This option is set to Yes by default. This allows you to maintain your stock or inventory. Setting this to No will disable Inventory-related features for your company.
Integrate Accounts with Inventory
Set Show more features to Yes.
Maintain your stock or inventory along with your books of accounts.
Stock records may contain errors caused by wrong allocation to items. This feature enables finalization of financial books without waiting for the reconciliation of stocks.
You can drill down from the Balance Sheet to view the Stock Register.
Enable multiple Price Levels
Set Show more features to Yes.
Create multiple price levels for your stock items.
Enable Batches
Set Show more features to Yes.
Maintain batch information pertaining to Stock Items. Setting this option to Yes displays the Maintain in Batches field in the Stock Item Creation screen.
Maintain Expiry Date for Batches
Set Show more features to Yes.
Set expiry dates for the batches. This displays the Use Expiry Dates field in the Stock Item Creation screen.
Enable Job Order Processing
Set Show all features to Yes.
Create Job Work Out or Job Work In orders.
Enable Cost Tracking
Set Show all features to Yes.
Analyse and track the cost of an item in transactions.
Use Discount column in invoices
Set Show more features to Yes.
Use separate Actual and Billed Quantity columns in invoices
Set Show more features to Yes.
Specify quantities that are different from those delivered/received when invoicing.
Taxation
Enable Goods and Services Tax (GST)
If your business is under the GST regime, set this option to Yes and specify the GST Details for your company.
Enable Tax Deducted at Source (TDS)
If your business considers TDS payments, set this option to Yes and specify the TDS deductor details along with the applicable Rates and Exemptions.
Enable Tax Collected at Source (TCS)
Set Show more features to Yes.
If your business considers TCS payments, set this option to Yes and specify the TCS collector details along with the applicable Rates and Exemptions.
Enable Value Added Tax (VAT)
Set Show all features to Yes.
If your business is under the VAT regime, set this option to Yes and specify the VAT Details for your company.
Enable Excise
Set Show all features to Yes.
Allow considering excise-related details during voucher entry.
Enable Service Tax
Set Show all features to Yes.
If you pay service tax as part of your business transaction, set this option to Yes and specify the service tax details and set the preferences for your company.
Online Access
Enable Browser Access for Reports
Set Show more features to Yes.
Once your company is connected to Tally.NET server, access the key business report from the broswer in any device using your Tally.NET credentials.
Enable Tally.NET Services for Remote Access & Synchronisation
Set Show more features to Yes.
Use features like Remote Access and Synchronisation.
Payroll
Maintain Payroll
Set Show all features to Yes.
Maintain payroll information in TallyPrime for the selected company.
Enable Payroll Statutory
Set Show all features to Yes.
Maintain payroll-related statutory information.
Others
Enable multiple addresses
Set Show more features to Yes.
Add multiple addresses for your company, as per your business needs.
Mark modified vouchers
Set Show more features to Yes.
For audit purposes, view all vouchers that are altered after creation.
After you have created the company, in the Gateway of Tally screen, under Name of Company, the company name appears in bold.
Multiple companies: Do you have multiple businesses to track and manage? You can create as many companies in TallyPrime and manage your business transactions in each company separately. If you also prefer to get a consolidated view of the health of multiple businesses or submit summarised reports for auditing purpose, you can use the Group Company feature in TallyPrime.
Identify, Track, Pay, and Report Payments to MSME Businesses
In this topic we will learn about the challenges faced by the MSME businesses due to the lack of visibility of their MSME status. We will also look into the provisions made by the Government to support such businesses and how the use of TallyPrime will improve the visibility in their business transactions and accelerate the movement of funds.
Micro and small businesses registered under the MSMED Act, 2006, get benefits such as loans at a lower interest, payment guarantees from buyers, and so on. The payment guarantee provision protects these businesses from delays in payment from their buyers. As per this act, any buyer of goods or services from registered MSMEs must make the payment on or before the agreed date or within 45 days. In case of a delay in payment beyond the specified date, buyers must pay interest on the amount. Generally in such cases, the interest rate is three times more than the rate that is notified by the Reserve Bank of India.
Additionally, the Ministry of Corporate Affairs (MCA) has notified that companies having outstanding dues to the MSME (Micro & Small) enterprises have to file the details of all the current outstanding dues to MSMEs in MSME Form-1 with the ROC (Registrar of Companies).
Despite all these facilities, the micro and small businesses are not fully benefitting from the provisions in the MSMED Act. This is primarily due to the absence of an identification for MSME Suppliers, which allows the buyers to omit/miss the MSME status of the supplier in their annual statement of accounts. As a result, the auditors do not detect such omissions because of the non-availability of any identification for MSME status.
The MSMEs should mention/print their MSME status on their invoices, bills and other relevant documents. The visibility provided to buyers and their accountants will help in the release of the payments on time and it will be also easy to file for compensation in case of delay in payments.
TallyPrime with its MSME feature will play this role of increasing the visibility of MSME status.
MSME Enterprises will be able to update their UDYAM Registration details and print the same in business documents.
Buyers from MSME can update UDYAM Registration details in ledgers and filter bill payables for MSMEs to ensure timely payment. They can also readily get details for MSME Form 1 for all overdues to MSME suppliers.
Buyers Update MSME Party’s UDYAM Details in Ledgers
The businesses purchasing goods and services from MSMEs can set up the status of the supplier as MSME. This sets reminders to make payments on time to all such parties and avoid paying interest for late payments. This also enables you to create and file returns quickly with all the details of payments to MSMEs.
Set/Update MSME UDYAM details for a Single Party
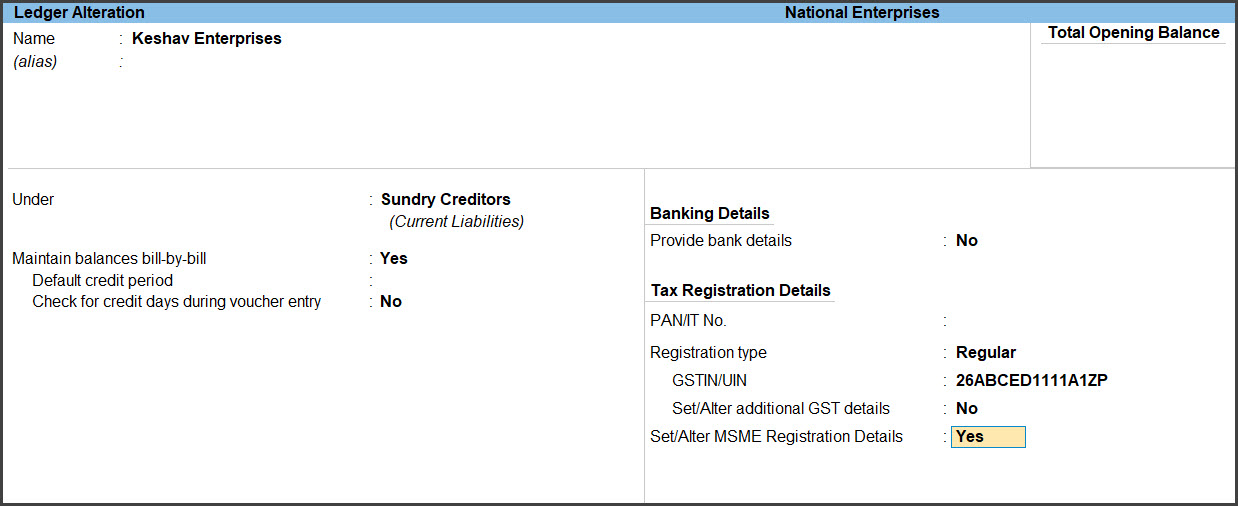
You can update the UDYAM details of MSME suppliers in the ledger master.
Press Alt+G (Go To) > Create Master or Alter Master > Ledger.
Enter basic party details like Name, Group, Address, if you are creating a new ledger.
Press F12 (Configure).
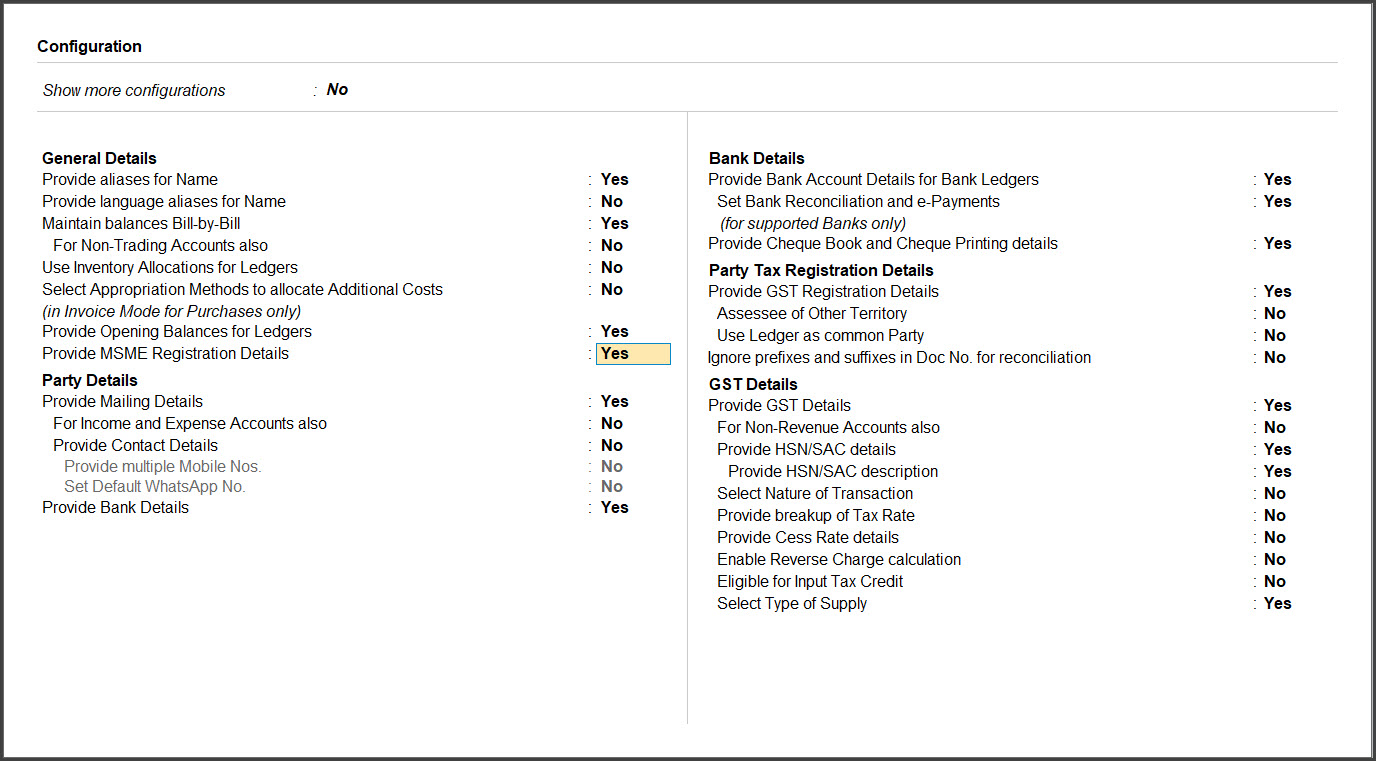
Set the option Provide MSME Registration Details to Yes.
Press Ctrl+A to save the configuration.
Enable Set/Alter MSME Registration Details.
Press Enter.
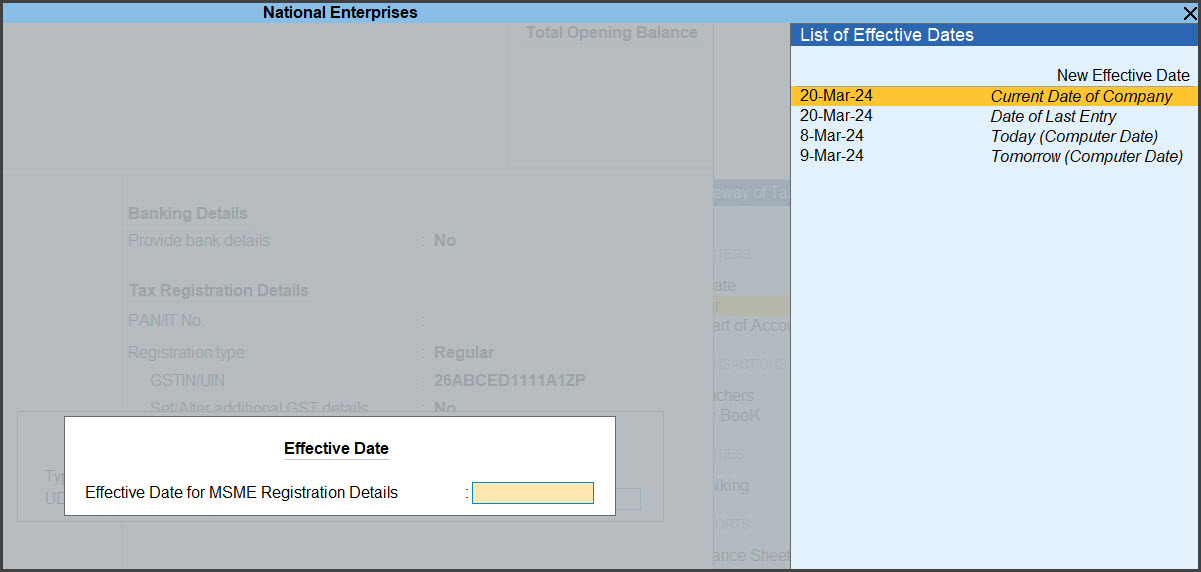
In the MSME Registration Details screen
Select the enterprise type of the party in the Type of Enterprise field.
Enter their UDYAM RegistrationNumber.
Press Enter.
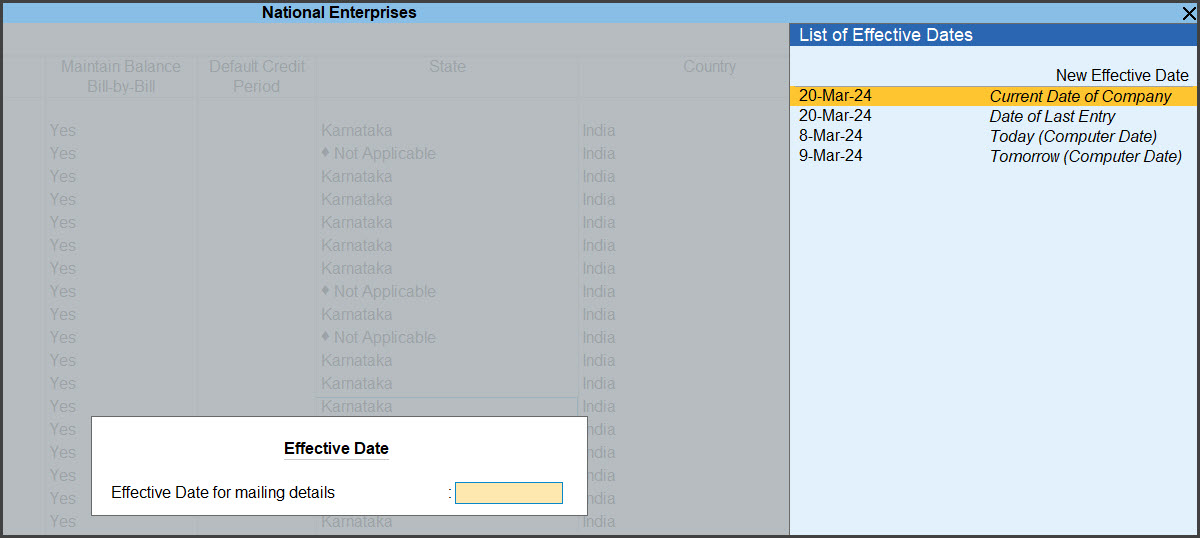
Enter the Effective Date for MSME Registration Details and press Enter.
Press Ctrl+A to save the ledger master.
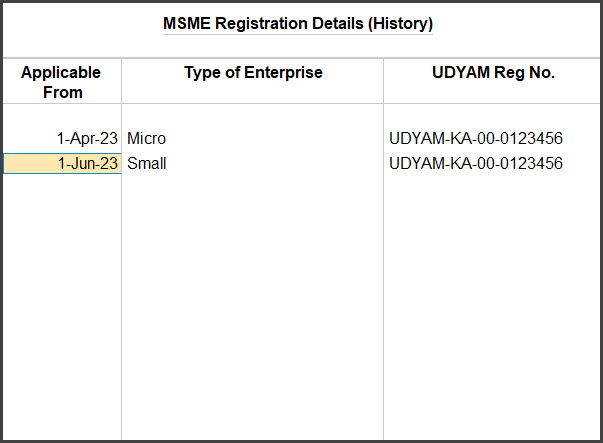
MSME Registration Details History
In case you make the change to you registration details due to change in the enterprise type or other such updates, and provide effective date for such changes to be applicable from, then all such changes are recorded and can be accessed from the history.
You can view the history of changes made to MSME registration details.
Press Ctrl+I (More Details).
Select MSME Registration Details (History)
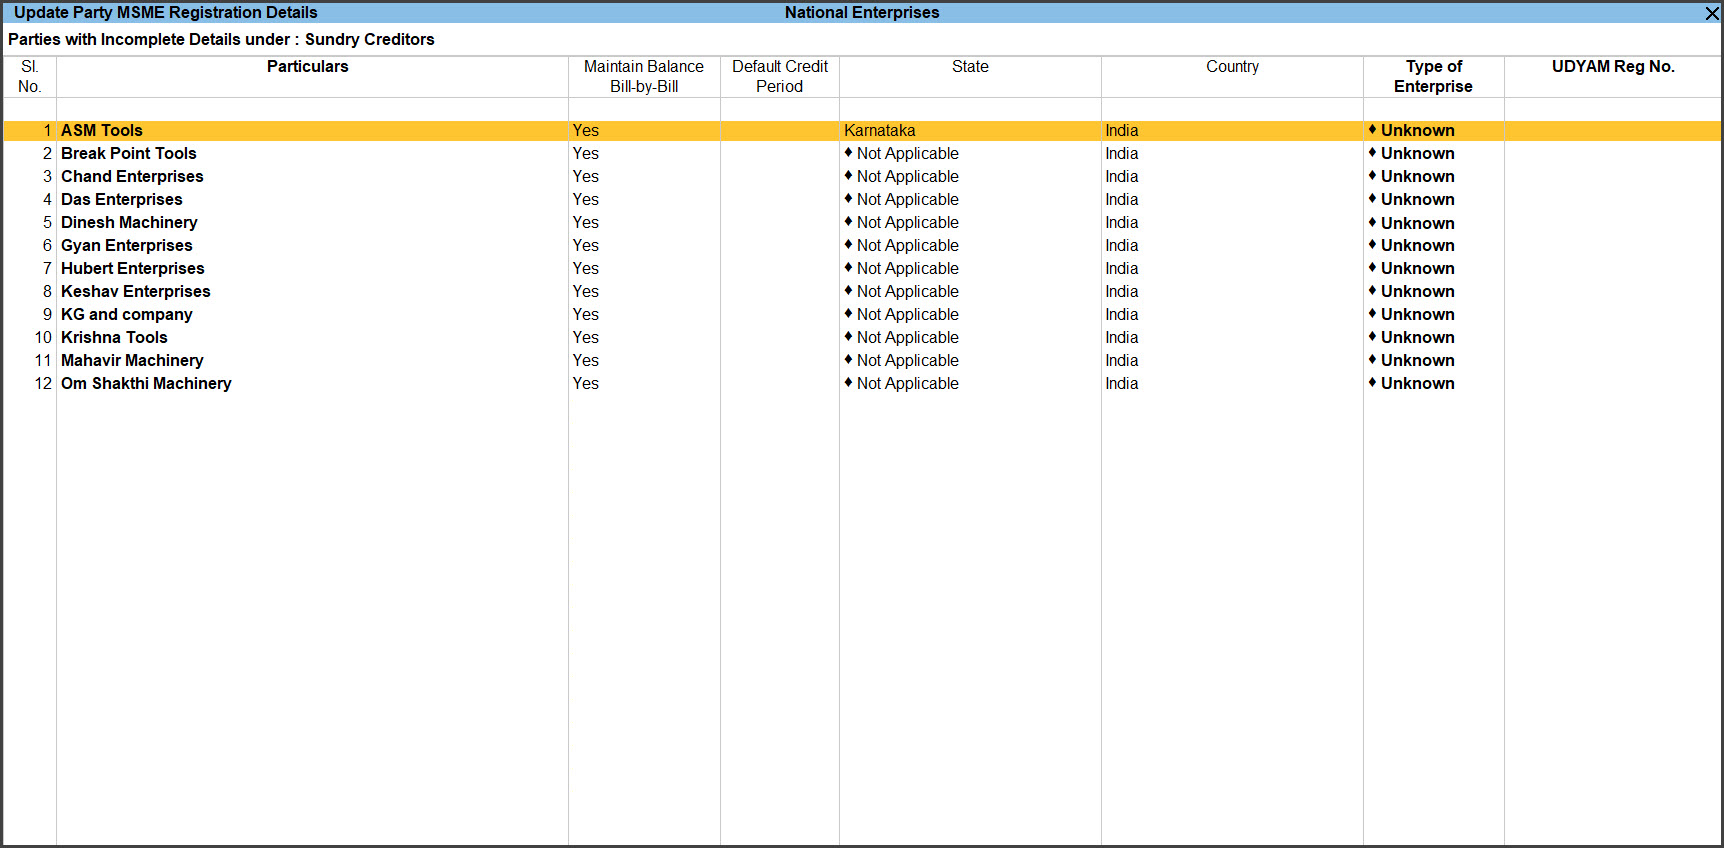
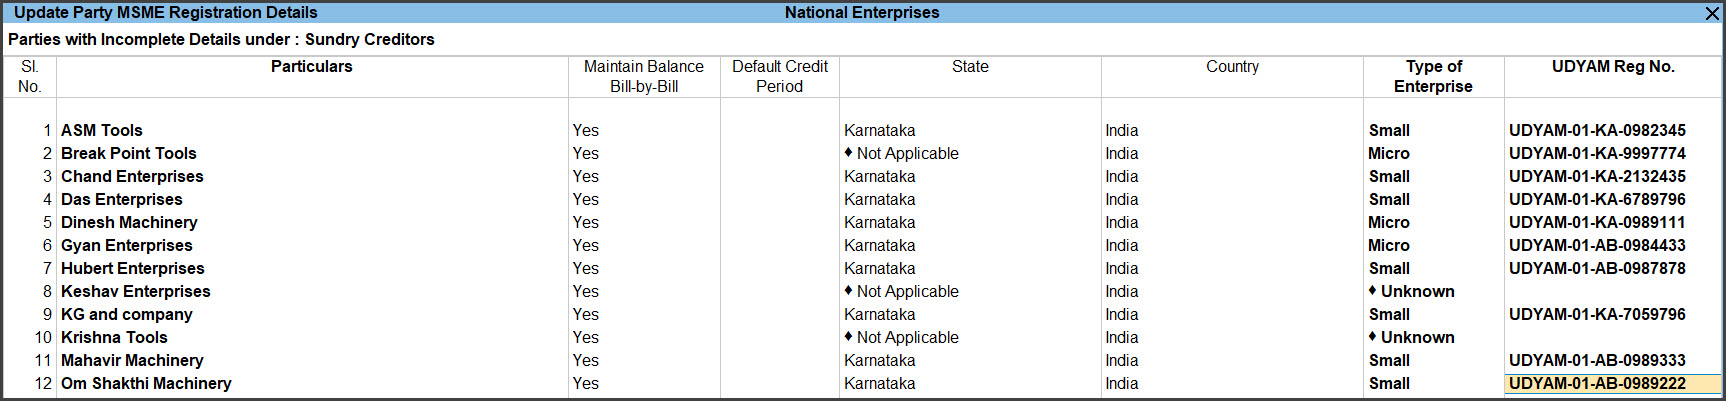
Update UDYAM Details for Multiple MSME Suppliers
TallyPrime provides option to update the UDYAM Details of multiple suppliers at once. This will help you update MSME details of all your MSME suppliers in one go.
Press Alt+G (Go To) > type or select Update Party MSME Details.
Alternatively, Gateway of Tally > Display More Reports > Statutory Reports > MSME Reports > Update Party MSME Details.
Select a specific group or All items in the NameofGroup field.
Select a specific ledger or All items in the NameofLedger field.
Select the party to update the UDYAM details and Alt+H or Enter.
Select the Type of Enterprise and enter UDYAM Reg No. of the party.
Press Enter.
Enter the Effective Date for Revised MSME Registration Details to apply the UDYAM details from that date.
Press Enter.
Press Enter or Y to save the UDYAM Details for the party.
You can also enter the UDYAM details for all parties in the same screen.
Press Alt+R (Multi Alter).
You can enter Default Credit Period, Type of Enterprise, and UDYAM Reg No. in the respective columns for any party.
Enter Effective Date for each party that you alter.
Press Ctrl+A to save the details.
Check Upcoming Due Dates for Payables
As a buyer, you need to identify and track the payments related to MSME suppliers or service providers to avoid exceeding the date agreed upon between you and the supplier. You need to consider all bills from MSMEs and cannot afford to miss out on any bill. The penal interest chargeable for delayed payment to an MSME enterprise is three times the bank rate notified by the Reserve Bank of India.
In case of delayed payments, MSME can file a complaint with MSME Samadhaan to get the payment along with interest.
Press Alt+G (Go To) > type or select Group Outstanding > Sundry Creditors.
Alternatively, Gateway of Tally > Display More Reports > Statement of Accounts > Outstandings > Payables.
Press Ctrl+B (Basis of Values).
Select Show Bills of and press Enter.
Select Micro & Small Parties option to view only the bills of micro and small parties.
Press Enter.
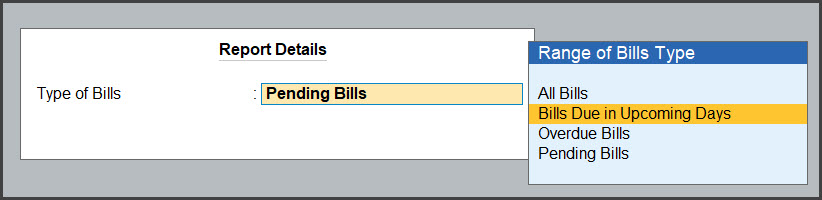
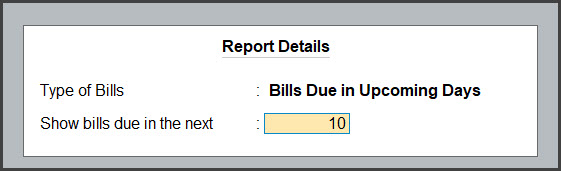
Select Type of Bills and press Enter.
Select the following based on:
All Bills, to view all the payable bills.
Bills Due in Upcoming Days, to see bills that upcoming in a specific number of days. You can specify the number of days in Show bills due in the next.
Overdue Bills, to see only the bills that are overdue.
Pending Bills, to only the pending bills.
In the Show bills due in the next field, enter the number of days to see bills that become due within the given number of days. This option appears only when you select Bills Due in Upcoming Days.
Press Enter.
Press Ctrl+A to save.
The report shows the bills based on the selection in Basis of Value. In case you had selected Bills Due in Upcoming Days and set the number of days as 10, the bills that are due in the next 10 days are shown.
By default, the report displays the Due on date for all the bills. You can change this to days until due date, overdue days, and overdue days from bill date.
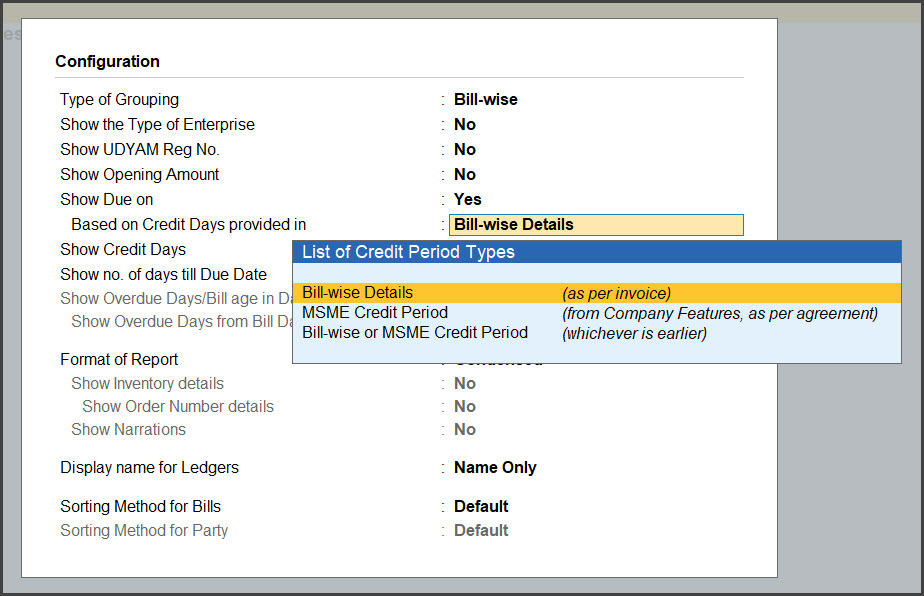
Configuration
You can add further details to the report using the configuration options.
Show Due on: Set this option to Yes, to view the date on which a bill becomes due for payment. The due date is considered based on the credit days set for the party. It can be the credit days specified in the invoice or in Credit Days Allowed for Micro & Small Parties under F11.
Note: The No. of Credit Days Allowed for MSMEs can be of two types, a. where there is an agreement with the MSME and b. where there is no agreement. Both type of credit days can be set. The due date will be calculated on the type of credit days configured.
Show no. of days till Due Date: Set this option to Yes to view number of days until the due date for each bill in Days till Due Date column.
Show Overdue Days/Bill age in Days: Set this option to Yes to view the number of overview days in Overdue by Days column.
Show Overdue days from Bill Date: Set this option to Yes to view the number of days since the day of billing in the Age of Bill in Days column.
View and Export MSME Form 1 Statement
As per a notification issued by the MCA, buyers from MSMEs should file disclosures through MSME Form 1 containing all the current outstanding dues to MSMEs periodically (1-Apr to 30 Sep) & (1-Oct to 30 Apr).
It is mandatory to file the MSME form 1 to avoid fines for non-furnishing/incomplete/incorrect information penalty.
TallyPrime provides Statement of MSME Form 1 with all the required details. The form lists all the MSME suppliers with UDYAM Details and having current outstanding dues. You can print the Form in the format prescribed for filing returns.
Press Alt+G (Go To) > type or select MSME Form 1 Statement.
Alternatively, Gateway of Tally > Display More Reports > Statutory Reports > MSME Reports > MSME Form 1 Statement.
Press Alt+P (Print).
Select Return Form and press Enter.
Press P (Print) to print the MSME 1 form.
The MSME Form 1 statement in TallyPrime by default displays all the details required to be filed in returns. You can add further details using the configuration options.
Configuration
You can add further details to the report using the configuration options.
Show the Type of Enterprise: Enable this option to show the Type of Enterprise set in the ledger master of the MSME suppliers.
Show PAN/IT No.: Enable this option to display the PAN/IT number of the MSME party.
Show UDYAM Reg No.: Enable this option to display the UDYAM number of the party, this is enabled by default.
Show Due on: Enable this option to display the Due on of each bill. This is set to Yes by default.
Based on Credit Days provided in: Under this you can select the option to arrive at Due On date, The options provided are:
Bill-wise Details (as per invoice)– Due on date is arrived based on credit days specified in bill-wise details of the invoice.
MSME Credit Period (from Company features, as per agreement) – Due on date is arrived based on msme credit days set for the party.
Bill-wise or MSME Credit Period(whichever is earlier) – Due on date is arrived based on earliest credit days set in bill-wise and in msme credit days.
Show Cleared On: Enable this option to see the date on which the bill was paid off.
Show Credit Days: Enable this option to see the credit days set for the MSME party
Show no. of days till Due Date: Set this option to Yes to view number of days until due date for each bill in Days till Due Date column.
Show Overdue Days/Bill age in Days: Set this option to Yes to view the number of overview days in Overdue by Days column.
Show Overdue days from Bill Date: Set this option to Yes to view the number of days since the day of billing in the Age of Bill in Days column.
TallyPrime is one of the most widely used business management software that allows you to get complete control over your inventory, from managing, tracking, and reordering it to much more. One of its key features is barcode assignment.
TallyPrime lets you quickly assign barcodes to your inventory, which makes inventory management and tracking a breeze. But how can you best use TallyPrime’s barcode feature for efficient inventory management? Read on to know more about the same.
5 vital things you should know before using barcodes with TallyPrime
Be clear on the type of barcode standard you would want to match your line of business. Some of the common barcode scanners that TallyPrime supports are Universal Product Code and International Article Number.
Next, you need a proper barcode generator that is in line with the barcode scanner you have selected.
Every item in your stock should be assigned a unique barcode.
In TallyPrime, you can choose a barcode that has a maximum of 32 characters.
When using the barcode scanner on your inventory, the appropriate software should be installed in your system, and the scanner should be connected to your system at all times.
A brief overview of the steps involved in barcode creation in TallyPrime
Before you know about these steps to create barcodes in the software, it would be a good idea to have a customised module of TallyPrime to suit the nature of your business
You will first assign barcodes to your stock items in TallyPrime by opening a particular item in the master file.
When you open this item, you will find the name of this item in the left-hand corner. Below this field, you will notice a field named, “Alias”. Here, you can enter the unique barcode for that item.
Please remember to press Ctrl-A after entering the code, to save the details. This way, the code will come up automatically whenever you enter the name of the item in the TallyPrime module.
Steps to generate vouchers, using the barcodes you have created:
To create a voucher, press Alt+G on the main module page.
Now, press F8 to view the sales page.
In the page that appears, you will find the field, “Name of item”. Keep your cursor in this field, and use the barcode scanner to scan the codes on the items. You will notice that the unique barcode of that particular item will automatically appear on the screen now.
All you need to do is enter the rate and quantity of the items, and the amount gets calculated automatically.
You can now save the voucher after entering the relevant GST details.
With this process, you can now create sales, purchases and other transactions within minutes, thanks to the automatic barcode generation feature of TallyPrime.
Why choose TallyPrime for assigning barcodes to inventory?
Have you wondered how using barcodes with TallyPrime will help you have better control over your inventory than before? Here are some points that will clear any ambiguity you might have:
Simple to use – Once you have the proper system in place, including the required software to create and print barcodes, you will have almost finished the process of assigning barcodes to your inventory. This process is simple, and with a single scan, all the details of your inventory get recorded into your system for easy management and tracking.
Good value for money – Using TallyPrime and a good barcode generator would cost your business only a few thousand of rupees. However, the value it generates is priceless, as it helps you manage all your inventory (across all locations) from a single point with utmost efficiency. The peace of mind you get when you have taken professional care of your inventory cannot be explained in words.
Accurate data at all times – Data accuracy plays a big part in the success and integrity of your business. With the barcode system of TallyPrime, you can be sure of data accuracy at all times because manual intervention is reduced considerably.
Guaranteed safety of inventory – When you have proper barcodes assigned to your inventory, you don’t have to worry about them getting lost or destroyed in transit. You can easily track the status of your inventory with these codes, and ensure that they get delivered to the right customers at the right time. Every type of inventory is assigned a specific code; hence, there are no chances of duplications or missing stock.
Better management of inventory across different locations – Without the help of technology and sophisticated software tools such as TallyPrime, it is almost an impossible task to manage and track inventory in different locations. With a single, centralised system, you can fulfil all customer orders by tracking your stock levels in multiple locations.
Increased speed, efficiency and accuracy – With Tally’s barcode system, you can increase the speed and efficiency of your inventory management. You don’t have to spend time manually recording the inventory as the items enter/leave your warehouse. You can rely on the automated processes of the software to do the job perfectly for you. This way, you have enough time on your hands to concentrate on other core areas of your business.
Many businesses use Excel spreadsheets to manage their books of accounts. While this setup may be enough for a small organisation, businesses find it necessary to adopt an accounting software when they begin scale their operations. Adopting a new software comes with its difficulties.
When you start to use the new software for your accounting operations, the first step you will need to perform is entering all of your spreadsheet data into the new system. For many software products in the market this is a manual task.
With TallyPrime you can easily migrate your excel data to the software. The latest version of TallyPrime 4.0 has a handy Excel Import function. As the name suggests, this feature will help you to migrate all the data from your Excel files to the software without any manual effort.
Steps to migrate data to TallyPrime from an Excel worksheet
Given below are the steps to migrate data from Excel spreadsheet to TallyPrime
Click on Alt+O, and then choose the Configurations from the Import Screen.
You will see the List of Configurations on the screen now. Click on the Show More option to view the entire list.
In this list, there are two sections—General and Banking. Here are the options you will see under the Banking section:
Location of the Import/Export Files—Choose where to save the file after successful import or export.
The behaviour of Import when exceptions exist—When the original file has some exceptions (like missing data or invalid data), how do you want to import it to TallyPrime? Choose if you want to ignore the exceptions, import with exceptions, or stop the import when you notice the first exception.
Overwrite vouchers—Set the option to “Yes”. This way, duplicate vouchers will be overwritten if the export and import files are of the same company.
Removal of invalid characters—Set the option to “Yes”. This way, invalid characters like additional spaces, tabs and other noise characters will be removed from the Excel file before importing.
Import batch size—How many files do you want to import at a time? You can set the batch size accordingly here.
Enable detailed log—Do you want to see a detailed log of errors during data import? Set the option as per your preferences.
Once you follow these steps, your data gets seamlessly migrated to TallyPrime so that you can continue your business operations effectively.
Advantages of migrating data to TallyPrime
With only a few clicks, you can migrate all the data on your vouchers, customer orders and other external software to TallyPrime. This saves you a great deal of time and effort while eliminating manual errors.
Thanks to the import functionality in TallyPrime, you can import any data in the new software at your convenience. Even if the original file has invalid data, missed data, or unorganised data, you can easily import to their respective fields on TallyPrime.
Once you import the data in TallyPrime, you can save this template for later use for similar kinds of data. It also provides several samples, which you can use to import your data to get the correct data in the proper fields within minutes. You can even customise a template as per your preferences.
When you import data to TallyPrime, you can also select the option of seeing detailed error logs. This helps you check for possible log errors, and correct them automatically. These logs will help you avoid similar errors in the next batch of imports.