Tally Tips
How to write a great resume
Know the purpose of your resume
The first thing that you need to understand is that a resume is not going to fetch you a job. It is the first step to get an interview call which will in turn land you in a job.
Back up your strengths,
While most of us like to flaunt off our strengths, a resume is just not the right place do to so. Any company or recruiter will get a better idea of your strengths when you relate it with your work/college experience, lest it might appear too vague.
Usage of language,
Like it or not, employers can judge your resume in no time. Using the apt language is the key to get interview calls. Simple English is appreciated over long, complex sentences. Avoid jargon, keep the titles short and crisp, be descriptive and stick to …
Order of details,
Ensure your education details follow ascending or descending order. Your prior work experience can help the recruiter gauge your skills and abilities. So put them first. While adding your other achievements, add the most recent ones on top.
Typography,
Big fonts make the recruiter’s job easier. However, 11 or 12 is the smallest you can go. Do not use capitals all over your resume. Remember your goal is to communicate the message as crisply as possible. Stick to one font style.
Keep negativity at bay,
Spare your resume from any kind of negative information. Things that you hated about previous employer, personal opinions etc can create a negative impression about you.
Irrelevant information,
Don’t include irrelevant information like your religion, age or political affiliation. Just skip these! It might interrupt your chances of landing in an interview.
Sell your fish,
Remember you have to market yourself through your resume. However, never overdo it, as you might end up blowing your own trumpet. As long as you avoid this, your marketing efforts are sure to fetch you a job.
Length of your resume,
No matter how long you have worked, never let your resume run for more than one or two pages at the maximum. Bear in mind that no one will have the patience to flip them. Keep it short and to the point.
Read and re-read,
Once you are done, proof read your resume. Check for spelling errors, facts and other important factors. You could also take help from a friend, family or someone who has more experience than yourself.
Form type in Tally ERP 9
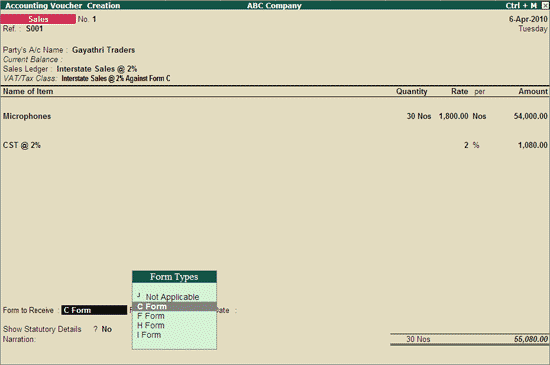
Depending on the nature of sales transaction you can select the applicable Form Type.
- C Form is for sales made to registered customers.
- D Form is for sales made to government.
- F Form is for Branch transfers.
- H Form is for deemed exports.
- I Form is for SEZ Customers.
- J Form is for sale made to Diplomatic Mission & U.N etc. Form J will be displayed for selection based on the State selected for CST compliance.
In case where the Inter-state sales transaction does not involve the receipt of C Form, select Not Applicable in the Form to Receive field of the sales invoice.
Shut Company in Tally ERP 9
Shut a Company is to unload it. It does not mean that you have deleted it. Simply select it again to load and work on it again.
You can shut a company in two ways
- either using the button F1: Shut Cmp (Alt + F1) or
- pressing Enter on Shut Company menu option on the Company Info. Menu.
The screen appears as shown below:

Inter–state Sales Invoice in Tally ERP 9
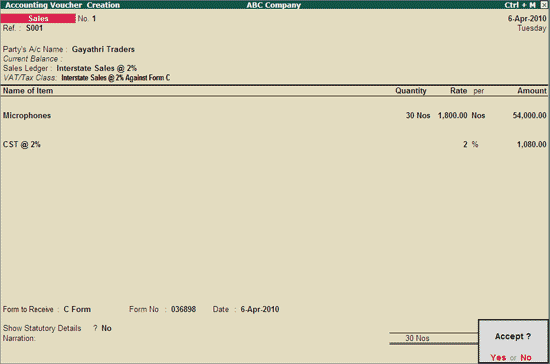
Interstate Sales Against Form C
Go to Gateway of Tally > Accounting Vouchers > F8: Sales
- Select As Invoice
- Enter the reference in the Ref. field, if required
- Select the Party’s A/c Name from the List of Ledger Accounts
- Select the Sales Ledger with the VAT/Tax class – Â Interstate Sales @ 2% Against Form C.
- On selecting the Sales Ledger, the VAT/Tax Class appears accordingly. In case the VAT/Tax Class is not defined in the master, select Interstate Sales @ 2% Against Form C from the VAT/Tax Class list.
- Select the Name of Item from the List of Items.
- Enter the Quantity and Rate. The amount is automatically displayed in the Amount field.
- Select the CST ledger grouped under Duties & Taxes with Type of Duty/Tax as CST and VAT/Tax Class – CST @ 2% from the List of Ledger Accounts. The amount of CST is automatically calculated on the assessable value.
- Select Form C as Form to Receive, if applicable.
- The Form number and Date fields will be displayed on selecting the Form to Receive from the Form Types list.
- Enter the Form number and Date if available for the Form selected
- Set Show Statutory Details field to No
- Enter Narration if required
- Press Enter to accept and save.


Enabling Cheque Printing in Tally ERP 9
To enable Cheque Printing in Tally.ERP 9,
- Go to Gateway of Tally > F11: Accounting Features
- Set Enable Cheque Printing to Yes
- Set/Alter Cheque Printing Configuration to Yes.
The screen appears as shown.

Once the option Set/Alter Cheque Printing Configuration is activated to Yes, you will get the Company Cheque Details screen.
Company Cheque Details screen Appears as shown

Company Name on Cheque:
To print the company name on the cheque for signature purposes, mention the name of the Company (for example, ABC Company). If you do not want Tally.ERP 9 to print the name, you can leave it blank. Many banks issue cheques with your company name printed.
Name of Banks
Select the Bank from the Bank accounts list.
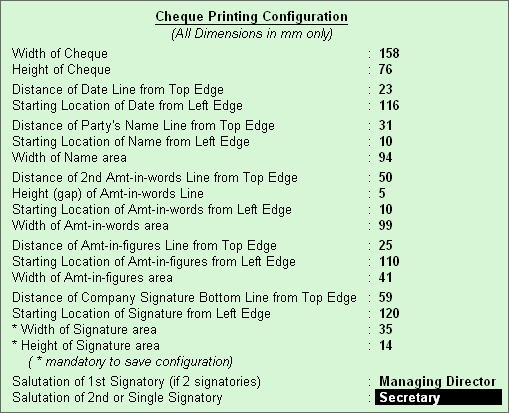
You will have to fill in the dimensions of the cheque. Tally.ERP 9 accepts user defined cheque dimensions. Take the banks cheque book and measure the dimensions of a cheque leaf carefully in millimeters and fill in the above form. You may need to correct it after trying out a couple of cheques so that the positioning is accurate. The placing of the cheque in the printer also determines the printing. To avoid mistakes trial could be made on photocopies of a cheque before using an actual cheque leaf.

General Tally Terminologies
| Term | Description |
| Input Tax | This is the tax paid on purchases |
| Output Tax | This is the tax charged on sales |
| Input Credit | The excess amount of Input tax over output tax for the current period which is permitted to be set off against Output tax of subsequent periods is termed as Input Credit. |
| TIN | Tax Identification Number (TIN) is the Registration Number given by the department to the dealer at the time of  Registration. This needs to be quoted at all required places where the registration details are to be provided. |
| Tax Invoice | This is the Sales invoice format issued by one Registered Dealer to another. Based on this Invoice, the ITC can be claimed by the purchasing dealer. |
| Retail Invoice | The Sales invoice format used for invoicing the Exempted Sales and the Sales made to Unregistered dealers is termed as Retail Invoice. |
| Registered Dealer | This term is used to identify a dealer who is registered either under Voluntary Registration or Compulsory Registration under the VAT Act. Such dealer can issue tax invoice and also claim the tax paid on purchases made from other registered dealers as Input tax credit. |
| Unregistered Dealer | Dealers who are not registered under the VAT Act are called as Unregistered Dealers (URD). Such dealers cannot issue tax invoice. They can neither Charge Tax nor Claim Input Tax Credit. |
| Purchase Tax | The Tax paid on goods purchased from unregistered dealers is liable to Purchase Tax. The purchase tax is treated as Output VAT payable by the dealer as it is a liability. It has to be paid while making the payment towards VAT liability. Based on the Rules and Regulations, the Input Tax Credit can be claimed on the payment made towards Purchase Tax. |
How to apply Lower Deduction TDS Rates for certain supplier
How to use lower deduction TDS rates for certain suppliers
By virtue of Section 197/197A an assesses can get a certificate of lower deduction from the ITO.
Such certificate will include your TAN number, Assesses PAN Number, Period of applicability, approx. billing amount to you during the period and the % of TDS by which you should deduct TDS on the same.
Let’s assume one of your supplier presents you such a certificate of lower deduction of tds at a rate of 6%, then you must deduct the same as per the certificate produced to you.
Let’s learn how to manage the same in Tally.ERP 9. Once you make the settings as per below then whenever you book the invoice of such supplier then TDS will be calculated and deducted from the bill automatically at the rates specified as per the lower Deduction certificate
- Go to related supplier’s ledger who produced you the lower deduction certification
- (Note : Enable “Allow ADVANCED entries in TDS Master†form F12 configuration)
- Enable “ Is TDS Deductable�
- Deductee Type : select deductee type from the list
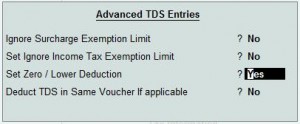
- Use Advanced TDS Entries : Set to “Yesâ€
- You will find a pop up as per below

- Enable “ Set Zero/Lower Deductionâ€Â to “Yesâ€
- You will find below screen

- Select the Nature of payment applicable from the pop up window list
- Set section number (it will be shown in the lower deduction certificate
- Mention necessary details and save it.
If you are not aware of TDS features in tally then you should referTDS help file for further reference
Removing a Line and bringing it back in a report
- In Tally ERP 9 we can hide a group, ledger and stock item by pressing Alt + R,
- To recall the hidden line press Alt + S, and
- To recall the lines in order of removal press Alt + U
Create a new company with similar Features and Configuration
Creating two or more companies with same F11: Features and F12: Configuration settings
- Create a company
- Set F11: Features and F12: Configuration as desired
- Keep the company loaded and create another company
- The new company will have the same settings (Same configuration and features)