Form type in Tally ERP 9

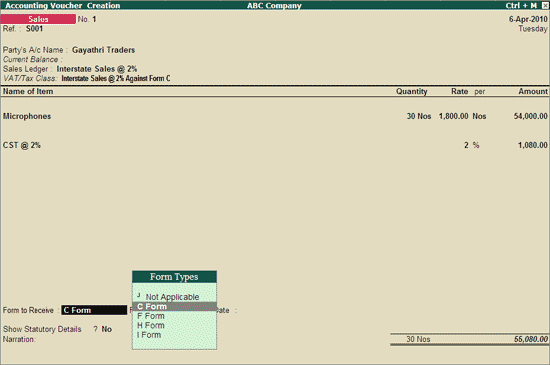
Depending on the nature of sales transaction you can select the applicable Form Type.

  • C Form is for sales made to registered customers.
  • D Form is for sales made to government.
  • F Form is for Branch transfers.
  • H Form is for deemed exports.
  • I Form is for SEZ Customers.
  • J Form is for sale made to Diplomatic Mission & U.N etc. Form J will be displayed for selection based on the State selected for CST compliance.

In case where the Inter-state sales transaction does not involve the receipt of C Form, select Not Applicable in the Form to Receive field of the sales invoice.

Inter–state Sales Invoice in Tally ERP 9

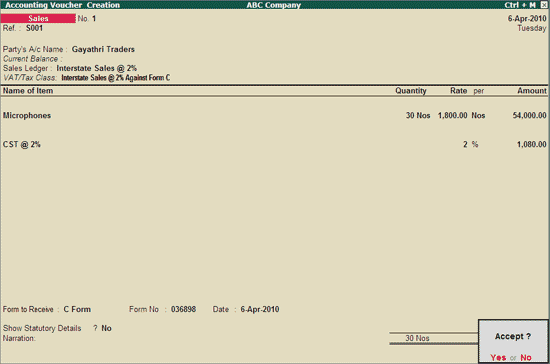
Interstate Sales Against Form C

Go to Gateway of Tally > Accounting Vouchers > F8: Sales

  1. Select As Invoice
  2. Enter the reference in the Ref. field, if required
  3. Select the Party’s A/c Name from the List of Ledger Accounts
  4. Select the Sales Ledger with the VAT/Tax class –  Interstate Sales @ 2% Against Form C.
  5. On selecting the Sales Ledger, the VAT/Tax Class appears accordingly. In case the VAT/Tax Class is not defined in the master, select Interstate Sales @ 2% Against Form C from the VAT/Tax Class list.
  6. Select the Name of Item from the List of Items.
  7. Enter the Quantity and Rate. The amount is automatically displayed in the Amount field.
  8. Select the CST ledger grouped under Duties & Taxes with Type of Duty/Tax as CST and VAT/Tax Class – CST @ 2% from the List of Ledger Accounts. The amount of CST is automatically calculated on the assessable value.
  9. Select Form C as Form to Receive, if applicable.
  10. The Form number and Date fields will be displayed on selecting the Form to Receive from the Form Types list.
  11. Enter the Form number and Date if available for the Form selected
  12. Set Show Statutory Details field to No
  13. Enter Narration if required
  14. Press Enter to accept and save.

Enabling Cheque Printing in Tally ERP 9

To enable Cheque Printing in Tally.ERP 9,

  1. Go to Gateway of Tally > F11: Accounting Features
  2. Set Enable Cheque Printing to Yes
  3. Set/Alter Cheque Printing Configuration to Yes.

The screen appears as shown.

Once the option Set/Alter Cheque Printing Configuration is activated to Yes, you will get the Company Cheque Details screen.

Company Cheque Details screen Appears as shown

Company Name on Cheque:

To print the company name on the cheque for signature purposes, mention the name of the Company (for example, ABC Company). If you do not want Tally.ERP 9 to print the name, you can leave it blank. Many banks issue cheques with your company name printed.

Name of Banks

Select the Bank from the Bank accounts list.

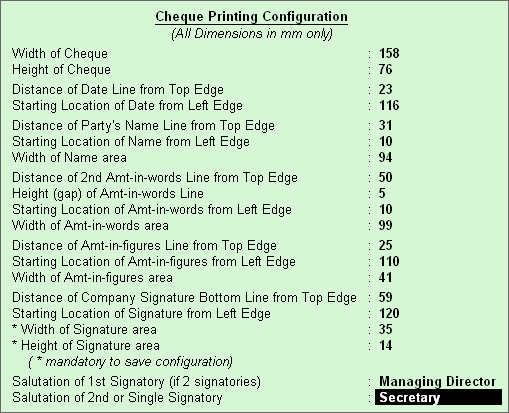
You will have to fill in the dimensions of the cheque. Tally.ERP 9 accepts user defined cheque dimensions. Take the banks cheque book and measure the dimensions of a cheque leaf carefully in millimeters and fill in the above form. You may need to correct it after trying out a couple of cheques so that the positioning is accurate. The placing of the cheque in the printer also determines the printing. To avoid mistakes trial could be made on photocopies of a cheque before using an actual cheque leaf.
General Tally Terminologies

Term Description
Input Tax This is the tax paid on purchases
Output Tax This is the tax charged on sales
Input Credit The excess amount of Input tax over output tax for the current period which is permitted to be set off against Output tax of subsequent periods is termed as Input Credit.
TIN Tax Identification Number (TIN) is the Registration Number given by the department to the dealer at the time of  Registration. This needs to be quoted at all required places where the registration details are to be provided.
Tax Invoice This is the Sales invoice format issued by one Registered Dealer to another. Based on this Invoice, the ITC can be claimed by the purchasing dealer.
Retail Invoice The Sales invoice format used for invoicing the Exempted Sales and the Sales made to Unregistered dealers is termed as Retail Invoice.
Registered Dealer This term is used to identify a dealer who is registered either under Voluntary Registration or Compulsory Registration under the VAT Act. Such dealer can issue tax invoice and also claim the tax paid on purchases made from other registered dealers as Input tax credit.
Unregistered Dealer Dealers who are not registered under the VAT Act are called as Unregistered Dealers (URD). Such dealers cannot issue tax invoice. They can neither Charge Tax nor Claim Input Tax Credit.
Purchase Tax The Tax paid on goods purchased from unregistered dealers is liable to Purchase Tax. The purchase tax is treated as Output VAT payable by the dealer as it is a liability. It has to be paid while making the payment towards VAT liability. Based on the Rules and Regulations, the Input Tax Credit can be claimed on the payment made towards Purchase Tax.

How to account TDS deducted by your customer

When we raise an invoice to our client, on which our client is requires to deduct TDS and pays the balance amount to us. The amount so deducted by our client, he is liable to pay it to the Income Tax department within first week of next month, hence its a receivable for us which we have to claim from the Income Tax Department and not from our client.

Now, we will see how to handle this situation in Accounts and Tally ERP 9 ?

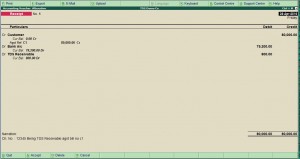
Suppose we  have issue a bill of Rs. 80000 on which Customer deducted TDS of Rs. 800 and pays you Rs. 79200 back to us. Then the entry in your books will be as under :

Particulars Amount
Dr. Bank Account Rs. 79200
Dr. TDS Receivable Account Rs. 800
Cr. Customer Rs. 80000

( This ledger should be open under the Group Loans & Advances (Asset))

The result will be that your customer a/c will be settled off and the TDS amount will be shown as receivable in the Balance sheet which we have to claim from the Income Tax department. We will get Form No. 16A From our client in this regard in support of our claim.

How to apply Lower Deduction TDS Rates for certain supplier

How to use lower deduction TDS rates for certain suppliers

By virtue of Section 197/197A an assesses can get a certificate of lower deduction from the ITO.

Such certificate will include your TAN number, Assesses PAN Number, Period of applicability, approx. billing amount to you during the period and the % of TDS by which you should deduct TDS on the same.

Let’s assume one of your supplier presents you such a certificate of lower deduction of tds at a rate of 6%, then you must deduct the same as per the certificate produced to you.

Let’s learn how to manage the same in Tally.ERP 9. Once you make the settings as per below then whenever you book the invoice of such supplier then TDS will be calculated and deducted from the bill automatically at the rates specified as per the lower Deduction certificate

  1. Go to related supplier’s ledger who produced you the lower deduction certification
  2. (Note : Enable “Allow ADVANCED entries in TDS Master” form F12 configuration)
  3. Enable “ Is TDS Deductable”?
  4. Deductee Type : select deductee type from the list
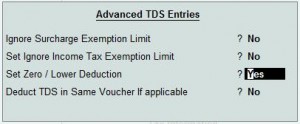
  5. Use Advanced TDS Entries : Set to “Yes”
  6. You will find a pop up as per below
  7. Enable “ Set Zero/Lower Deduction”  to “Yes”
  8. You will find below screen
  9. Select the Nature of payment applicable from the pop up window list
  10. Set section number (it will be shown in the lower deduction certificate
  11. Mention necessary details and save it.

If you are not aware of TDS features in tally then you should referTDS help file for further reference

Tally ERP 9 Release 3.0 upcoming features

Tally ERP 9 Release 3  of Current series A is due and it will be available soon to all the Tally users.

There are some long-awaited and expected features for which Tally community was looking since a long time.
Here is the brief features that will be available with Tally ERP 9 Rel 3,

  • Auditor’s edition enhanced with form 3CA and 3CB
  • Now you can enter Multiple addresses for the Company and for Debtors and Creditors in Master ledger
  • Complete  Jobwork  module for manufacturers with excise compliance
  • Rs symbol has changed
  • multiple outstanding entries will be available.
  • if  you want to insert your company logo, in the bills etc.., it can be done ! now no more need to customise for logo print or any TDL!
  • auto back in customised path/folder. An enhanced feature  of the earlier release 2.1,and now you can set your own path/folder to take auto back up of your data
  • Customer can select the reports he sees often and add it to ” my Favorites “
  • Pre order closure is available.
  • Form no. 16 for employee and tds on salary module will now be available.
  • last, but not least,call the expert toll-free no charge! see the picture below now for any of query just call a tally expert from tally software free of cost and get solve your query in no time.

For Sales and Support

Note : All this features will be available only to licensed Tally users and whose Tally Net Subscription (TNS) is active.

If your TNS     had been expired then you may renew it now.

Available new stat 132 from 18th January, 2010

New Stat.900 Version is available free for existing Tally User Major Enhancement are :

Value Added Tax

Goa

The Payment Challan – Form VAT – V is provided for VAT and Composite VAT enabled Companies.

Haryana

  • The VAT Payment Challan – Form VAT C1 is provided.
  • Excel export support for Form VAT R1 and Form VAT R2 is provided.

Maharashtra

The functionality of e-Audit Form 704 is enhanced as per the requirements of revised FORM-704.xls file.

Manipur

The value of entries recorded using the VAT/Tax class provided for 5% and 13.5% VAT rates is captured in Form 10 and Annexure A.

Release details of Stat900 version 132 (PDF file)

Download Stat 132