TallyPrime
Resolve Conflicts in Transactions Due to Changes in GST Details in Masters
Resolve Conflicts in Transactions Due to Change in Source of GST Details
Convert transactions from B2B to B2C in bulk when GSTIN/UIN is inactive
Export GSTR-1 for Multiple Return Periods into a Single Excel File
Allow Back-Dated Transaction Entries | Update Financial Year in TallyPrime
If you have maintained your books of accounts prior to the current financial year, you can add all of the back-dated transactions to your company in TallyPrime. Let us assume that you started your business in 1-Jun-2019 and have maintained your business transactions since then. However, you created a company in TallyPrime on 1-May-2019. By default, the books and financial years in TallyPrime are both set to 1-Apr-2020.
To allow entries of transactions in TallyPrime starting 1-Jun-2019, you will need to update the financial year information of the company.
- Press Alt+K (Company) > Alter.
- In the Company Alteration screen, update the Financial year beginning from as 1-Apr-2019 and the Books beginning from date as 1-Jun-2019.

- Accept the screen. As always, you can press Ctrl+A to save.
You can change the Books beginning date in the Company Alteration screen anytime to make back-dated entries up to 1-Apr-2019 for the financial year 2019-2020.
Update Company Details | Alter Company in TallyPrime
If your company address, phone number, or any other contact information was not provided earlier or has changed, you can update such details in TallyPrime. Any changes made to these details will be reflected accordingly in your reports and printed invoices.
- Press Alt+K (Company) > Alter.
- In the Company Alteration screen, make the necessary changes.
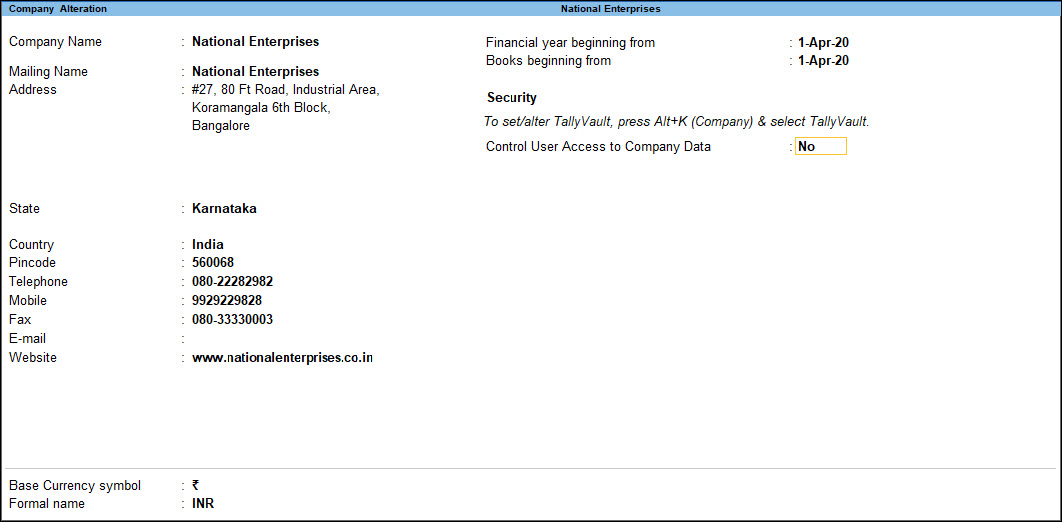
- Accept the screen. As always, you can press Ctrl+A to save.
If you do not need the company anymore, you can delete the company as well.
- Press Alt+K (Company) > Alter.
- In the Company Alteration screen, press Alt+D. The company will be deleted permanently.
If you want to access the business transactions recorded in the company at a later time, you can take a backup of the company before you delete it. Note that once you delete the company, you cannot retrieve it, and therefore keeping a back up of the company data is recommended.
Load company in TallyPrime
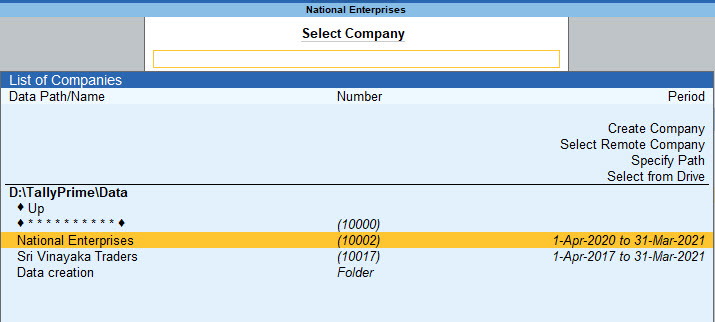
Once you have created a company, you can load the company in one of the following ways:
Select company
- Open TallyPrime > Alt+F3 (Select Company) > and select the company from the List of Companies.
- If you have created more than one company, you can browse to the data path and select the required company to open.
Set Up Your Company
Maintaining your business transactions on a day-to-day basis is critical to your business. To keep a record of all your business transactions, you need to first create a company in TallyPrime. Through the company, you can also view and update all your transaction entries, as needed, and go through the financial reports based on the transactions that you maintain.
Create company: To create the company, just enter the company name, address and other details, such as financial year, security, and base currency information. Once you have created your company, based on your business preferences, you can use the accounting, inventory, payroll, and taxation features. You can also specify the tax registration details as applicable, such as GST, VAT, Excise, TCS, or TDS, which can be accounted for your transactions.
Security: All the business transactions that you maintain in the company remain safe. You can enable additional security options for your company to prevent unauthorised access to your transaction records.
If you have more than one user accessing your company, you can set up security for each user based on their roles.
You can create an account in TallyPrime for each user. Based on the user’s roles, you can access to the tasks the user can perform.
Multiple companies: Do you have more than one business? If yes, you can create multiple companies in TallyPrime, maintain transactions separately for each business, and also manage the returns for each company accordingly.
Group company: If you are maintaining multiple companies, you can get a consolidated view of such business reports by using the Group Company feature. Viewing the financial reports separately for each business and consolidating the accounts manually can be a tedious task.
Once you have set up your company in TallyPrime based on your business requirements, you can record and manage your day-to-day transactions, and track them – even remotely.
Create a Company to Record Business Transactions
You need to create a company to keep record of all your business transactions and view related financial reports. To create the company, just enter the company name and address and update other details, such as contact and financial year information.
In this section
- Create a company
- Set up company features
- Load company
Create a company
- On launching TallyPrime, select Create Company.
- If you already have one company open and would like to create another company, press Alt+K (Company) > Create.
- Provide the Company details.
- Enter the Name, Mailing name, and Address. For more information, click here.
By default, your company data will be saved in the location specified under Company Data Path, which is the same as the folder where TallyPrime is installed.
- Enter the State, Country, and other contact details. A sample image is shown below. These details can be printed on your invoices, if needed. For more information, click here.
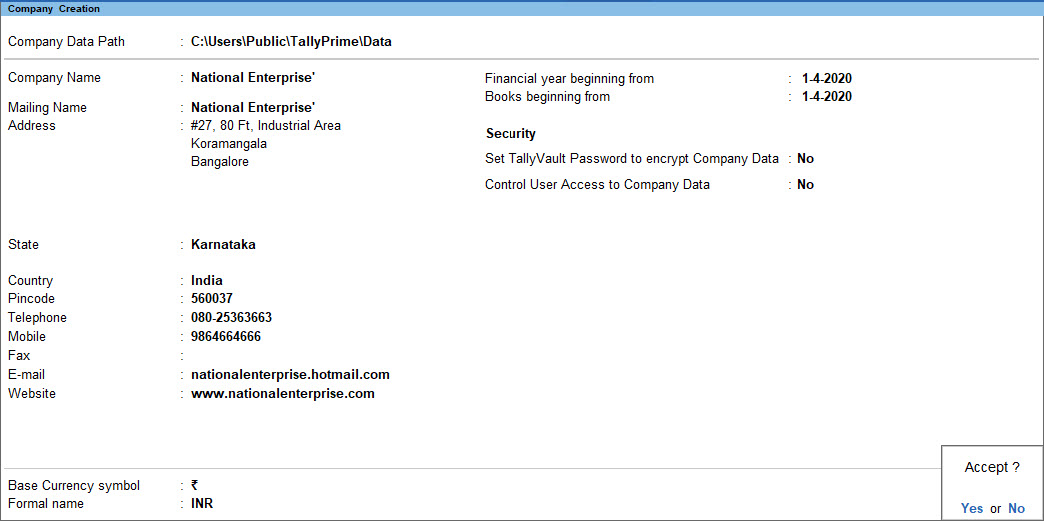
- Accept the screen. As always, you can press Ctrl+A to save the details and create the company. You can set up the remaining company details (steps 3 and 4 below) anytime later.
The name of new union territory Dadra & Nagar Haveli and Daman & Diu is provided in Release 6.6.3. All masters with Daman & Diu and Dadra & Nagar Haveli are automatically updated with the name of new union territory. The state/union territory name before merger is captured in State (before reorganisation) field. Retaining the pre-merger state/union territory name helps in managing transactions and tax returns from that period.
- Enter the Name, Mailing name, and Address. For more information, click here.
- Set up financial year details and security options.
- Financial year beginning from: TallyPrime pre-fills this field based on the date settings of your computer and the Country selected in the Company Creation screen. For more information, click here.
- Books beginning from: By default, TallyPrime fills this field with the Financial year beginning from date. You can update this, as needed. Say you started your business and have maintained all business transactions since 1-Oct-2020. You can update the Books beginning from date to 1-Oct-2020, while the financial year will be 1-Apr-2020.
- Enable Edit Log: This is optional, available from TallyPrime Release 2.1 onwards. You can enable Set Edit Log applicability under F12 and enable Edit Log for the Company. This will help you to view Edit Log for the future activities that you will perform in masters and transactions.
Furthermore, Company-level activities such as enabling or disabling the Edit Log feature, data migration, or data split that affect the Edit Log report of masters and transactions will be recorded in the Edit Log report under Company. - Security: This is optional. You can enable security features such as TallyVault and User controls for your company anytime later.
If you do not see the Security option, press F12 (Configure) > set the following options to Yes:- Use TallyVault Password to encrypt Company Data
- Use User Access Control
For more information, click here.
- Specify the Base Currency Information.
You can set up the base currency depending on the currency used in your business to record transactions.
To view all the options related to base currency, press F12 (Configure) > set Provide Additional Base Currency details to Yes. - Accept the Company Creation screen. As always, you can press Ctrl+A to save.
Saving the company takes you to the Company Features screen, which displays that the company is created successfully.

Set up company features
As you create a company in TallyPrime, you can set up the necessary features, either now or anytime later, based on your business needs. The basic minimum key features required for you to start recording your business transactions are enabled and displayed by default. To view other features in the Company Features screen
- Set the Show more features option to Yes.
- Set the Show all features option to Yes.
| Features | Description |
| Accounting | |
| Maintain Accounts | This option is set to Yes, by default. Setting it to No will disable accounting-related options for your company. |
| Enable Bill-wise entry | Enable this option to display the option Maintain balances bill-by-bill created under sundry debtors and creditors.
When you enter details of sales and purchases with the bill-wise option activated, TallyPrime prompts you to identify the invoice with an appropriate reference number. The reference number can then be used to allocate payments to the correct invoice to maintain an accurate account of outstanding. Bill-wise details for non-trading accounts are useful when one needs to track either an installment to be paid or a loan amount to be received over a certain period. |
| Enable Cost Centres | Set Show more features to Yes to view this option.
Used for maintaining and allocating expenses to cost centres. |
| Enable Interest Calculation | Set Show more features to Yes to view this option.
Enable this option to calculate interest automatically based on the interest rate and the style of calculation specified. This is useful when interest rates change from time to time. |
| Inventory | |
| Maintain Inventory | This option is set to Yes by default. This allows you to maintain your stock or inventory. Setting this to No will disable Inventory-related features for your company. |
| Integrate Accounts with Inventory | Set Show more features to Yes.
Maintain your stock or inventory along with your books of accounts. Stock records may contain errors caused by wrong allocation to items. This feature enables finalization of financial books without waiting for the reconciliation of stocks. You can drill down from the Balance Sheet to view the Stock Register. |
| Enable multiple Price Levels | Set Show more features to Yes.
Create multiple price levels for your stock items. |
| Enable Batches | Set Show more features to Yes.
Maintain batch information pertaining to Stock Items. Setting this option to Yes displays the Maintain in Batches field in the Stock Item Creation screen. |
| Maintain Expiry Date for Batches | Set Show more features to Yes.
Set expiry dates for the batches. This displays the Use Expiry Dates field in the Stock Item Creation screen. |
| Enable Job Order Processing | Set Show all features to Yes.
Create Job Work Out or Job Work In orders. |
| Enable Cost Tracking | Set Show all features to Yes.
Analyse and track the cost of an item in transactions. |
| Use Discount column in invoices | Set Show more features to Yes. |
| Use separate Actual and Billed Quantity columns in invoices | Set Show more features to Yes.
Specify quantities that are different from those delivered/received when invoicing. |
| Taxation | |
| Enable Goods and Services Tax (GST) | If your business is under the GST regime, set this option to Yes and specify the GST Details for your company. |
| Enable Tax Deducted at Source (TDS) | If your business considers TDS payments, set this option to Yes and specify the TDS deductor details along with the applicable Rates and Exemptions. |
| Enable Tax Collected at Source (TCS) | Set Show more features to Yes.
If your business considers TCS payments, set this option to Yes and specify the TCS collector details along with the applicable Rates and Exemptions. |
| Enable Value Added Tax (VAT) | Set Show all features to Yes.
If your business is under the VAT regime, set this option to Yes and specify the VAT Details for your company. |
| Enable Excise | Set Show all features to Yes.
Allow considering excise-related details during voucher entry. |
| Enable Service Tax | Set Show all features to Yes.
If you pay service tax as part of your business transaction, set this option to Yes and specify the service tax details and set the preferences for your company. |
| Online Access | |
| Enable Browser Access for Reports | Set Show more features to Yes.
Once your company is connected to Tally.NET server, access the key business report from the broswer in any device using your Tally.NET credentials. |
| Enable Tally.NET Services for Remote Access & Synchronisation | Set Show more features to Yes.
Use features like Remote Access and Synchronisation. |
| Payroll | |
| Maintain Payroll | Set Show all features to Yes.
Maintain payroll information in TallyPrime for the selected company. |
| Enable Payroll Statutory | Set Show all features to Yes.
Maintain payroll-related statutory information. |
| Others | |
| Enable multiple addresses | Set Show more features to Yes.
Add multiple addresses for your company, as per your business needs. |
| Mark modified vouchers | Set Show more features to Yes.
For audit purposes, view all vouchers that are altered after creation. |
After you have created the company, in the Gateway of Tally screen, under Name of Company, the company name appears in bold.
Multiple companies: Do you have multiple businesses to track and manage? You can create as many companies in TallyPrime and manage your business transactions in each company separately. If you also prefer to get a consolidated view of the health of multiple businesses or submit summarised reports for auditing purpose, you can use the Group Company feature in TallyPrime.