One of the most crucial and useful features that TallyPrime offers businesses, is its banking capability. Bank-related activities are performed almost on a daily basis by business owners. And so the need to automate and facilitate smooth maintenance of records and processes that are fundamental to effective recording of accounting transactions for timely payments, is extremely significant.
How does TallyPrime help business owners manage their banking activities?
The banking feature in TallyPrime, enables business owners to perform a host of bank-related activities, including payments to parties, bank reconciliation, and cheque management. Usage of this feature enhances and simplifies the banking experience significantly by saving time, reducing errors, improving productivity, and scaling up traceability.
It provides amazing banking capabilities for running your company. You can use its e-payments capability to make timely payments to your parties, manage cheques, reconcile bank statements, and others. TallyPrime’s banking feature supports the following major areas of your business operations.
Banking utilities in TallyPrime
As a business owner, if you use a specific bank to manage your transactions wrt receiving and making payments, TallyPrime offers you a host of utilities including:
Auto bank reconciliation
Cheque management
E-payments
Deposit Slip
How to create bank ledger in TallyPrime?
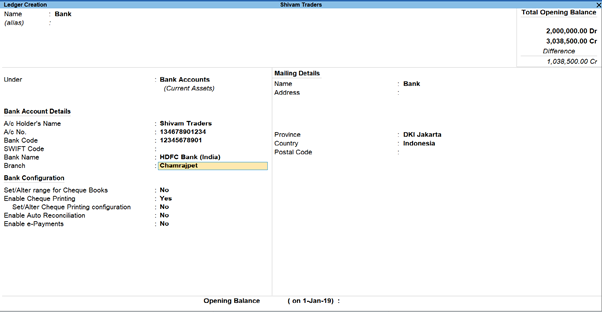
Bank ledgers contain crucial information about a bank that you use to make or receive payments. You can provide information such as Bank name, Account no., IFS code, and address while creating bank ledgers.
Simply go to Gateway of Tally > Create > type or select Ledger and press Enter.
OR
Alt+G (Go To) > Create Master > type or select Ledger and press Enter.
Fill in the required details such as;
Name of the bank
Bank Accounts (Saving Account (Bank Account), Over Draft account ( Bank OD), Cash Credit account (Bank OCC))
Once you have configured all the details, you can seamlessly perform the required actions based on the preset details you’ve entered for that bank’s ledger.
Auto Bank reconciliation
Reconciling company’s bank books with the banker’s statement is a regular task of accounting. Thus, TallyPrime offers you bank reconciliation capability, which explains the difference between the bank balance shown in an organization’s bank statement, as supplied by the bank, and the corresponding amount shown in the organization’s own [accounting] records at a particular point of time. With TallyPrime, you can:
Check correctness of reconciliation
Recover reconciliation of any date
Auto Bank Reconciliation
Reconcile manually
TallyPrime’s auto bank reconciliation enables users to reconcile bank statements with a long list of transactions, in the most simplified manner. All you got to do is simply import the bank statements, and the reconciliation will happen, automatically. Yes, it is that simple!
You need to enable the option provided for auto bank reconciliation in the bank ledger to reconcile the transactions made with that bank.
Learn how to do auto bank reconciliation in TallyPrime:
Cheque management
With TallyPrime, you can manage a host of pre-defined cheque formats, multiple cheque books and powerful cheque register, manage your banking needs effortlessly. You can maintain record of all payment made using cheques or if you have received payments through cheques from your parties. In TallyPrime, you can configure the cheques based on the type of cheque book you use in your business. Configure the cheques as your need and get them printed to suit your business needs.
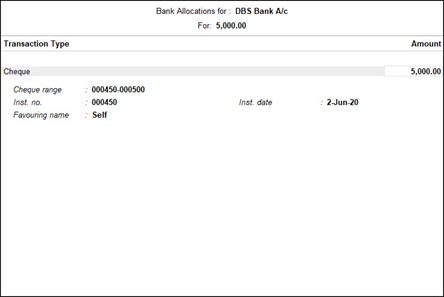
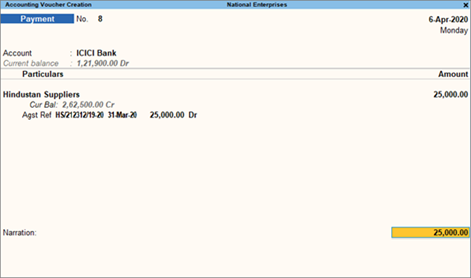
In order to print a self cheque in TallyPrime, cheque printing has to be configured. Then you have to pass a contra entry by entering Self as the Favouring Name in the Bank Allocation screen.
Gateway of Tally > Vouchers > press F4 (Contra). Credit the bank account
Enter the amount in the Credit column
Press Enter to go to the Bank Allocations screen
Press F12(Configure) > set Show favouring name as Yes, to enter Self as the Favouring name.
The Bank Allocations screen appears as shown below:
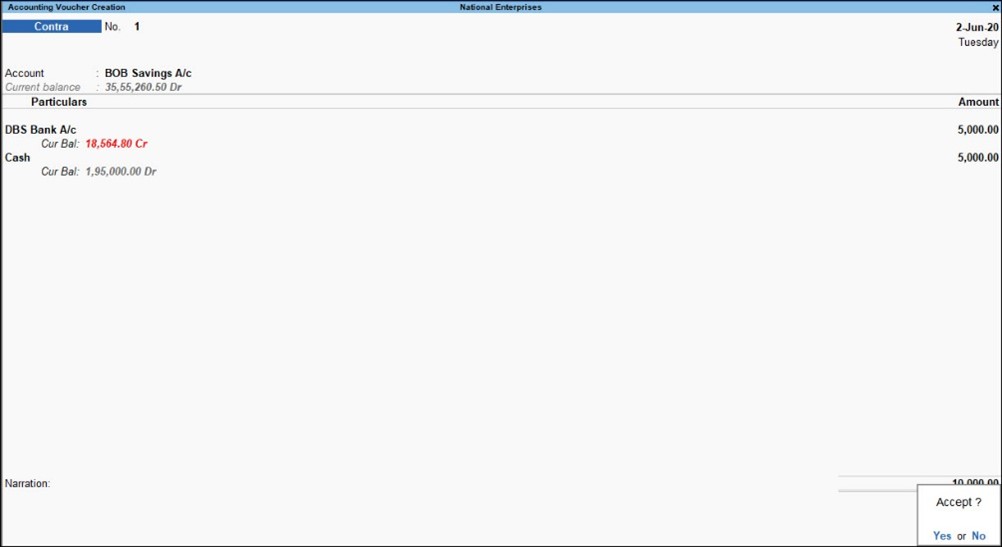
Press Ctrl+A to accept and return to the Accounting Voucher Creation screen
Debit the cash account. The Accounting Voucher Creation screen appears as shown below:
Press Enter to go to the Cheque Printing screen and Press P (Print) to print the self-cheque.
Post-dated cheque management
Post-dated cheque as the name suggests is the one that the recipient enchases on a future date. Accounting books usually enter such transactions only once the payment is made.
TallyPrime facilitates smooth management of post-dated cheques and the underlying transactions:
You can mark an entry as post-dated and specify the date on which the cheque was received/issued
The transaction will automatically affect the accounting books on the date of the post-dated cheque
You can obtain a comprehensive summary of all transactions involving post-dated cheques, using the Post-dated Summary report
You can include post-dated transactions in other accounting reports such as Ledger Vouchers, Group Summary, Outstanding reports, and so on.
Check how to handle cheque management:
Cheque Printing in TallyPrime
This option provided in the Banking menu enables you to print the pending, already printed or the required cheques continuously from a single screen. You can also update the cheque details and have track of cheques to be printed, of a selected or all banks.
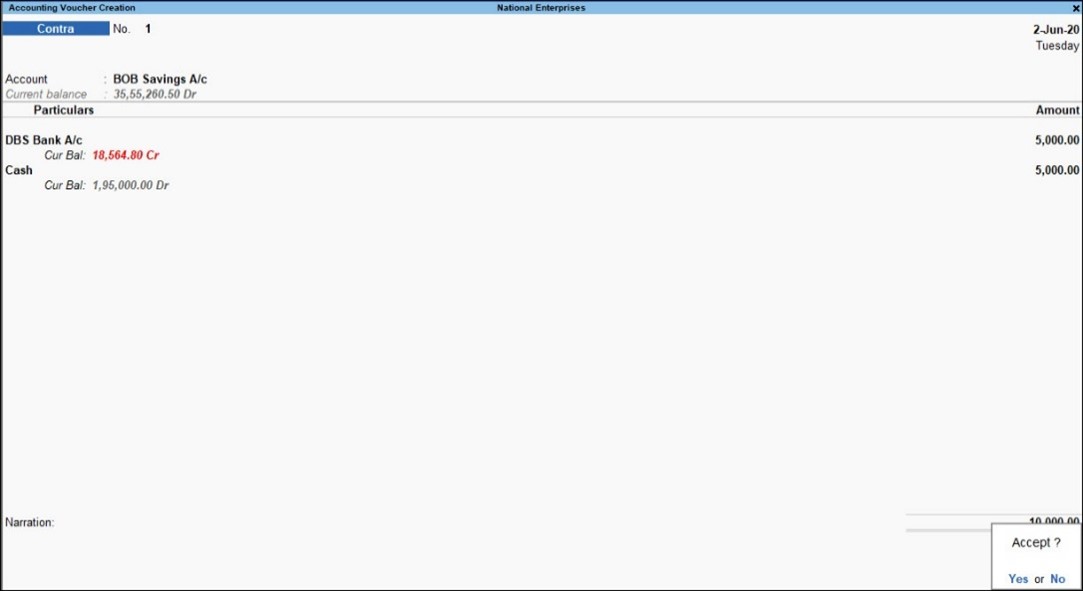
In order to print a self cheque in TallyPrime, cheque printing has to be configured. Then you have to pass a contra entry by entering Self as the Favouring Name in the Bank Allocation screen.
Press F12 (Configure) > set Show favouring name as Yes, to enter Self as the Favouring name
Press Ctrl+A to accept and return to the Accounting Voucher Creation screen
Debit the cash account. The Accounting Voucher Creation screen appears as shown below:
E-payments
This feature is a unique capability that syncs your bank master, party master and voucher entry into a common platform intimating the payment transaction to the bank. With e-payments, you can
Easily record transactions using the electronic mode of fund transfer, including e-Fund Transfer, e-Cheque, and e-Demand Draft/PO
Identify any incomplete information or mismatch in beneficiary details
You can send completed payment transactions to the bank, with accurate bank details, either during voucher creation or from an intuitive e-Payments report under Banking
You can also export either single or multiple transactions at a time, so you will not have to repeat the process of export. In case of DBS (India), you can also open the bank portal directly from the e-Payments report and authorise any pending transactions
View and track the status of your e-payment transactions using the e-Payments report
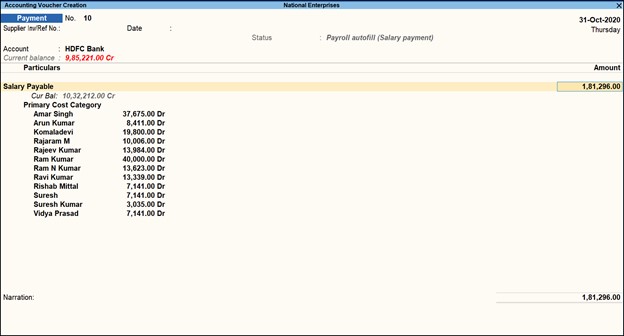
Getting started with e-payments is easy! All you have to do is, contact your bank to enable bulk upload and then enable e-payments in TallyPrime. In fact, recording an e-payment transaction in TallyPrime is also as easy as recording any other transaction. Simply open a payment voucher, select the party and the bank ledgers, and complete the payment transaction. What’s more, you can make e-payments to your parties or the employees on your company’s payroll using the same simple steps.
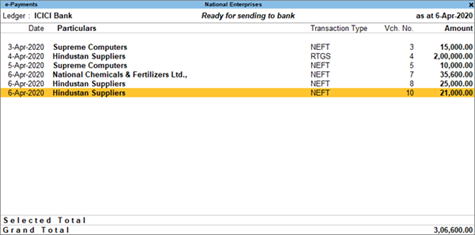
Once your e-payment transactions are recorded, the payment instructions are ready to be uploaded to the bank portal. Before uploading, the e-Payments report in TallyPrime will help you in checking the transactions to ensure that the details are complete and error-free. If there are any errors, then you can drill down to the relevant section and update the details.
You can view and track the status of your e-payment transactions and identify any incomplete information or mismatch in beneficiary details. You can view the e-payments that are sent (or ready to be sent) to the bank. You can also view the bank balance as per the company’s books and compare it with the balance as per the bank.
Gateway of Tally > Banking > e-Payments > press Enter
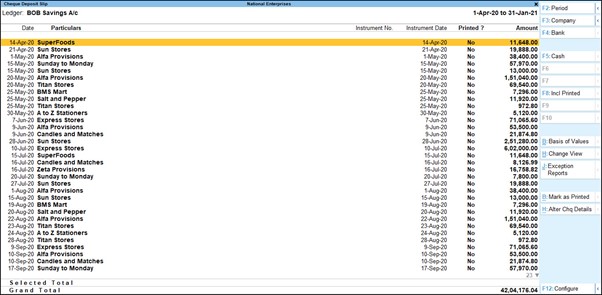
Deposit Slip
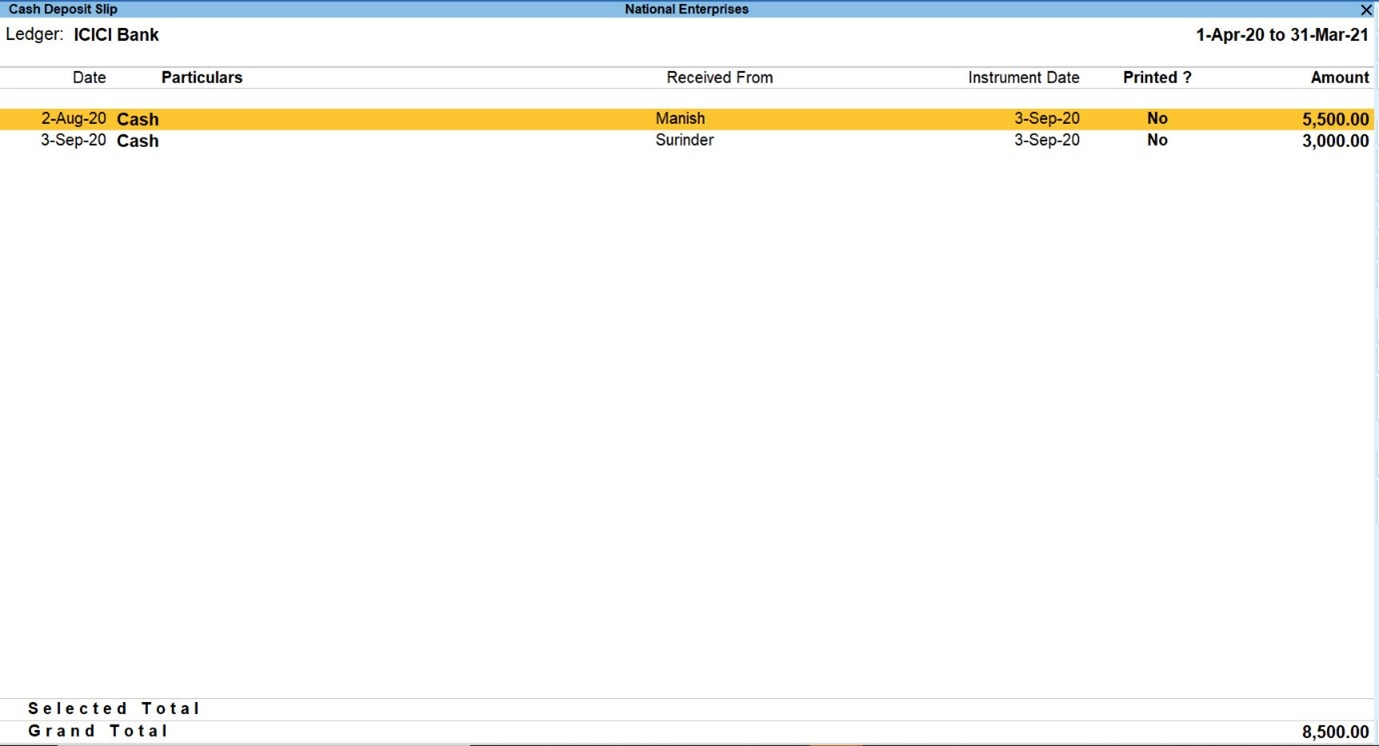
Any cash which is received by your business, must be deposited in the bank with relevant Cash Deposit Slip attached. You can generate as well as print the cash deposit slip for depositing cash into a bank on any particular date and period.
The Cash Deposit Slip option in the Banking menu is used to generate cash deposit slips, bank-wise. It has all the relevant information which once configured, need not be re-entered:
Account Number
Account Holder Name
Bank Name
Branch Name (information is fetched automatically from Bank ledger)
Company’s Telephone Number
Cash Denomination
To view cash deposit slip report:
Gateway of Tally > Banking > Deposit Slip
OR
Alt+G (Go To) > type or select Cash Deposit Slip and press Enter.
Select the required Bank account from the list for whose transaction you want to print Cash Deposit Slip and press Enter
Similarly, you can also generate and print cheque deposit slips for payments received through cheque or demand draft which need to be deposited into the bank.
To View Cheque Deposit Slip
Gateway of Tally > Banking > Deposit Slip
OR
Alternatively, Alt+G (Go To) > type or select Cheque Deposit Slip and press Enter.
Select the required Bank account from the list for whose transaction you want to print Cheque Deposit Slip and press Enter
The payroll process is an essential activity in an organization with employees. Depending on the structure of the salaries and the prevailing laws and regulations, the calculation of payroll can be either simple or more complex. It is vital to process payroll in a timely and accurate manner. Any discrepancies in the calculations have a direct impact on employee morale and productivity.
The payroll process also involves compliance with the regional laws and regulations. If there are mistakes that are not in compliance with the rules, it could put the organization into legal and financial trouble. An accurate and effective payroll process is essential in any organization whether big or small. Using business management software with capabilities to manage payroll makes the entire process simpler and error-free.
The payroll is the amount of money that the employer pays out to employees for their services. Every organization has a list of add ons and deductions from the basic pay of the employee. These involve allowances, bonuses, taxes etc.What is payroll process?
To have a payroll process, every organization must:
Define a pay policy with basic pay, benefits, leave policies, encashment of leave and other related items
Define the components that appear on the payslip as per the company’s policy and in compliance with regulations
Obtain and record the employee details accurately. This includes the bank account details, tax details etc.
Validate the employee inputs
Calculate the statutory as well as non-statutory deductions and deduct them to arrive at the gross pay amount
Pay the salary amount to the employees through the mode that the company employs. Most often this is done by intimating the bank of the salary amount to be disbursed to each employee account
Record the payroll transactions in the accounting system
Pay the dues to the appropriate authorities and file returns accurately and before the due dates
Physically or digitally (PDF) distribute payslips and other relevant tax documents to the employees.
How to process payroll in easy steps?
The payroll process steps are categorized into the following
Pre-payroll process,
Payroll calculation process
Post-payroll process
Let’s discuss each of these in detail.
Pre-Payroll Process
Defining the payroll policy
Different organizations have their own unique payroll policies. These should be very clearly and unambiguously defined. The first step is to define the basic pay for the different designations in the organization. Leaves and benefits are monetized differently in each organization. There may be deductions for leave taken beyond the given quota. Unused leave may be convertible to money. Some organizations pay for overtime while others do not. Certain companies have the practice of an annual bonus payout. If the bonus is performance-based, the policy should be well defined. The accurate computation of this amount is essential. The payroll policy should be approved by the management of the organization.
Data gathering
The details of an employee are usually collected and recorded at the time of onboarding a new employee. This may include their PAN number, other ID numbers and details.
Attendance and performance data
Payroll also requires the attendance data of the employee. If any bonuses or benefits are due, the relevant department would have to provide the data to payroll. If the employee has earned a performance bonus or a raise, it should be recorded by payroll. In a smaller organization, this data would be easy to gather and compute. In a larger organization, this flow of data to payroll is more challenging. Business management software with an integrated payroll system makes the data flow easier and more accurate.
 Validation
All the data received would have to be validated for accuracy and compliance with the organization’s policies as well as the law. Payroll would have to ensure that no employee who has left employment continues to feature as an active employee for payroll calculation. All the current employees should be included for salary calculation without missing anyone.
Payroll calculation process
This is the payroll process that takes place based on the data input.Payroll is calculated manually or through the use of software to calculate the net pay after factoring in gross income and gross deductions.
Gross income/salary = regular income + allowances if any + one time payment or bonus if any
Gross deduction = regular deductions + statutory deductions + one-time deductions if any
Net pay = Gross income – gross deduction
If the payroll is calculated manually, these values are checked for accuracy and errors if any are corrected.
Post-payroll process
Payroll accounting
The amount of salary disbursed as well as the different components of additions and deductions have to be accounted for. The relevant transactions have to be recorded and entered as per the accounting practices of the organization. If the company uses a standalone payroll software or HR software the data would have to be reentered into the accounting software.
Salary payout
The actual payment of salary to the employees is most often through bank accounts. The organization’s bank account should be sufficiently funded before initiating the salary disbursal payroll process. A salary bank advice statement is generated based on the net pay for each employee along with their account number.
Reporting
Payslips and tax details are generated and given to the employees physically or digitally. Payroll reports that are required by the management have to be generated and submitted.
Compliance
The statutory deductions that are made from the employees’ salaries have to be paid to the relevant government agencies. The amounts have to be paid and the returns filed well within the due dates.
Process payroll accurately and on time every time
When there are gaps in the payroll data flow, the chance of computational or data entry errors is higher. It is essential that payroll should be error-free and in compliance with the laws and regulations. TallyPrime makes the payroll process quick and easy.
The benefits of payroll accounting with TallyPrime are:
Integration with financial accounting. Tally seamlessly integrates the payroll amounts to the accounting process. There is no necessity for reentering all the payroll data into the accounting software
Generates payslips for employees
Enables payroll processing with compliance
Also tracks the loan details of employees
Allows flexibility in user-defined classifications, departments, groups, subgroups and other criteria. It also allows the user to define all the components of payroll such as attendance/time/production units, earning and deduction pay heads.
Revenue expenditures are short-term expenses that are also known as revenue expenses and operational expenses (OPEX). Revenue expenditure is generally spoken to in relation to fixed assets as it records the expenses which have occurred in connection to a fixed asset. For example, if you have a piece of equipment that requires monthly maintenance then the expense will be termed under revenue expenditure. It involves all costs that are required for the successful running of a business such as salaries for employees and property taxes. Â Revenue expenditure is recorded during an accounting period or a single year.
Revenue expenditure types
Revenue expenditure can be divided into two categories; direct expenses and indirect expenses.
Direct expenses
Direct expenses are those costs that are incurred when goods and services are in the process of being produced. The costs that are incurred during the day-to-day operations that take place in the business are also direct expenses. For manufacturing companies, examples of direct expenses include the costs that are incurred for the conversion of raw materials to finished products or goods. Direct expenses also include costs such as electricity used during the production, wages paid to workers, legal expenses, rent, shipping-related costs, and freight charges.
Indirect expenses
Indirect expenses are the second type of revenue expenditure. These types of expenses are usually incurred when the finished goods and services are being sold and distributed. These expenses include taxes, salaries for employees, depreciation, and interest among others. Indirect expenses also include repairs and maintenance costs. Although these costs aren’t directly linked to the finished products, they are required to ensure the proper functioning of the asset which in turn supports the proper functioning of the business.
Example of revenue expenditure
A company called A&J spends 100000 BDT on a machine used for the production of goods. To ensure the proper functioning of the machine, a monthly fee of 1000 BDT is spent. In this example, the revenue expenditure is 1000 BDT which has been spent on the upkeep of the machine on a monthly basis. When the income statement will be prepared, the 1000 BDT will have an entry for that particular month where the upkeep expenditure was made. In case the machine has an issue and needs to be repaired, the cost of repair will also fall under revenue expenditure and will be reflected on the month during which the expenditure was done.
Revenue expenditure Vs. capital expenditure
Revenue expenditure and capital expenditure are often confused for one another which makes understanding their differences even more vital.
Revenue expenditure
Capital expenditure
Functionality
Revenue expenditure is the expense that is used to run your business on a daily basis. It includes the costs used to ensure the proper functioning of a fixed asset repair costs, maintenance costs, and costs that are incurred for current operations. It differs from the cost used to acquire or buy an asset. Examples of revenue expenditure include rent, utilities, and office supplies.
Capital expenditure, also known as a capital expense or Capex, is the expense that is used to acquire a capital asset. This asset is a long-term asset that is used to improve how the business functions by boosting efficiency. Examples of capital expenditures include vehicles, computer equipment, land, fixtures, software, office buildings, and so on.
Consumption
Revenue expenditure is consumed within a short span of time. For example, the regular upkeep of equipment is done monthly or every quarter depending on the type of equipment used for the production of goods. Â Revenue expenditure is a recurring expense that your business needs to spend every month or every few months. It is not a one-time investment.
Capital expenditure is consumed over a long period of time until the asset is useful or until the asset has reached its end of life. For example, machinery is used for many years until it is able to function correctly. It is not a recurring expense as your business needs to pay for the cost of the machinery only once.
Reporting
Revenue expenditure is reported in the income statement of your business whenever the expense was incurred. It is not stated in the balance sheet. When it comes to charging revenue expenditures, they are charged immediately in the current period during which you paid for it or after a short period of time.
Capital expenditure is reported in the cash flow statement of your business and in the balance sheet. When being reported in the balance sheet, it is stated under fixed assets. Capital expenditure isn’t immediately charged as an expense. Instead, it is charged over a long period of time until you will use it using depreciation. This is a gradual process.
Purpose
The purpose of revenue expenditure is to ensure the assets such as machinery are functioning optimally at all times and so this expenditure comes into the picture after the business has started operating. These expenditures are used to sustain your business. Although these expenditures do not add more capability to the asset, they are used to ensure the asset works as it should.
The purpose of capital expenditure is to generate more revenue over time. It involves expanding the business and investing in machinery that is going to give ROI and long-term gain. For example, an expensive machine in a manufacturing plant can be acquired to improve current processes so that it can contribute to revenue generation. These expenditures come into the picture before your business starts to operate.
Cost
When it comes to revenue expenditure, the cost associated with them is comparatively lower than that of capital expenditures. Revenue expenditure isn’t the expense related to investment so it is generally smaller. In certain cases, the expense related to revenue expenditures can be large as long as the cost is a period cost or it is an expense related to the revenue.
Your business will pay much more for anything that falls under capital expenditure. Firms usually have a threshold value that marks the distinction between revenue expenditure and capital expenditure. If the expenditure is more than the threshold value then it is considered a capital expenditure, else it might be a  revenue expenditure.
Both revenue expenditure and capital expenditure are equally important
It is wrong to say that either is better than the other because both are required for your business to operate without issues and generate profits. Capital expenditure is critical because it can improve business efficiency. Revenue expenditure is vital as it ensures smooth business operations so there is nothing stopping your business from operating fully. Your business must manage and monitor both these expenditures to ensure you are not over-spending on each. If you do so regularly, you can effectively use strategies for regulating these expenses.
TallyPrime is an ERP accounting software that provides a powerful combination of ERP and accounting software. It can be of help when it comes to both revenue expenditure and capital expenditure. TallyPrime ensures you stay within your budget, know your spending history, and spend wisely. With the help of its robust reports, you get instant insights that can drive your business decisions in the right direction
Using TallyPrime’s cost centre management will help you stay on top of all the spending’s even on little expenses and make confident decision. What’s more? You can set budget and track the variance.
Businesses today have plenty of obstacles to overcome and plenty of tools to help them do so. Technology in particular has greatly changed the way companies operate, and currently over ninety percent of all companies use technology of some form to help with basic functions. Payroll is the most commonly used feature in software.
Companies that don’t like the thought of outsourcing will have to find another solution, and TallyPrime’s payroll is an attractive option. There are many benefits of using TallyPrime payroll solutions or HR payroll software, including some which one may not even be aware of. If the business wants to keep the HR department responsible for payroll, considering TallyPrime payroll is a great way to help them handle the tasks.
Benefits from a payroll software for accountants
Simplicity in usage
Accounting and payroll software do not involve installation of any expensive infrastructure equipment for its functioning
Implementation of accounting and payroll software is as simple as logging into a secure web portal
No disruption of work at the office while systems are set up and no downtime with accounting and payroll software
It is simple in a way that its features can be accessed and learned by any professional with the most basic computer software and business skills
Ensures security and reliability of data
Accessibility – Data can be accessed from any machine (computer) at any time
What does a business need from an HR payroll software?
If a business is considering using an automated program and keeping most of the payroll functions within the office, then it should likely ensure that payroll customer service can help it deal with any issues related to the software, especially technical support.
Most HR payroll software will provide with regular reports, but good payroll customer service means being able to request any payroll related information and receive it quickly. Say, if a business needs the stats for employee salaries or attendance over the last six months, it should be able to get it through payroll customer service.
Payroll software for small business
Technically speaking, payroll software is defined as a computer program that manages a company’s payroll necessities. For small and medium businesses, we know it’s a formidable task to sit at the end of every month and pour in many hours to summing up the salary details for each employee. Often, in such companies, the owner has to perform multiple duties and it’s difficult to spare time for calculating overtimes and employees’ taxes.
And one such HR payroll software which tops the Payroll software list among other service providers for small business entities is TallyPrime. TallyPrime Accounting and payroll software is simple yet effective software that takes care of all the necessary calculations and takes care that the salaries are paid on time.
TallyPrime delivers comprehensive payroll management software with necessary payroll compliances built in it. It provides the facility from simple payslip generation up to complex allied processes which include Salary revision, loans and advances and ad-hoc payments. It also manages the salary of the employees according to statutory norms and processes.
Notable features of TallyPrime payroll software
Full integration with accounts for simplified payroll processing and accounting
User-defined classifications and sub-classifications for comprehensive reporting on aspects such as employees, employee groups, pay components, or departments
Support for user-defined Earnings and Deductions Pay Heads
Flexible and user-defined criteria for simple or complex calculations
Unlimited grouping of Payroll Masters
Support for user-defined production units such as attendance, production, or time-based remuneration units
Flexible processing period for payroll
Comprehensive reports for cost centre as well as employee-wise costing
Predefined processes for accurate and timely salary processing, employee statutory deductions & employer statutory contributions
Processing payments using the e-payments capability in TallyPrime
Auto-fill facility to expedite the attendance, payroll, and employer’s contribution processes
Accurate computation and deduction of statutory payments such as Income Tax, ESI, EPF, NPS, Professional Tax, and Gratuity
Generate statutory forms and challans for Income Tax and EPF & ESI, as prescribed
Facility to drill-down to the voucher level for any alteration
Compute arrears of previous period(s)
Track loan details of employees.
Frequently asked questions
What is payroll management?
Payroll is simply an aggregation of total amount of wages paid by the company to its employees. Companies usually hire payroll services from third parties by way of outsourcing which make the process of accounting for payroll and easy and effortless task. Management of employee payroll in a smart way is now as easy as it can get, with TallyPrime. A collection of predefined processes in TallyPrime enables error-free automation of payroll process. Further, you can view and handle exceptions effortlessly.
How to choose the best payroll management software?
To choose the best payroll management software, you must ensure that it has the following capabilities:
Payroll Accounting & Salary Processing
Multiple Employee Grouping
Flexible Attendance/Production Types
Statutory Compliance in payroll
Easy to define and process fixed and flexible pay-outs to the employees
Multiple Calendar type such as fixed days, as per calendar etc. to suit your requirements
Generate Monthly Returns, Annual Forms and Statements for PF, ESI, Professional Tax and Income Tax.
How does payroll management software work?
TallyPrime offers various features that allows you to implement and process payroll. You can use the Payroll Info. menu to create different payroll masters required for computing earnings and deductions for employees.
What is payroll in TallyPrime?
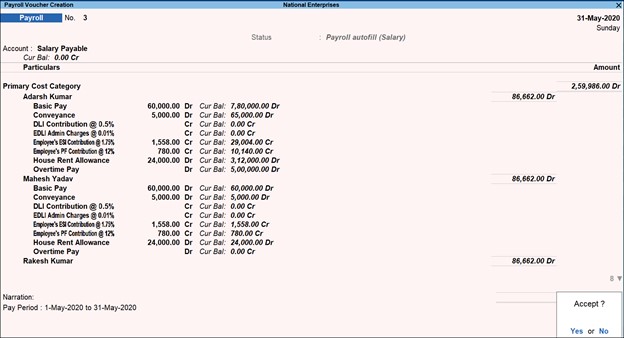
The payroll feature in TallyPrime is fully integrated with accounting to streamline payroll processing. Organisations can set up and process payroll using simple and complex criteria. A collection of predefined processes in TallyPrime enable error-free automation of payroll process.
How do I enter salary in Tally payroll software?
You can add, delete or change a pay head component or its value for individual employees. To quickly enter the pay structure of each employee, define the Pay Structure for the Employee Group for an employee group using pay heads which are applicable to most employees. You can then copy and apply the same structure to each employee.
Experience the freedom of viewing your Tally.ERP 9 reports from anywhere, on any device, in a browser, securely. All you need is Tally.ERP 9 Release 6.6, and a device with a web browser and internet connection.
Anywhere, Any device : You can access Tally.ERP 9 reports from anywhere using any device such as, laptop, smartphone, tablet, and so on, with a web browser, and an active internet connection.
Security and Control : You have complete control on who views the reports, and which reports are available to a user. Further, your data will always be in your machine. Whenever a user views a report in a browser, only the data required for that report is fetched from your Tally.ERP 9.
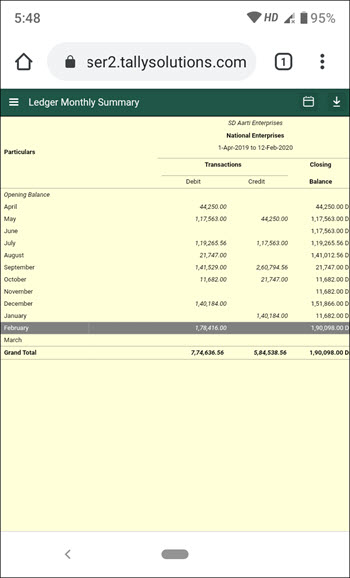
Reports in a web browser : Select the company, then select the report from the list shown once you log in to the Tally portal. The report with the latest data is fetched and displayed. You can drill down to the next levels of the report to get further details. You can change the period of the report as well. Refresh the page to get the updated information.
Download Reports and Invoices : You can open a report and download it as a PDF document. You can drill down up to the voucher level. You can also download invoices and vouchers.
Easy Setup : Update to Tally.ERP 9 Release 6.6, connect your company, and allow users to view reports from anywhere. Note that only users with valid Tally.NET IDs are allowed to view reports in browser. Your account ID (e-mail ID used to activate your license) is a valid Tally.NET ID. You can also create Tally.NET IDs for users who need to view reports in browser.
Connect Company to view reports in browser
You can decide when to connect your company for users to view reports and disconnect the same when it is not needed. You need to have internet connection on the computer where Tally.ERP 9 is installed.
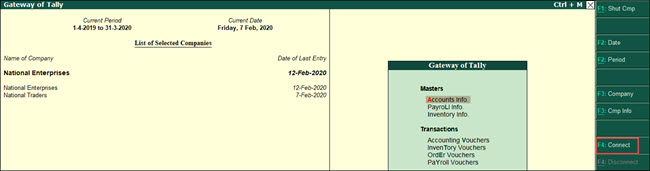
1. Go to Gateway of Tally , click F4: Connect .
a. If you have enabled security control for your company, move to step 2.
In case you have not enabled security control for your company, Tally.ERP 9 will prompt you for the same.
o In the Security Control screen, the option Use security control is set to Yes .
o Provide the administrator details. This login credential is for the company data.
2. Provide report access to Tally.NET users.
a. Click Yes to add Tally.NET users and allow browser access.
c. In Username/Tally.NET ID , enter a valid Tally.NET ID for which you want to give access.
Note: You can check for valid Tally.NET IDs on the Tally portal , by logging in with account administrator’s e-mail ID. You can also create more Tally.NET IDs, if needed.
Now that the company is connected, a sign (c) appears against the company name in the List of Selected Companies in the Gateway of Tally.
When an authorised user logs in to the Tally portal, the connected company appears in the List of Companies with the status as Connected .
View Tally.ERP 9 reports from anywhere using browser
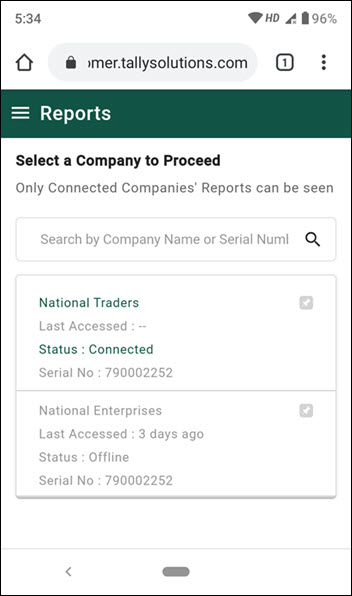
1. Open www.tallysolutions.com and log in using your Tally.NET ID and password. All the companies that you can access are listed with the status as Connected or Offline .
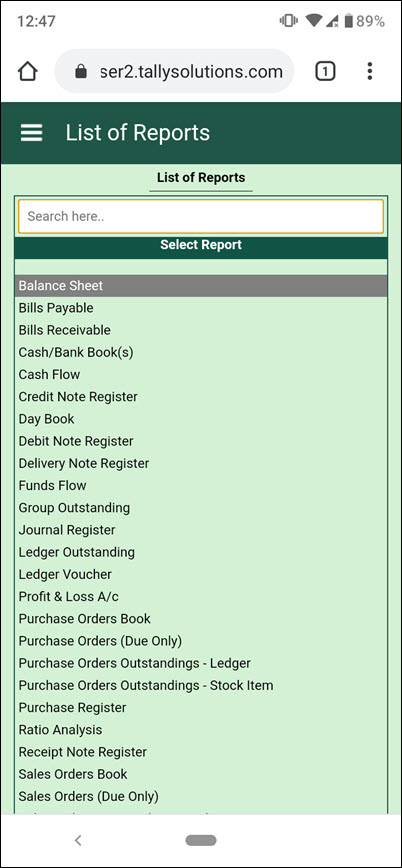
2. Select a connected company. The List of Reports is displayed.
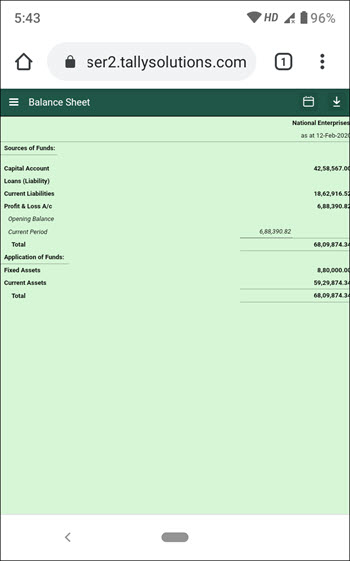
3. Select the report that you want to view. A request is sent to Tally.ERP 9, and the selected report is fetched to display in the browser. You can download the report as a PDF document by clicking  , and change the report period by clicking  on the top-right corner of the screen.
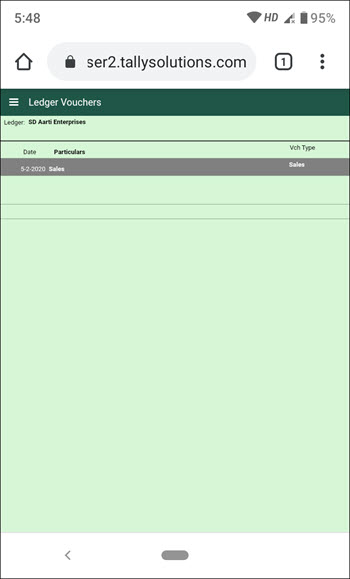
4. To get further details of any value, you can drill down up to the voucher level in many reports. You can also download the voucher as a PDF document.
Â
Use the Back button of the browser to go back to the previous screen. In case you are accessing from a phone, the phone back button does the same.
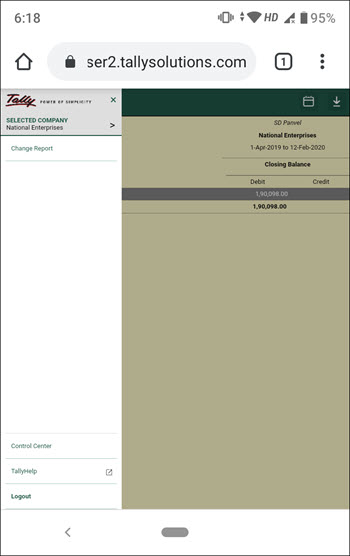
5. To change the report, you can use  on the top left of the screen, and click Change Report .
6. To change company, you can use  on the top left of the screen, to view the List of Companies, and click SELECTED COMPANY .
Manage Access Rights of Users
You can add many Tally.NET users, and allow them to view reports in browser. You can also decide who can access which report.
In this section
â—Â Create Tally.NET IDs
â—Â Allow users to view reports in browser
â—Â Create Security Levels to provide limited access to reports
Create Tally.NET IDs
You can create Tally.NET IDs directly on the Tally portal. Alternatively, you can create using Control Centre in Tally.ERP 9.
1. Go to Tally portal , log in using your account administrator’s e-mail ID.
2. On the left pane, click Control Centre > User Management > Manage Users .
3. In the Manage Users screen, click CREATE USER .
4. In the Create New User section, select the required Security Level as Standard User or Owner .
5. In the Tally.NET ID field, enter a valid e-mail ID. The password for the Tally.NET ID is sent to the email ID provided.
6. Select the option Enable Tally.NET Services to give access to Tally.NET features and browser reports.
7. In case you have multiple branches, select the branch for which the user is allowed to access reports in browser.
8. Click CREATE .
Tally.NET IDs are created. You need to allow browser access to these users, in Tally.ERP 9, so that they can view reports in browsers.
Allow users to view reports in browser
You can allow many users to view reports in browser.
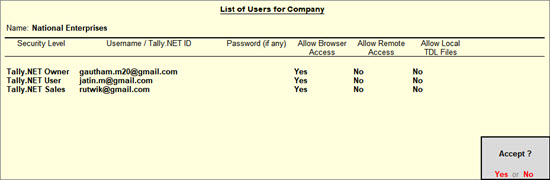
1. Go to Gateway of Tally > F3 : Cmp Info > Security Control > Users and Passwords .
2. Select the Security Level as Tally.NET Owner , Tally.NET User , or Tally.NET Auditor . You can also create Security Levels, if needed.
3. In Username/Tally.NET ID , enter the required Tally.NET ID.
4. Set the option Allow Browser Access to Yes , and accept.
Note: By default, the security level Tally.NET Owner and Tally.NET Auditor provide access to view all the reports available for viewing in browsers. But the security level Tally.NET User has access to only a few reports. The reports that are not available to the security level Tally.NET User are given here .
â— In case you need to disallow viewing reports for this company in browsers for a user, set Allow Browser Access to No .
These users can view reports in browsers, whenever the companies are connected.
Create Security Levels to provide limited access to reports
You can create multiple Security Levels to manage user access to different reports in Tally.ERP 9. If Tally.NET IDs are added under such Security Levels, you can control who can view which report in browser.
1. Go to Gateway of Tally > F3 : Cmp Info > Security Control .
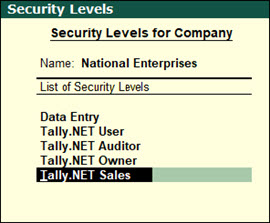
2. Select Types of Security and press Enter .
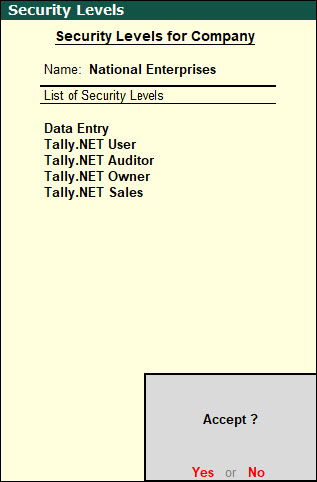
3. In the Security Levels screen, move to the end of the entries in List of Security Levels to get a blank row.
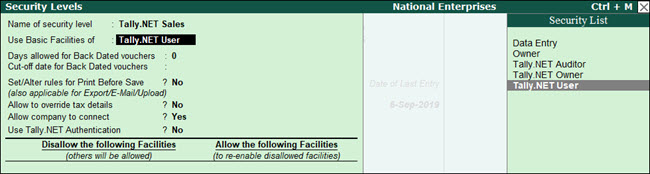
4. Enter the name for the new security level and press Enter to drill down.
5. In the Use Basic Facilities of field, select Tally.NET User .
6. Ensure that the option Use Tally.NET Authentication is set to Yes . This will enable you to change the configuration of Allow Browser Access option while adding a user.
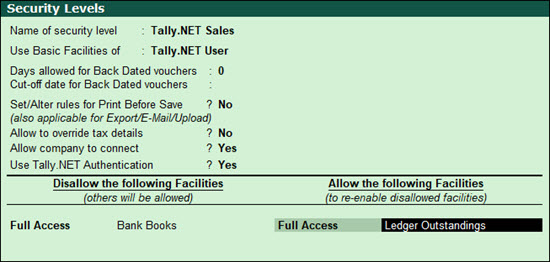
7. In the Disallow the following Facilities column, select Full Access from the Type of Access list and press Enter .
8. Select the name of the report you want to disallow. For example, if you want to disallow access to Bank Books , select it and press Enter . Full access to Bank Books is disallowed for this security level and for all users added under this security level.
9. In the Allow the following Facilities column, select Full Access from the Type of Access list and press Enter .
10. Select the name of the reports you want to allow access. For example, if you want to allow access to Ledger Outstanding , then select it and press Enter .
11. Similarly, allow access to other reports, Group Outstandings and save.
You have created a new security level with access to all reports available for a Tally.NET User except Bank Books and additionally allowed access to Ledger Outstandings and Group Outstandings .
12. Add Tally.NET IDs under this Security Level to allow these users to view the limited set of reports in browser.
Manage Company for Browser Access
You have complete control and flexibility on the company setting for report access, including when the access is needed.
â—Â Enable/Disable browser access for your Company
â—Â Disconnect Company
â—Â Connect/Disconnect multiple companies
â—Â Connectivity Status report in Tally.ERP 9
â—Â Remove names of Offline Companies not used from the list in browser
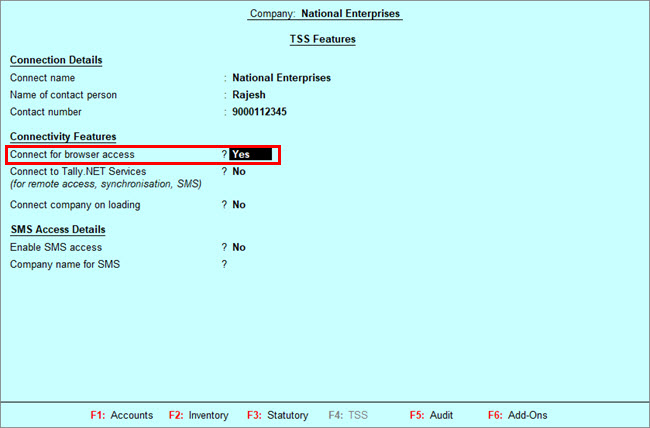
Enable/Disable browser access for your Company
When you update your Tally.ERP 9 to Release 6.6, browser access is enabled for the company. However, you can disable it when no users are expected to view the reports.
â— Go to F11: Features > F4: TSS Features to check your settings. You will see that Connect for browser access is set to Yes .
â— If you need to disable browser access, set the option to No .
Disconnect Company
When there is no need for users to access reports in browser you can disconnect the company.
â— Click F4: Disconnect .
When you disconnect a company in Tally.ERP 9, the status of the company changes to offline on the Tally portal.
Connect/Disconnect multiple companies
When you have more than one company open in Tally.ERP 9, you can connect any or all of these companies at once. Ensure that the companies have security enabled and Tally.NET IDs are added to give access to reports in browser before using multiple company connect functionality. You need to have internet connection on the computer where Tally.ERP 9 is installed.
1. Open all the required companies.
2. Click F4: Connect .
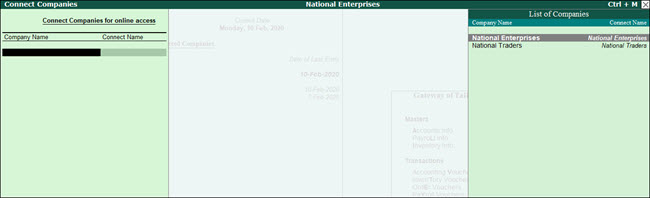
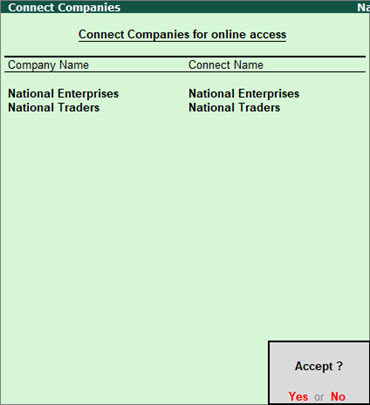
3. In the Connect Companies screen, select the companies one by one.
4. Press Enter to connect. You can see the connection success message for each company in the calculator panel.
When multiple companies are connected, you can disconnect many connected companies at once.
â— Press Alt+F4 to disconnect the companies.
â— In the Disconnect Companies screen, select the companies to disconnect and accept.
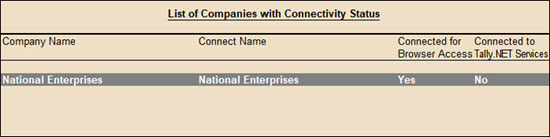
Connectivity Status report in Tally.ERP 9
This report gives you details of all the companies connected for Browser Access and Tally.NET Services. This report is active when at least one company is connected.
1. Go to Gateway of Tally > F3 : Cmp Info .
2. Select Connectivity Status .
The Connectivity Status report displays the company name, the company’s connect name, and the status of connection for Browser Access and Tally.NET Services.
Remove names of Offline Companies not used from the list in Browser
When a company is connected for browser access the name of company continues to be shown in the browser list for ever. In case you are not connecting that company anymore the name will continue to appear but with connection status as offline. You would want to remove all such names from the list of companies in the browser which are no more connected and only appear as offline. You can do so using the Remove from the list option.
1. Open www.tallysolutions.com and log in using your Tally.NET ID and password. All the companies that you can access are listed with the status as Connected or Offline .
2. Click the three dots provided next to the offline company.
3. Click the option REMOVE FROM THE LIST .
4. A message Are you sure you want to remove the company from the list? to confirm . click Remove .
5. A confirmation message is displayed once the company is removed successfully. click Ok .


 Â