Any business, irrespective of the size needs to be organised to achieve its goal, whatever it maybe. A well-structured firm has more chances to achieve success and sustain for a prolonged period in the market as compared to a disorganised business. Each department needs to be tracked and analysed on a timely basis so that various business decisions can be taken appropriately.
Since most businesses are a part of an ever-changing environment, it is crucial to roll and embrace the changes. And if you want to be a part of such rapidly changing scenario, it is imperative to manage all business activities rigorously. As a part of staying afloat in a competitive space, the need of managing business reports arises. Businesses may gather financial, marketing and sales-related information, or more technical data; a business report sample will be your all-time assistance to adjust purchasing plans, staffing schedules, and more generally, communicating your ideas in the business environment. These business reports would vary from business to business and there is no stringent rule to be followed while creating them as every business model is different and unique.
What are business reports?
A business report is a set of data which can provide historical information related to a company’s operations, production, specific department’s insights, and create a base for future decision-making processes or factual insights needed to organize business functions. According to Lesikar and Pettit, “A business report is an orderly, objective communication of factual information that serves some business purposeâ€. Like we said before that each business report would be different depending on the business model, but they all have one common trait: gathering data and tracking the business activities related to something specific.
General business report format
A good general format for a formal business report includes the following:
A cover sheet that lists the name of the report, your company name and address and the date
A table of contents, if the report is longer than 10 pages
An executive summary; an introduction section explaining the background of the report and any special methodology used
The main body of the report, with appropriate subheadings
A section with conclusions and recommendations
An appendix for non-essential attachments such as charts and graphs that don’t need to be in the body of the report.
Several businesses might not require such a structured format as a business report depending on the audience. For example, a balance sheet is a type of business report. It has a common structure that’s easy to replicate, and typically, every spreadsheet and accounting program has a template available that generates the report from basic inputs. Likewise, a marketing plan has a general format that includes a cover sheet, an executive summary, a budget and sections that detail market research, target market, positioning, competitive analysis and market strategy.
Example
There are 12 types of business reports that virtually every business and consultant needs:
Weekly activity reports
Project status reports
Sales reports
Digital marketing reports
Competitor analysis reports
Case studies
Growth strategy reports
Market research reports
Budget reports
Annual reports
White papers
Project plans
Business proposals
Each of these business reports serve different purposes and cater to different audiences. While creating business reports, it’s crucial to segregate your audience, so that you do not present an irrelevant report to your target group. One of the best ways to strike the right chord with your audience is to make your report visually appealing with data presented in the form of pie charts, diagrams, graphs, et al. No one likes to read documents which are text-heavy, so make your report interesting and pleasing to the eye.
Doing the right reporting and information delivery can have a significant impact on your organization and orientate its strategy better.
Data synchronisation is the effort to ensure that, once data leaves a system or storage entity, it does not fall out of harmony with its source, thereby creating inconsistency in the data record. Often, we might modify and update the data after it has been entered into the system. It is important that when we make such changes, all the alterations reflect in all the systems in the same way and there are no discrepancies, in order to avoid any errors. Data synchronisation provides a means of creating harmony and consistency among all the systems that have access to data.
Data conflicts can result in errors and low data quality, which consequently leads to a lack of trusted data down the line. With data synchronisation properly implemented throughout a system, a business will see performance improvement in many areas, including:
Logistics and transportation
Sales team productivity
Order management
Invoice accuracy
Business systems
Cost efficiency
Reputation management
Data accessibility and error resolution afford time savings, allowing emphasis to be put on important business development processes like marketing, new product development, and strategic decision-making. Virtually everyone benefits from clean, synced data.
Customers receive product information and service that meets their specific needs
Business users can interact with all department members using up-to-date information, in real-time, even globally
Executives receive the latest data when making important strategy decisions
Stockholders can easily stay on top of their business interests
Manufacturers access the most recent updates or changes for accurate design and production
Distributors have access to the most recent product and marketing information
Benefits of Data Synchronisation
·      Data availability
One of the key benefits of a data synchronization system is that data is made available locally, rather than through potentially expensive, less reliable, and slow connections to a single central database. Data is accessible locally even in the absence of any connection to a central database, so you are not cut off from data in the event of a failure of a network connection.
·      Response time
Synchronization improves response times for data requests for two reasons. Retrieval rates are faster because requests are processed on a local server, without accessing a wide area network. Also, local processing offloads work from a central database server so that competition for processor time is decreased.
Tally.ERP 9 has a robust mechanism to synchronise Master data, removing the need for convoluted approaches, giving both higher reliability, as well as allowing new forms of control architectures (example, allowing for a central system to ‘create and modify masters’, while the local systems are only allowed to enter transactions). You can share data between two or more instances of Tally.ERP 9 using a client–server environment using data synchronisation. Data synchronisation can be initiated from the client to the server or vice versa, depending on your user-defined configurations.
The concept of ‘On Demand Synchronisation’ – where systems actually align to a Tally.NET Synchronization Service, allowing each system to independently complete their work without needing to be ‘connected to each other live’. It has immediate benefits of removing the ‘manual’ coordination between two end-points before data is exchanged – which is a current typical behaviour. It immediately increases the scale of ‘simultaneous uploads’ from ‘multiple points’ – as each system is now independently operating without clashing with another.
A fund flow statement is a statement prepared to analyse the reasons for changes in the financial position of a company between two balance sheets. It portrays the inflow and outflow of funds i.e. sources of funds and applications of funds for a particular period.
It is also righteous to say that a fund flow statement is prepared to explain the changes in the working capital position of a company.
Objectives of fund flow statement
A question arises as to why prepare fund flow Statement when we already prepare profit and loss and balance sheet. The need here arises because the profit and loss and balance sheet will not explain the reasons for a change in the financial position.
Profit and loss a/c and balance sheet will give two years figures i.e., current years and previous years. But it will not explain as to why the movement has happened, let’s say, the extent of use of long-term funds for a long-term needs and the use of short-term funds for a long term and short term. Here is why fund flow statement is prepared.
Broadly, a fund flow statement will give us the following two information:
Sources of funds – From where the funds have come in
Application of funds – Where these funds have been used
Components of a fund flow statement
A fund flow statement comprises of :
Sources of funds: It talks about the extent of funds availed from
Owners
Outsiders
Application of funds: It talks about how the funds have been utilized
Funds deployed in Fixed assets
Funds deployed in Current assets
Fund flow statement explained with examples
National Enterprises raised its funds from the following equation listed below:
Long term funds for its noncurrent assets.
Explanation: Noncurrent assets are a company’s long-term investments for which the full value will not be realized within the accounting year. Examples of noncurrent assets include investments in other companies, intellectual property (e.g. patents), and property, plant and equipment.
So, going by the accounting parlance, long term funds are generally raised by a company to meet its long-term requirements. So National Enterprises using its long-term funds for its non-current assets are the right utilization of funds and these details are explained by fund flow statement.
What if National Enterprises uses its short-term funds to finance its long-term assets?
Here the fund flow statement when prepared conveys the users of financial information that the usage of the fund has not been made properly by the company as it is living dangerously by utilizing its short-term funds for financing long term assets.
It means that when the company is in need for funds for repaying it to the short-term obligation, it will be in cash crunch situation since once an investment is made into long term assets by the company it, it will not be in a position to convert it into liquid cash at a later stage due to the nature of the investment.
This is how the fund flow statement explains the source of funds and its utilization or application, allowing the users of financial information interpret and know the impact on the business.
Benefits of preparing a fund flow Statement
It helps to explain the managers of funds as to why the company is sitting in liquidity strain despite making profits as reflected in profit and loss statement.
On the contrary, it helps the managers to understand as to how a company is financially strong despite losses made by it in its operation front.
A fund flow statement helps us to analyze whether any short-term funds are being used for long term purposes. The grey area which can only be highlighted by preparation of fund flow Statement.
Users of funds flow Statement
The most interested users of fund flow statements are the lenders of capital. They pay more attention to the fund Flow Statements than the Profit and Loss and Balance sheet.
For Example, Bankers who lend money to the company as Overdraft or Cash Credit in return for interest. The bankers use the information provided by the company in its profit and loss statement and balance sheet in preparing fund flow statements, which then enables them to take decisions as whether to provide its overdraft or cash credit facilities to its clients or not.
Fund flow statement format
Sources of Funds
Â
Application of Funds
Â
 Capital
Debts
Funds generated from operations
Sale of assets (if any)
·      (Bal.fig) Excess usage of funds over sources.
[Decrease in working capital]
xxx
xxx
xxx
Funds utilised in creation of Fixed assets
Funds utilised in creation of other Non- current assets.
Funds utilised in repaying existing loans.
Funds utilised for paying dividends, taxes
*(Bal.fig) Excess of Funds over application of funds –
[ Increase in working capital]
xxx
xxx
xxx
xxx
xxx
Total
xxx
xxx
Increase in working capital
Possibilities may arise when long term sources are in abundance of uses or application resulting in a gap. Which we call in fund flow statement as ‘Increase in working capital’. As it is a free flexible source which can now be used by the company for funding its working capital requirements. Say short term loans outstanding (if any) can be paid from the long-term sources slot or dividends be paid etc.,
Decrease in working capital
Possibilities that the company has more uses of funds, but it has very limited long-term source available. At that time, the company will go for funds which are available in the nature of working capital.
As a result, the company will reduce the funds available for working capital and divert it for long term uses. So, by decreasing the working capital, we get the funds which are available for long term uses which form part of the source of funds.
The increase or decrease in working capital can be known by preparing a statement of changes in working capital. This statement compares the values of two years of the difference between Current asset and Current Liabilities and tells as to whether there is an increase or decrease in working capital.
How do modern businesses prepare a fund flow statement?
Given the importance of fund flow statements brings to the table, most of the businesses prepare and analyze this statement more frequently. Today, most businesses use ERP software or accounting software which automatically prepares the fund flow statement along with various other financial statements. This allows business owners and other users of financial information to analyze and make on-time smart business decisions.
GST Council introduced e-Invoicing from 1st January, 2020 on a voluntary basis, for reporting of business to business (B2B) invoices. The GST Council had approved the standard to be used for the e-Invoice in its 37th meeting that was held on the 20th of September, 2019 in Goa. Below are some FAQs on the e-Invoicing system under GST.
What is e-invoicing?
Electronic invoicing or E-invoicing is the new system through which business to business (B2B) transactions are authenticated electronically by GSTN for further use on the common GSTN portal. In simpler words, it is an invoice generated using a standardised format, where the electronic data of the invoice can be shared with others, thus ensuring interoperability of data.
Issue of e-invoices by the taxpayers registered under GST having a turnover above Rs 500 crores has been notified on 13th Dec 2019.
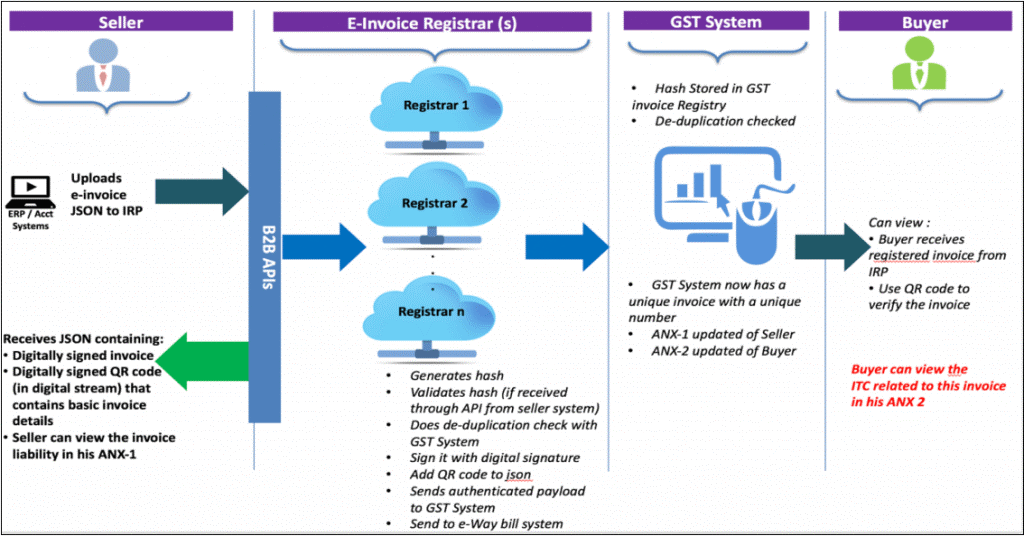
How does e-invoicing model work?
Today, a transaction between the supplier and recipient is done directly without the government having any proof of the exchange. Under the e-Invoicing model, businesses will continue to generate invoices on their respective ERPs just the way it was being done in the past. The only difference is that, the standard, schema and format for the generation of invoices will be specified, to ensure a level of standardisation and the machine-readability of these invoices.
With e-invoicing, the moment an invoice is made, it will be uploaded to GSTN portal where pre-validation will be done, and a unique number called IRN (Invoice Reference Number) will be issued which will then be digitally signed. Once IRN is issued, it will then generate a QR code, containing vital parameters of the e-Invoice. This will be returned to the same to the taxpayer who generated the document in the first place. The IRP will also send the signed e-Invoice to the recipient of the document, on the email ID provided in the e-Invoice.
What are the types of documents that are to be reported into the IRP?
The following documents will be covered under e-Invoicing for now:
Invoices by the Supplier
Credit Notes by the Supplier
Debit Notes by the Recipient
Any other document as required by law to be reported by the creator of the document
What is the workflow of e-invoice?
Step 1 – Generation of e-invoice:
The taxpayer will continue to generate invoices in the normal course of business. However, the reporting of these invoices electronically has criteria. It needs to be done as per the e-invoice schema along with mandatory parameters. The mandatory fields of an invoice for the supply of goods are listed below:
Invoice type
Code for invoice type
Invoice Number
Invoice Date
Supplier details like Name, GSTIN of Supplier, Supplier address (including place, pin code, state)
Details of the buyer such as name, GSTIN, state code, address, place, pin code, payee name, account number, payment mode and IFSC code
Details of goods like Sl. no., quantity, rate, assessable value, GST rate, amount of CGST/SGST/IGST, total invoice value, batch number/name
The seller has to ensure that his accounting/billing software is capable of generating a JSON of the final invoice. The seller can create a JSON following the e-invoice schema and mandatory parameters by using the following modes:
Accounting and billing system that offers this service
Utility to interact with either accounting/billing system, ERP, excel/word document or a mobile app
Offline Tool to generate e-invoice by keying-in invoice data
Step 2 – Generation of unique IRN:
The supplier has the option to generate ‘hash’ based on specific parameters usually three of them such as Supplier’s GSTIN, Supplier’s invoice number, Financial Year (YYYY-YY). The prescribed algorithm, such as SHA256 must be used for the hash generation. If the hash is validated, it would later become the Invoice Reference Number (IRN) of the e-invoice.
Step 3 – Uploading the JSON:
The following modes may be used to upload the JSON of the final invoice:
Directly on the IRP
Through GST Suvidha Provider (GSP)
Third-party provided apps (including through API)
The supplier can also upload the hash along with the JSON onto the IRP, if generated by him
Step 4 – Hash generation/validation:
Hash will have to be generated by the IRP in respect of the invoices uploaded without the hash. In such a case, the hash generated by the IRP would become the IRN. Where the supplier has also uploaded hash, a de-duplication check will be performed. It is done by validating the hash/IRN against the Central Registry of GST System to ensure that the IRN is unique. Once validated, the hash/IRN is stored in the Central Registry. IRP will then generate a QR Code and digitally sign the invoice and make it available to the supplier. The IRP also sends the e-invoice via e-mail mentioned on the invoice to the buyer and seller.
Source: last FAQ doc released by GSTN
How will the system of e-invoicing be integrated with GST Returns?
An e-Invoice will be uploaded into the relevant GST return only once it has been validated and registered by the invoice registration system. After the validation has been done, it will be visible to the recipient for viewing and taking action (in the new return system).
The main aim of the tax department is to enable the pre-population of GST returns, which will reduce reconciliation-related problems. Once e-Invoicing has been implemented, the data in the invoices can be pre-populated into the relevant tables of the tax returns without the need for fresh data entry.
What data will be included in an e-invoice?
As per the draft format generated by the GSTN, an e-Invoice will contain the following parts-
E-invoice schema: This part will consist of the technical field name and the description of each field. It will also specify if a field is mandatory or not, and has a few sample values along with explanatory notes
Masters: Masters will specify the set of inputs for certain fields, that are pre-defined by GSTN itself. It includes fields like UQC, State Code, invoice type, supply type, etc
e-Invoice template: The template is as per the GST rules and enables the reader to correlate the terms used in other sheets. The mandatory fields are marked in green and optional fields are marked in yellow
What are the benefits of e-invoicing?
One-time reporting of B2B invoices while generation, which reduces reporting in multiple formats
Sales and Purchase Registers can be generated from this data, and GST returns can be kept ready for filing under the new return system
E-way bills can also be generated using e-Invoice data
There is minimal need for data reconciliation between the books and GST returns filed
Real-time tracking of invoices prepared by a supplier can be enabled, along with the faster availability of input tax credit. It will also reduce input tax credit verification issues
Automation of the tax-filing process
Reduction in the number of frauds as the tax authorities will also have access to data in real-time
Elimination of fake GST invoices getting generated
Being a business owner, you got to do a lot of things to run your business. For you to completely focus on the things which matter the most for business growth, you need time to think and plan the business strategy. Today, one of the biggest mistakes, especially small business make is devoting most of their time in managing manual books of accounts. Somewhere in the process of managing manual books, businesses miss to catch the big fish. Here is why, accounting software’s are helpful and with no cost, you can try accounting software for free.
Today, we will discuss the benefits of free accounting software and How to download and try free accounting software.
Why try accounting software for free
No Doubt! Accounting software is invaluable for business. Not because it helps in ease of managing books of account, but the business information provided by accounting software is precious for decision making. The following are the business benefits of trying the best accounting software for free.
Ease of accounting and managing Books.
Printing professional-looking invoices in few seconds
Better control and clean track of bills receivable and payables.
Business information at your fingertip since the reports are auto-generated
Books are accurate and always complete
Ease of managing tax Compliance
Accurate returns in the prescribed format
Optimum inventory and stock level
Better control on cash flow and much more…
How Tally.ERP 9 can help you?
You work hard to grow your business. You need software which grows with you. Tally.ERP 9, is the an accounting software used by more than 17 Lakhs business. The following are the features of Tally.ERP 9:
Professional invoicing with multiple billing format
Effective cash and credit Management
Flexible order management
Accurate and flexible inventory management
Seamless e-banking capabilities and banking utilities
Insightful business reports at blink of an eye
Managing tax compliance is a cakewalk
Payroll accounting & salary processing
Enhanced security and user Management
Cost control and cost analysis
Secured remote access and data synchronization
How to download free accounting software
The free version of accounting software can be download from the official website of Tally. To download the free accounting software, you need to visit https://tallysolutions.com and navigate to the download page. The following are the steps to download free accounting software.
Click on the ‘Download’ option available on the top right side of the menu
In the middle of the download page, click on ‘Download Now’
Once the download is complete, you are ready to install the free version of accounting software – Tally.ERP.
Downloading the best accounting software is free and you need not sign up for downloading it.
How to try accounting software for free
To try accounting software for free, you need to download the accounting software from the website mentioned in the above section. Downloading accounting software is free. Once you download the accounting software, you must install it in educational mode. The educational mode allows you to learn and use Tally.ERP 9 without buying a license. Explore and experience the best accounting software for free on your computer. Visit Tally Solutions website for more details and sign up for a free trial.
Balance sheet refers to a financial statement which reveals the complete financial position of the company for a given date. A company’s balance sheet tells you the details of assets, liabilities and owners’ equity for the business. In simple words, the balance sheet is a statement which tells you the assets of the business, the money others need to pay you and the debt you owe others including the owner’s equity.
Balance sheet is one of the important financial statement used for making business decisions. Balance sheet is used by various stakeholders like management, employees, investors, creditors, banks, regulatory authorities, tax authorities etc.
Balance sheet objectives
A balance sheet is also called as a top financial statement. Let’ us understand this by knowing the purpose and objective of the balance sheet. The following are some of the key objectives of the balance sheet:
It helps in ascertaining the financial position of the business on a given day.
Details of owner’s equity can be determined
The information from the Balance sheet helps you create provision for future loss/contingencies by creating reserves
It provides a snapshot of business health including the economic resources the business owns, owes, and the sources of financing for those resources.
Ascertain if the business is financially autonomous and therefore solvent
Determine the financial liquidity of the business
Balance sheet components
Balance sheet components are broadly divided into ‘Assets’ and ‘Liabilities’. Each of this balance sheet components consists of several sub-components. The following are balance sheet items:
As shown in the above balance sheet illustration, assets are broadly classified into fixed assets, investments and current assets. Similarly, liabilities are classified as owner’s capital, long-term debts and current liabilities. Let’s understand these balances sheet items in detail.
Assets
Something that an entity has acquired or purchased and owned, regarded as having value and available to meet debts, commitments or legacies. Assets are further broadly classified as:
Fixed Assets
Assets which are purchased for long-term use and are not likely to be converted quickly into cash, such as land, buildings, and equipment.
Current Assets
A current assets are those assets which can be converted into cash within one year. Examples of current assets are, Cash, Bank balances, Investments, Deposits, Accounts receivables and Inventory
Liabilities
Liabilities are the obligations or Debts payable by the enterprises in future in the form of money or goods. Liabilities are further broadly classified as:
Equity or Capital:
Money invested in the business to generate income.
Loans & Borrowings
Money borrowed from a financial institution or from others to be utilized in business for generating income and managing the day to day affairs of the business. Ex: Bank Overdraft, Term Loan.
Current Liabilities
Current liabilities are debts or obligations payable within a short period of time or one year. Ex: short term debt, trade payables, taxes due, accrued expenses.
Balance sheet format
Below is the balance sheet format
As illustrated above, on the left side of the balance sheet format, all the assets are shown followed with the sub-components of assets. On the right side of the balance sheet format, liabilities followed with sub-components are displayed.
Balance sheet equations
As shown in the above balance sheet format, the balances of total liabilities and assets owned by the business always match. This implies that the total value of assets always adds up to the total liabilities of the business. The following are balance sheet equations:
Assets = Liabilities + Owner’s Equity: This balance sheet equation tells you that all the assets owned by the business are either sponsored using the owners’ equity or the amount which company should owe others like suppliers or borrowings like loans
Liabilities = Assets – Owner’s Equity: The difference of assets and owner’s investment into business is your liabilities which you owe others in the form of payables to suppliers, banks etc
Owners’ Equity = Assets – Liabilities: This equation reveals the value of assets owned purely by owner equity
How to prepare a balance sheet?
Balance sheet preparation involves multiple steps to consolidate the accounting records and preparing various statements.
The following are the steps to prepare a balance sheet:
Posting of accounting records from journal books to individual ledge accounts
Preparing ledger accounts and ascertaining the closing balance of each ledger accounts
Preparing trial balance summarizing the closing balance of ledger accounts
Computing the debit and credit balance in trial balance to ensure the journal and ledger posting are arithmetically accurate.
If there is any difference in trial balance, errors need to be identified and corrected
Post correction and fixing the errors, an adjusted trial balance needs to be prepared
Preparing trading and profit & loss account by considering all the ledgers having income and expenses nature from trial balance
Finally, preparing a balance sheet in the format shown above by considering all assets and liabilities from the trial balance.
Balance sheet prepared by modern day business
Today, most businesses have automated balance sheet preparation using accounting software. Businesses believe using accounting software helps in saving time and efforts involved in managing books and preparing financial statements such as balance sheet. Further, the use of accounting software facilitates in generating comparative balance sheet – across periods and branches and consolidated balance sheet of all the branches or business verticals.
Accounting cycle refers to the complete process of accounting procedure followed in recording, classifying and summarizing the business transactions. Accounting cycle starts right from the identification of business transactions and ends with the preparation of financial statements and closing of books.
Steps in accounting cycle
Whether you are a business owner or aspiring accountant, it is important to know and understand the process involved in the accounting cycle. Accounting cycle consists of 8 steps listed below:
Step-1 of accounting cycle is identification of business transactions
The first step of the accounting cycle beings with the identification of financial transaction that have occurred in the business. In this accounting cycle, the accountant or the bookkeeper collects the data of all the transactions such as purchases, sales, payments, receipts etc. and keeps the data ready to complete next step of the accounting cycle. Here, the accountant or bookkeeper analyze the nature of transactions, accounts impacted etc.
Step-2 of the accounting cycle is the recording of transactions in the books of accounts
The next step of the accounting cycle is the most crucial and important. In this accounting cycle, the bookkeeper or accountant records the financial transaction in the book of accounts. This step of the accounting cycle is also known as a journal entry and the book in which it is recorded is a journal book.
Here, all the transactions are recorded in chronological order along with the ledger accounts involved, amounts in Dr/Cr and narration (a brief note on the transactions)
Step-3 of accounting cycle is ledger posting
Ledger posting simply refers to posting the financial transactions recorded in journal books to individual ledger statements. For example, in preparing cash ledger account, you must post all Debit (receipts) and Credit (payments) into statement and difference between these two including the opening balance of cash will be the closing balance.
This part of the accounting cycle includes posting all the Debit and Credit transaction into a statement belonging to a ledger account as shown in the below image.
Step-4 of accounting cycle is to prepare un-adjusted trial balance
In this step, you must list all ledger accounts with closing balance posted from individual ledger accounts statement (discussed above). The format of trial balance consists of the Debit column and Credit column in which the closing balance of each ledger accounts will be posted. After posting the closing balance of all the ledger accounts, the debit balance should match with the credit balance.
This is the primary source for preparing the final accounts and all other financial statements.
Step-5 of accounting cycle is to post the adjustment entries
Here, adjustment entries such as accrued incomes, depreciation, etc. are posted considering the unadjusted trial balance prepared earlier.
Step-6 of accounting cycle is to prepare the adjusted trial balance
Adjusted trial balance is a statement listing all the closing balance of the ledger accounts after all the adjustment entries related to accounting period is posted into the books of accounts.
Step-7 of accounting cycle is to prepare financial statements
This is the most important step of the accounting cycle. Once you have followed all the above steps of the accounting cycle, it’s time for you to start preparing financial statements. Profit & Loss account and Balance sheet are the two key financial statements.
Profit and loss account:Â Profit and loss accounts is a financial statement prepared to know the profitability of the business. This is also known as Income Statement.
Balance sheet: Balance sheet is one of topmost financial statement prepared by the businesses. The financial details of the balance sheet help you and the external stakeholders to evaluate the financial performance of the business on a given date. click here to know Balance Sheet format, steps to prepare balance sheet etc.
Step-8 of accounting cycle is closing the books of accounts
Closing books of accounts refer to freezing books from recording the business transaction. This is done after the closure of the accounting period and posting all the adjustment entries. At this stage of the accounting cycle, all the financial statements are prepared and new books for the subsequent financial year will be started.
Modern-day accounting cycle
With the growth of trade and commerce and the diversity of the business operations, businesses are using accounting software to get rid of the complex procedure involved in the accounting cycle. Accounting software automates the entire accounting cycle by just recording the transactions. For business owners, it saves time and efforts involved in the manual accounting cycle. Not just automating the accounting cycle but the capabilities to auto-generate various financial statements such as cash flow, accounts receivables reports, projections etc. makes accounting software invaluable to the business.
Financial statements refer to reports prepared to evaluate the performance, financial health and the liquidity position of the business. Financial statements are prepared using the transactions accounted in the books of the account. In simple words, all the accounting data is consolidated into a financial statement in a manner which is generally accepted and understood.
Periodicity of financial statements
Traditionally, financial statements were prepared annually i.e. after the closure of the accounting period. With modern-day business operations and requirements, the business owners depend on the financial statements for decisions making. As a result, businesses prepare financial statement monthly, quarterly and half-yearly as well. The insights from the financial statements are reliable and help business owners to make confident decisions.
Users of financial statements
Financial statements are used by internal users as well as external users. The financial statements depict the overall financial health of the business and help users to make better business decisions.
Internal users:Internal users of financial statements are management, employees, Owners etc.
External users:Regulatory, tax authorities, banks, unions, investors, creditors etc. are the external users of financial statement.
Types of financial statements
Using the accounting records, 3 types of financial statements are prepared by the company. These 3 types of financial statements provide insights about the financial health, profitability and liquidity of the business. Following are the 3 types of financial statement:
Balance sheet
Profit and loss account
Cash flow statements (CFS)
Balance sheet: Balance sheet is a type of financial statement that summarizes the company’s assets, liabilities and the amount owned by the business owners. This financial statement broadly consists of assets and liabilities. A balance sheet helps the stakeholders to evaluate the efficiency in working capital, asset portfolio and the financial strength.
Profit and loss account:Â This statement reveals the performance of the business in terms of profit or loss for a specified period. Using this financial statement, net profit is calculated after considering the gross profit/loss and all other indirect expenses or incomes.
Cash flow statements:Â Cash flow statement projects the organization ability to generate cash inflow, cash outflows to meet its obligations or commitments and investment.
How to prepare financial statements
All the financial statements are prepared using the accounting transactions recorded in the books of the accounts. Preparing financial statements is one of the outcomes of accounting i.e. analyzing and interpreting the business transactions.
The following are the steps to prepare a financial statement:
Recording transactions in a journal book
Preparing ledger accounts
Preparing trial balance summarizing the closing balance of ledger accounts
Using trial balance, you need to prepare profit and loss account and balance sheet.
Cashflow statement is an independent financial statement which compliments balance sheet and income statement. Cash flow statement is prepared considering the operating activities, investing activities and financing activities.
Experience the freedom of viewing your Tally.ERP 9 reports from anywhere, on any device, in a browser, securely. All you need is Tally.ERP 9 Release 6.6, and a device with a web browser and internet connection.
Anywhere, Any device : You can access Tally.ERP 9 reports from anywhere using any device such as, laptop, smartphone, tablet, and so on, with a web browser, and an active internet connection.
Security and Control : You have complete control on who views the reports, and which reports are available to a user. Further, your data will always be in your machine. Whenever a user views a report in a browser, only the data required for that report is fetched from your Tally.ERP 9.
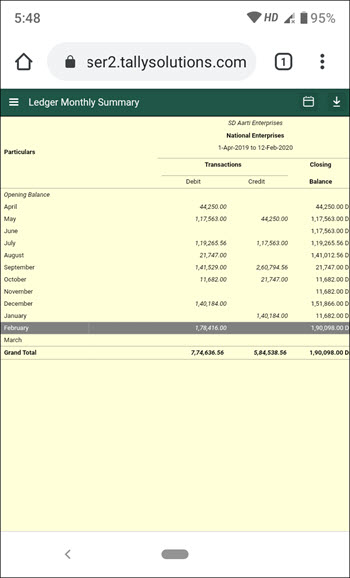
Reports in a web browser : Select the company, then select the report from the list shown once you log in to the Tally portal. The report with the latest data is fetched and displayed. You can drill down to the next levels of the report to get further details. You can change the period of the report as well. Refresh the page to get the updated information.
Download Reports and Invoices : You can open a report and download it as a PDF document. You can drill down up to the voucher level. You can also download invoices and vouchers.
Easy Setup : Update to Tally.ERP 9 Release 6.6, connect your company, and allow users to view reports from anywhere. Note that only users with valid Tally.NET IDs are allowed to view reports in browser. Your account ID (e-mail ID used to activate your license) is a valid Tally.NET ID. You can also create Tally.NET IDs for users who need to view reports in browser.
Connect Company to view reports in browser
You can decide when to connect your company for users to view reports and disconnect the same when it is not needed. You need to have internet connection on the computer where Tally.ERP 9 is installed.
1. Go to Gateway of Tally , click F4: Connect .
a. If you have enabled security control for your company, move to step 2.
In case you have not enabled security control for your company, Tally.ERP 9 will prompt you for the same.
o In the Security Control screen, the option Use security control is set to Yes .
o Provide the administrator details. This login credential is for the company data.
2. Provide report access to Tally.NET users.
a. Click Yes to add Tally.NET users and allow browser access.
c. In Username/Tally.NET ID , enter a valid Tally.NET ID for which you want to give access.
Note: You can check for valid Tally.NET IDs on the Tally portal , by logging in with account administrator’s e-mail ID. You can also create more Tally.NET IDs, if needed.
Now that the company is connected, a sign (c) appears against the company name in the List of Selected Companies in the Gateway of Tally.
When an authorised user logs in to the Tally portal, the connected company appears in the List of Companies with the status as Connected .
View Tally.ERP 9 reports from anywhere using browser
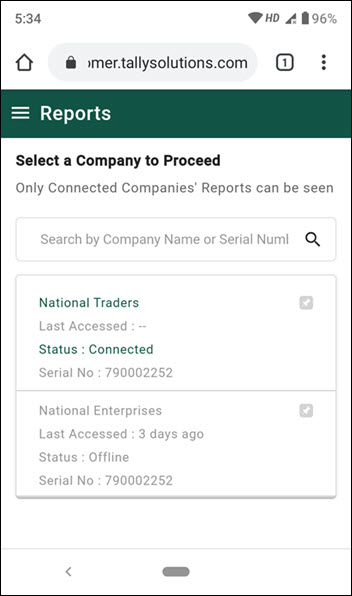
1. Open www.tallysolutions.com and log in using your Tally.NET ID and password. All the companies that you can access are listed with the status as Connected or Offline .
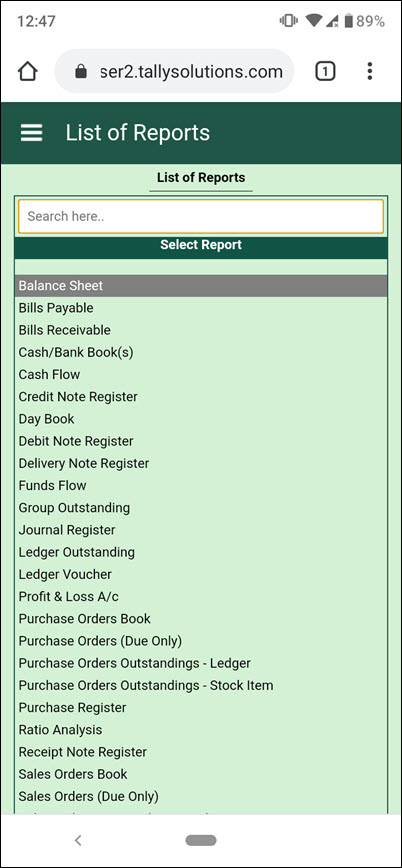
2. Select a connected company. The List of Reports is displayed.
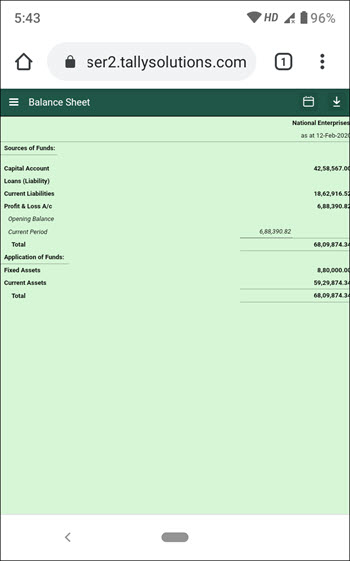
3. Select the report that you want to view. A request is sent to Tally.ERP 9, and the selected report is fetched to display in the browser. You can download the report as a PDF document by clicking  , and change the report period by clicking  on the top-right corner of the screen.
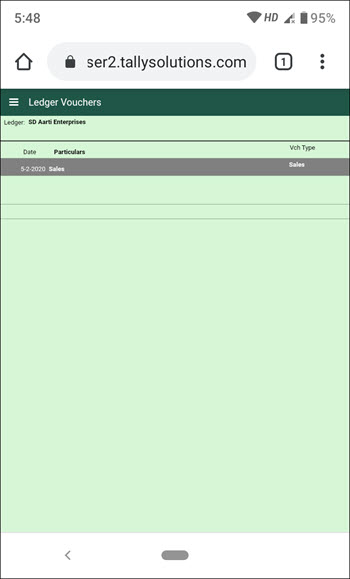
4. To get further details of any value, you can drill down up to the voucher level in many reports. You can also download the voucher as a PDF document.
Â
Use the Back button of the browser to go back to the previous screen. In case you are accessing from a phone, the phone back button does the same.
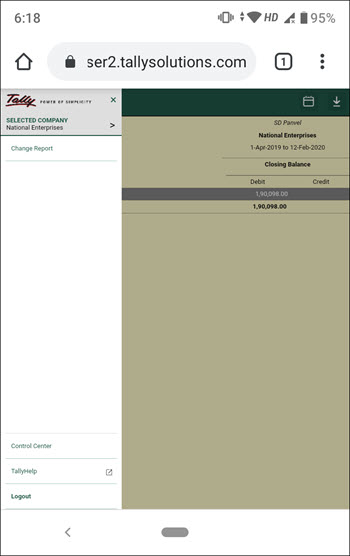
5. To change the report, you can use  on the top left of the screen, and click Change Report .
6. To change company, you can use  on the top left of the screen, to view the List of Companies, and click SELECTED COMPANY .
Manage Access Rights of Users
You can add many Tally.NET users, and allow them to view reports in browser. You can also decide who can access which report.
In this section
â—Â Create Tally.NET IDs
â—Â Allow users to view reports in browser
â—Â Create Security Levels to provide limited access to reports
Create Tally.NET IDs
You can create Tally.NET IDs directly on the Tally portal. Alternatively, you can create using Control Centre in Tally.ERP 9.
1. Go to Tally portal , log in using your account administrator’s e-mail ID.
2. On the left pane, click Control Centre > User Management > Manage Users .
3. In the Manage Users screen, click CREATE USER .
4. In the Create New User section, select the required Security Level as Standard User or Owner .
5. In the Tally.NET ID field, enter a valid e-mail ID. The password for the Tally.NET ID is sent to the email ID provided.
6. Select the option Enable Tally.NET Services to give access to Tally.NET features and browser reports.
7. In case you have multiple branches, select the branch for which the user is allowed to access reports in browser.
8. Click CREATE .
Tally.NET IDs are created. You need to allow browser access to these users, in Tally.ERP 9, so that they can view reports in browsers.
Allow users to view reports in browser
You can allow many users to view reports in browser.
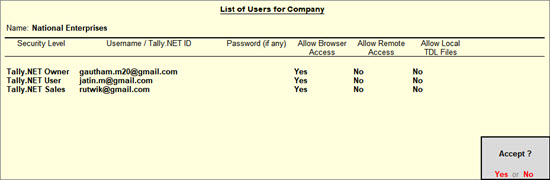
1. Go to Gateway of Tally > F3 : Cmp Info > Security Control > Users and Passwords .
2. Select the Security Level as Tally.NET Owner , Tally.NET User , or Tally.NET Auditor . You can also create Security Levels, if needed.
3. In Username/Tally.NET ID , enter the required Tally.NET ID.
4. Set the option Allow Browser Access to Yes , and accept.
Note: By default, the security level Tally.NET Owner and Tally.NET Auditor provide access to view all the reports available for viewing in browsers. But the security level Tally.NET User has access to only a few reports. The reports that are not available to the security level Tally.NET User are given here .
â— In case you need to disallow viewing reports for this company in browsers for a user, set Allow Browser Access to No .
These users can view reports in browsers, whenever the companies are connected.
Create Security Levels to provide limited access to reports
You can create multiple Security Levels to manage user access to different reports in Tally.ERP 9. If Tally.NET IDs are added under such Security Levels, you can control who can view which report in browser.
1. Go to Gateway of Tally > F3 : Cmp Info > Security Control .
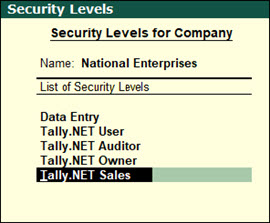
2. Select Types of Security and press Enter .
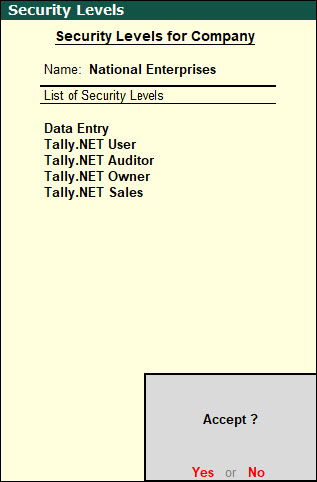
3. In the Security Levels screen, move to the end of the entries in List of Security Levels to get a blank row.
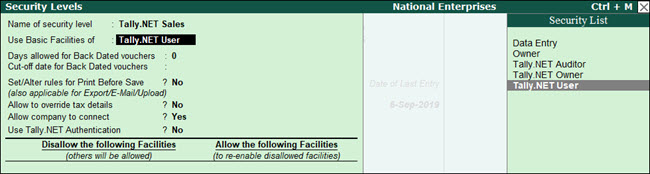
4. Enter the name for the new security level and press Enter to drill down.
5. In the Use Basic Facilities of field, select Tally.NET User .
6. Ensure that the option Use Tally.NET Authentication is set to Yes . This will enable you to change the configuration of Allow Browser Access option while adding a user.
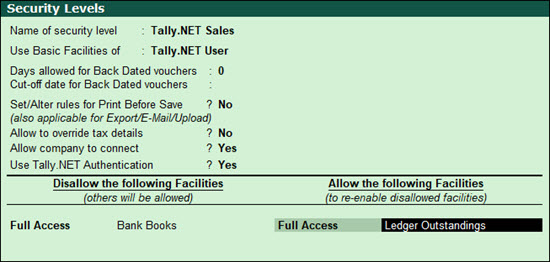
7. In the Disallow the following Facilities column, select Full Access from the Type of Access list and press Enter .
8. Select the name of the report you want to disallow. For example, if you want to disallow access to Bank Books , select it and press Enter . Full access to Bank Books is disallowed for this security level and for all users added under this security level.
9. In the Allow the following Facilities column, select Full Access from the Type of Access list and press Enter .
10. Select the name of the reports you want to allow access. For example, if you want to allow access to Ledger Outstanding , then select it and press Enter .
11. Similarly, allow access to other reports, Group Outstandings and save.
You have created a new security level with access to all reports available for a Tally.NET User except Bank Books and additionally allowed access to Ledger Outstandings and Group Outstandings .
12. Add Tally.NET IDs under this Security Level to allow these users to view the limited set of reports in browser.
Manage Company for Browser Access
You have complete control and flexibility on the company setting for report access, including when the access is needed.
â—Â Enable/Disable browser access for your Company
â—Â Disconnect Company
â—Â Connect/Disconnect multiple companies
â—Â Connectivity Status report in Tally.ERP 9
â—Â Remove names of Offline Companies not used from the list in browser
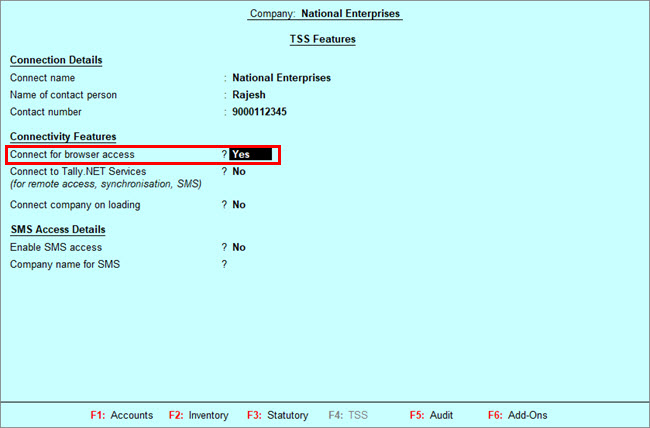
Enable/Disable browser access for your Company
When you update your Tally.ERP 9 to Release 6.6, browser access is enabled for the company. However, you can disable it when no users are expected to view the reports.
â— Go to F11: Features > F4: TSS Features to check your settings. You will see that Connect for browser access is set to Yes .
â— If you need to disable browser access, set the option to No .
Disconnect Company
When there is no need for users to access reports in browser you can disconnect the company.
â— Click F4: Disconnect .
When you disconnect a company in Tally.ERP 9, the status of the company changes to offline on the Tally portal.
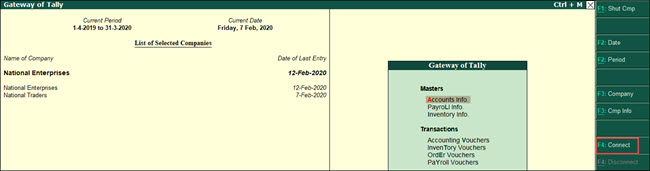
Connect/Disconnect multiple companies
When you have more than one company open in Tally.ERP 9, you can connect any or all of these companies at once. Ensure that the companies have security enabled and Tally.NET IDs are added to give access to reports in browser before using multiple company connect functionality. You need to have internet connection on the computer where Tally.ERP 9 is installed.
1. Open all the required companies.
2. Click F4: Connect .
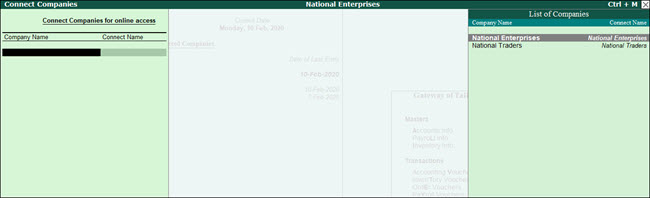
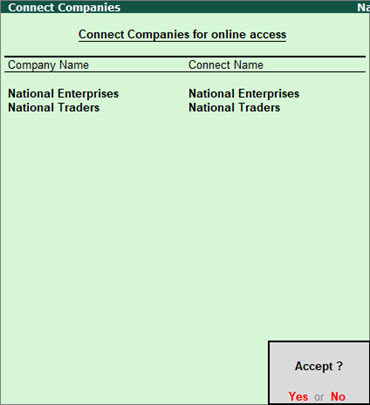
3. In the Connect Companies screen, select the companies one by one.
4. Press Enter to connect. You can see the connection success message for each company in the calculator panel.
When multiple companies are connected, you can disconnect many connected companies at once.
â— Press Alt+F4 to disconnect the companies.
â— In the Disconnect Companies screen, select the companies to disconnect and accept.
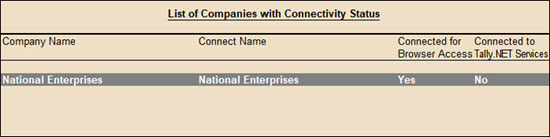
Connectivity Status report in Tally.ERP 9
This report gives you details of all the companies connected for Browser Access and Tally.NET Services. This report is active when at least one company is connected.
1. Go to Gateway of Tally > F3 : Cmp Info .
2. Select Connectivity Status .
The Connectivity Status report displays the company name, the company’s connect name, and the status of connection for Browser Access and Tally.NET Services.
Remove names of Offline Companies not used from the list in Browser
When a company is connected for browser access the name of company continues to be shown in the browser list for ever. In case you are not connecting that company anymore the name will continue to appear but with connection status as offline. You would want to remove all such names from the list of companies in the browser which are no more connected and only appear as offline. You can do so using the Remove from the list option.
1. Open www.tallysolutions.com and log in using your Tally.NET ID and password. All the companies that you can access are listed with the status as Connected or Offline .
2. Click the three dots provided next to the offline company.
3. Click the option REMOVE FROM THE LIST .
4. A message Are you sure you want to remove the company from the list? to confirm . click Remove .
5. A confirmation message is displayed once the company is removed successfully. click Ok .
The latest release brings to you a simple, secure, and swift way to view Tally.ERP 9 reports on the go using any device. Login to Tally portal in a web browser and get frequently used business reports from Tally.ERP 9 on demand.
This release also provides:
For India: GST reports for Jammu & Kashmir and Ladakh – You can now generate GSTR-1, GSTR-3B, GST CMP-08, and GST Annual Computation to help file GST returns for the periods before and after 1-Jan-2020.
For UAE: New Invoice Format 2 to allow you to print VAT invoices (in English) as required by FTA.
Product Improvements
In the Export for e-Way Bill report, the exported e-Way Bills appeared under Invoice Ready for Export section. This issue is resolved. Now the exported e-Way Bills are appearing under Invoices Exported section.
Provision to record transfer of Input Tax Credit from SGST to UTGST is now supported for Ladakh.
The message that appeared in the calculator panel while navigating to the ledger display screen (Gateway of Tally > Accounts Info. > Ledger >Display > select any ledger) is now taken care of.
Total Invoice Value appearing in GST Returns when transaction was booked in accounting voucher mode has been corrected.
The crash which occurred in a particular case of opening or saving an accounting voucher is resolved.


 Â