Release 6.0
Contact Details for e-Payment
Using the e-Payments facility in TallyPrime, you can send payment instructions to the bank quickly and securely, without visiting the bank.
If you are using TallyPrime Release 5.1 or earlier, then watch How to Make e-Payments to Your Beneficiaries Through TallyPrime.
To use e-Payment as a mode of payment you need to configure your bank ledger. You can record a payment voucher and select e-Payment as the mode of payment and later export the payment instructions which can be loaded to the bank portal. In TallyPrime, you can also reconcile your e-Payment transaction.
The process of e-Payment reconciliation is also much simpler. Bank portals provide you with an intermediate/payment reverse file that records the status of your e-payments upload. You only have to import the intermediate/payment reverse file to TallyPrime, and TallyPrime will update the reconciliation status for you. You can view and track the status of your e-payment transactions using the e-Payments report and identify any incomplete information or mismatch in beneficiary details.
Apart from cheques, the most used payment mode is e-Payment in the business. e-Payment is a method of paying online or through an electronic medium. The most popular methods of e-Payment are Credit Cards, Debit Cards, UPI payments and so on. Online payment or e-Payment became popular as it improves the relationship with the suppliers due to the transparency, security and fast transfer of money. It also reduces the risk as Electronic payments are much more efficient and safe due to the multiple ways of securing your payments.
All the banking information and transactions that you maintain in TallyPrime are safe. However, you can provide additional security by authorising only certain users for e-Payments reports and operations. You can also create users with different levels of rights.
Configure Bank Ledger for e-Payments
To make the payments to the parties through online payment or e-Payment you need to enable e-Payments in your bank ledger. Once enabled you can configure the e-Payments option depending on the bank through which you have enabled the e-Payments facility. You can configure your Bank ledger for e-payments only for selected banks.
If you are on TallyPrime Release 6.0 or later, then refer to Configurations for e-Payments.
If you are on TallyPrime Release 5.1 or earlier versions, then click here
Record e-Payment Transactions
![]()
- Record a payment voucher.
- Press Alt+G (Go To) > Create Voucher > press F5 (Payment) and press Enter.
Alternatively, Gateway of Tally > Vouchers> press F5(Payment) > and press Enter. - Debit the party ledger and credit the bank ledger that is configured for e-Payments.
- Press Alt+G (Go To) > Create Voucher > press F5 (Payment) and press Enter.
- Verify the e-Payments details.
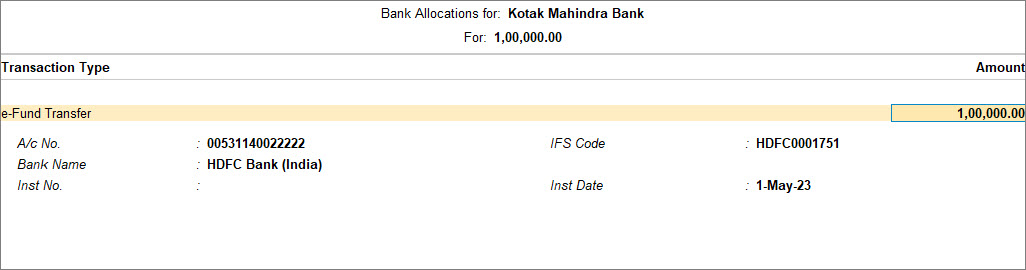
- In the Bank Allocations screen, select e-Fund Transfer as the Transaction Type.
- Enter other details such as A/c No., IFS Code, Bank Name, Inst No., and so on if you have not maintained the beneficiary details in the party master.
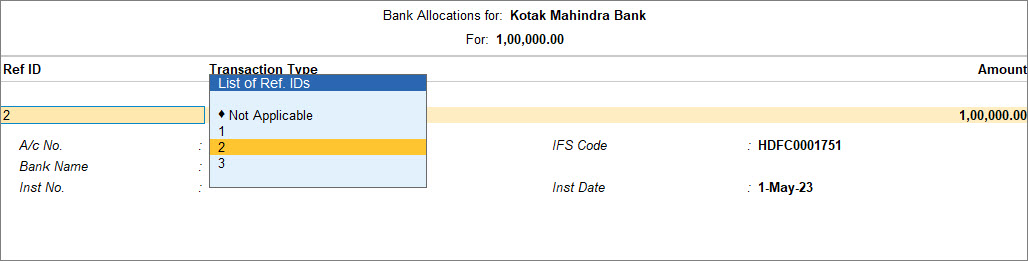
- Press F12 (Configure) and set the option Show Ref ID to Yes if multiple beneficiary details are maintained.
The Ref ID column appears in the Bank Allocations screen. - Press Backspace to select the required beneficiary for the transaction.
- Press Ctrl+A to accept the Bank Allocations screen.
- Press Ctrl+A to save the payment voucher.
The Exporting Payment Instructions screen appears.
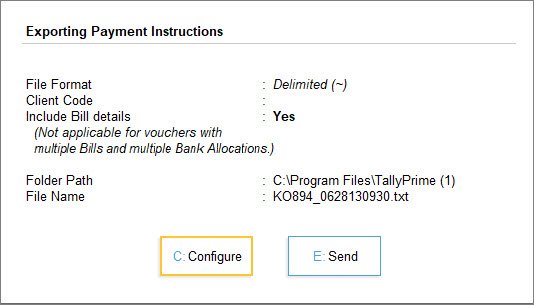
- Press C (Configure) to change the configurations or press E (Send) to export the details.
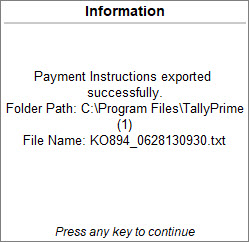
On successful export, the following message appears.
If beneficiary account details (like A/c No., IFS Code, and so on) are not provided in the ledger or during the transaction, or if there is a mismatch in the details, then the transaction will not be exported. You can find the transaction in the e-Payments report under the respective section.
- For DBS, the transactions are directly uploaded to the bank portal, if you are logged in with the Tally.NET User ID that is registered with the bank. You can view the status in the e-Payments report and authorise the same on the bank portal.
- For other banks supported for e-payments, the transactions are exported locally. You can upload the exported transactions by logging in to the bank portal.
Export/Upload Payment Instructions to the Bank
TallyPrime Release 6.0 onwards, you can initiate export for payments from anywhere in TallyPrime.
- Press Alt+Z (Exchange) > Send Payments.
- Select the bank ledger for which you want to export payment instructions.
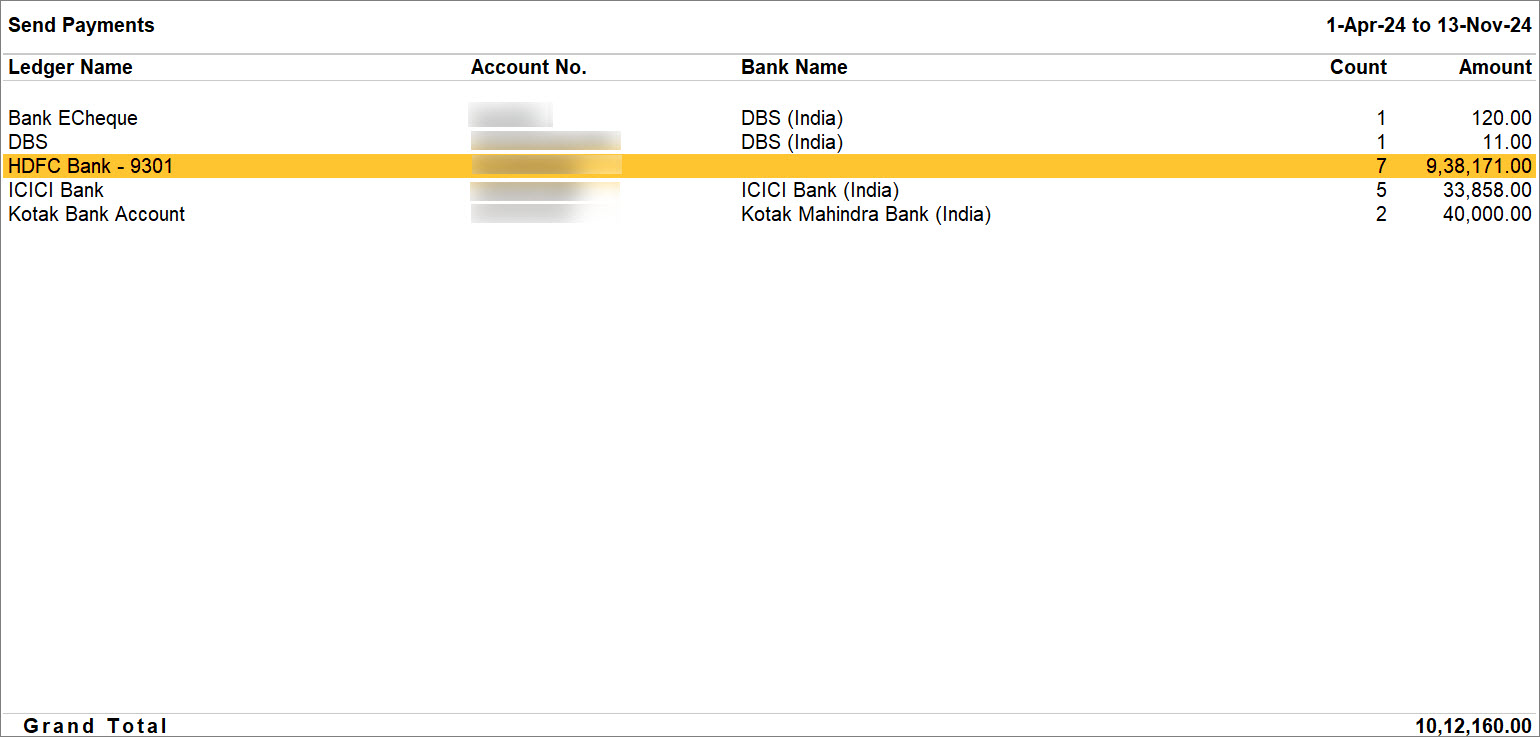
If you want to add transactions with mismatch in the Bank Details, then press Ctrl+B (Basis of Value) and enable Include Transactions with Mismatch in Bank Details.
- Select transactions to export.
- Export the selected transactions.
- Press C (Configure) to configure the export.
- Press E (Export) to export the payment instructions.

Alternatively, to export payment instructions for multiple payments, follow the steps given below:
![]()
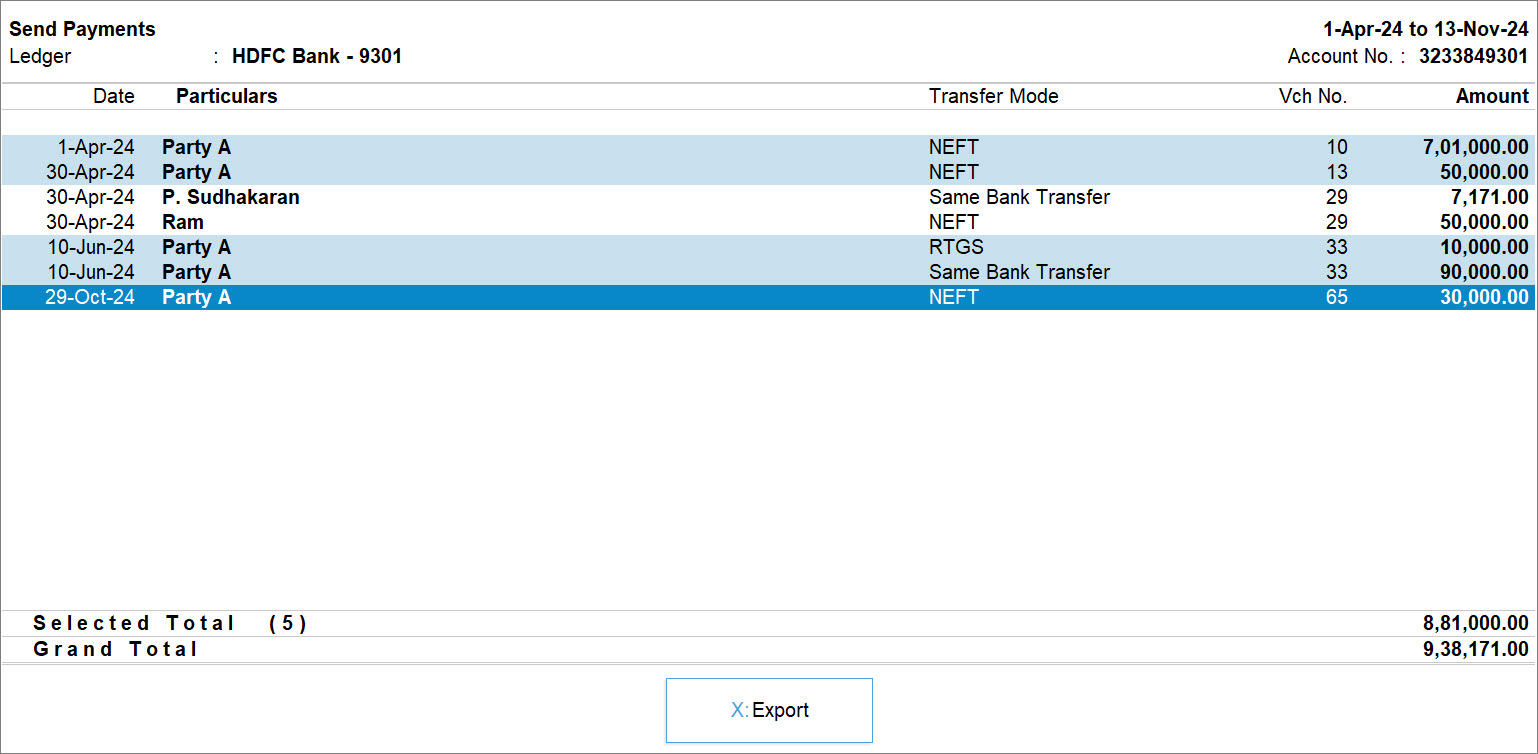
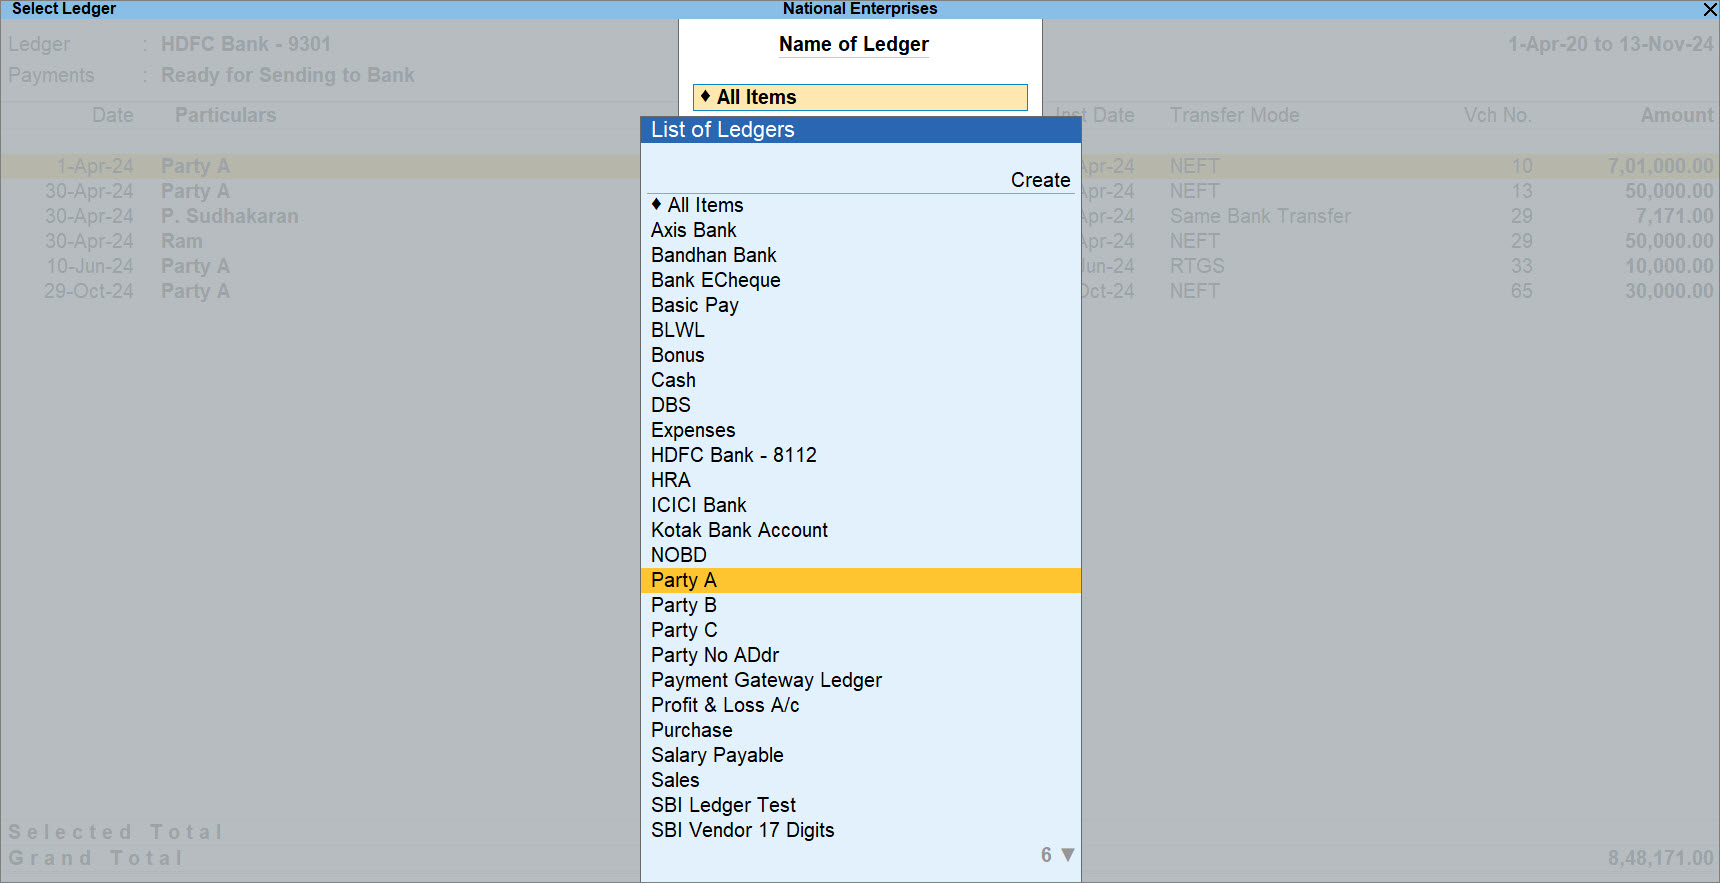
- Press Alt+G (Go To) > type or select e-Payments > press Enter.
Alternatively, Gateway of Tally > Banking > e-Payments. - Select the required bank column for the Ready for Sending to Bank section, and press Enter.
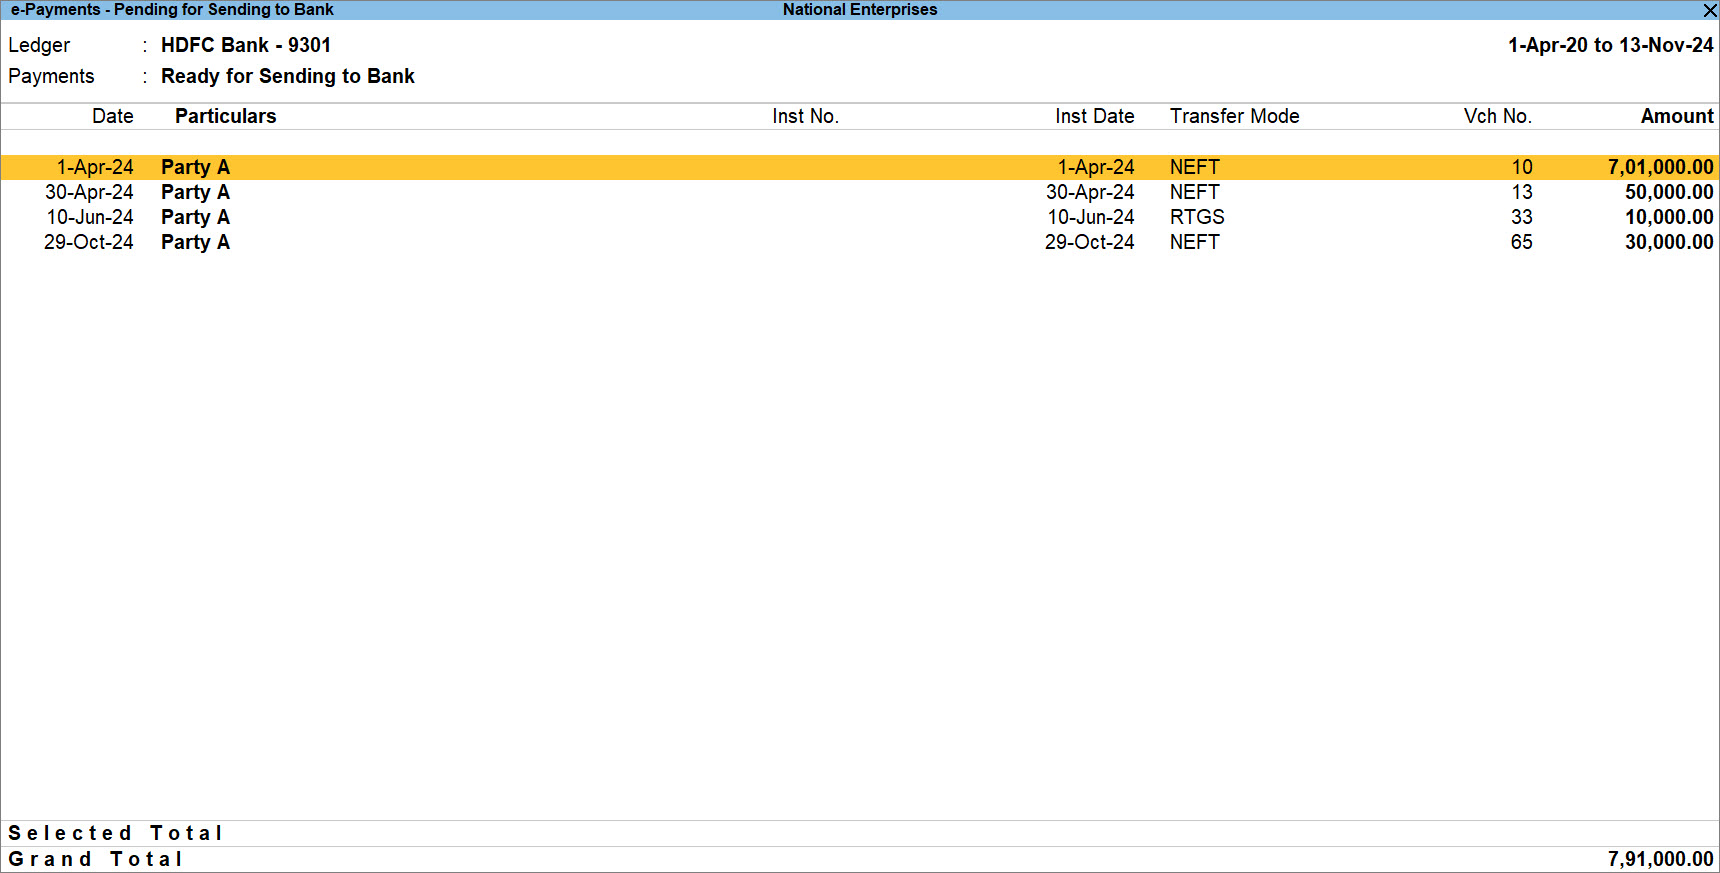
The e-Payments screen for the selected bank appears, as shown below:
- Select the transactions that you want to export, and press Alt+E (Export) > Payment Instructions.
The Exporting Payment Instructions screen appears as shown below:
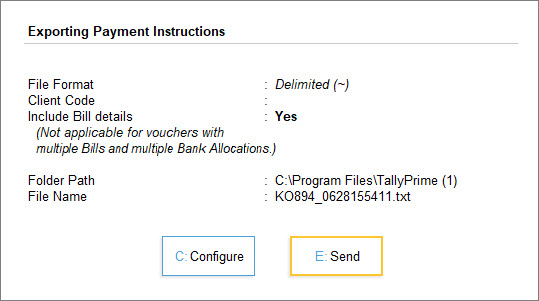
- Press C (Configure) to change the configurations or press E (Send) to export the details.
You can now log in to your bank portal to upload the exported output file from your local system.
Use e-Payments Report
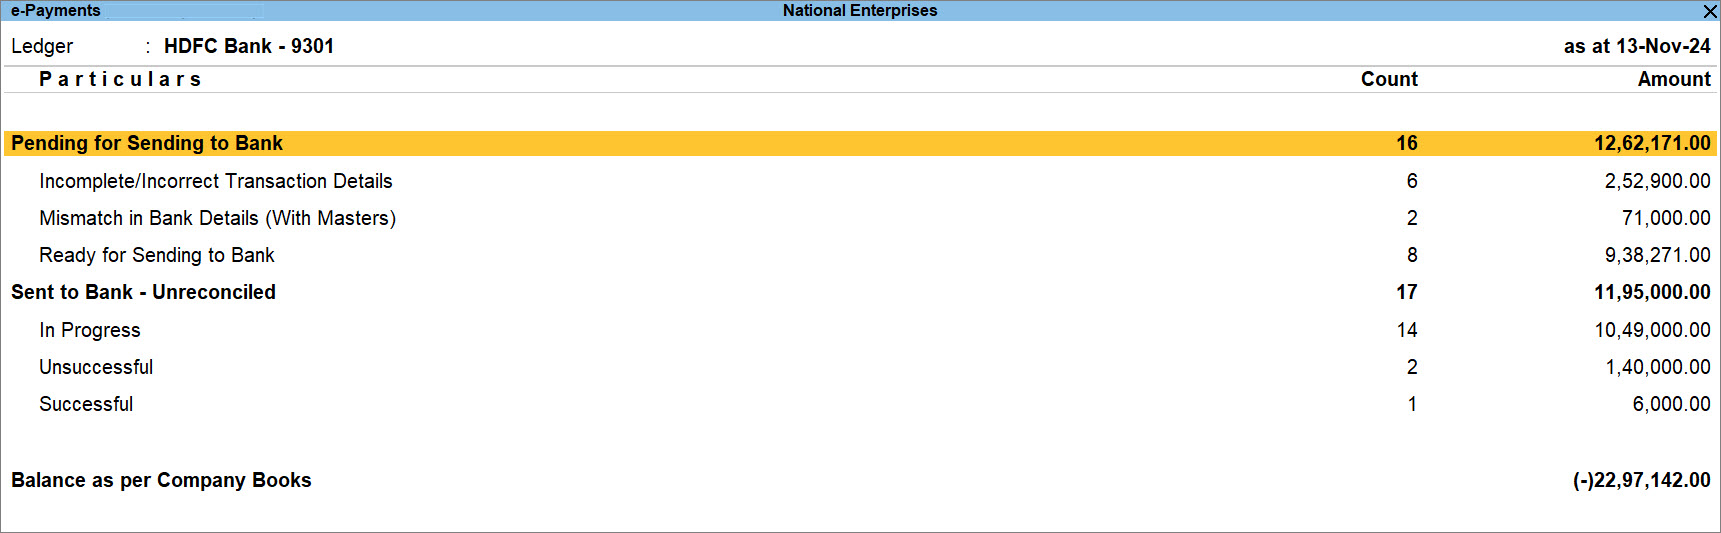
The e-Payments report provides you with an overview of e-Payment transactions recorded in TallyPrime. The report is divided into sections, and you can find transactions in the respective section, based on their status. This helps you take appropriate actions on the transactions, so that you can send payments to your suppliers.
- Press Alt+G (Go To) > type or select Banking Activities, press Enter, and then drill down from the e-Payments column for a specific Bank ledger.
Alternatively, Gateway of Tally > Banking > Banking Activities, and then drill down from the e-Payments column for a specific Bank ledger.
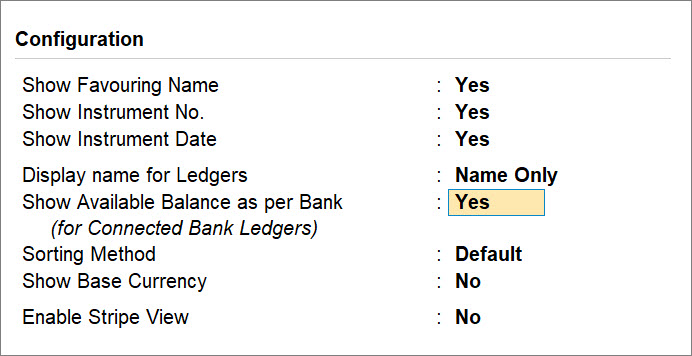
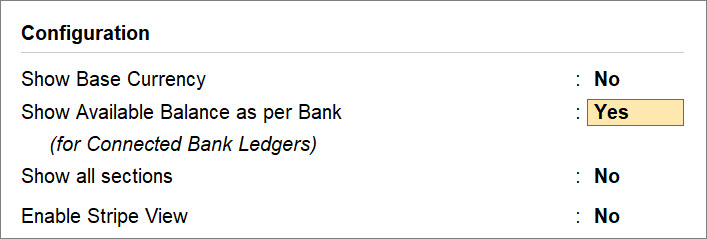
You can also view the Available Balance as per Bank for the connected bank accounts. If you are using the Bank account or ledger through Connected Banking and have check your balance from TallyPrime, then you will view the bank balance as per the bank.
You can view change the Bank Ledger for which you want to view the report.
- Press F4 (Bank Ledger).
- Select the ledger and press Enter.
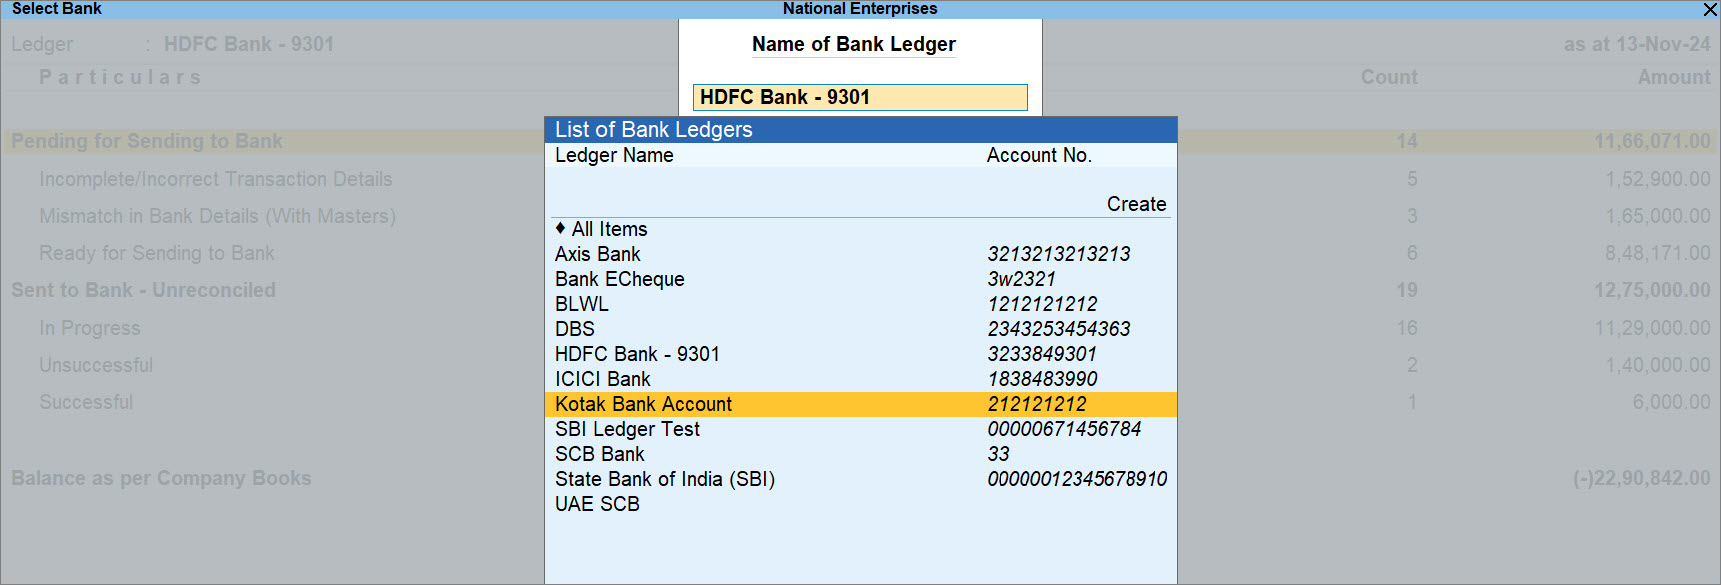
If you want to view the report for all the banks, then select All Items and press Enter.
The report gets displayed for the selected ledger.

You can also change the Bank Ledger after you drill down from any of the sections.
The sections are categorised, based on the readiness for sending the payment. If the details in a transaction or ledger are incomplete, incorrect, or mismatch, then you can drill down from the section and resolve the transactions.
Similarly, you can view the transactions that are sent to the bank with the applicable status.
Once you drill down, you can view the transactions recorded for a party.
- Press Ctrl+F4 (Ledger).
- Select the ledger and press Enter.
The report gets displayed with the transactions recorded for the party.
You can view the report for specific payment types. Furthermore, you can include the transactions with exact match available in Bank Reconciliation.
When you drill down from a specific section of the report, you can also filter the report to view transactions with a specific payment type.
- Press Ctrl+B (Basis of Value).

- Select the Payment Type.
- Press Enter on Payment Type.
- Select the option, based on the type of payment, such as Payroll or all payments excluding Payroll.
- Include Transactions with Exact Match Available in Bank Reconciliation: Yes.
The report displays the transactions that have an exact match in the Bank Reconciliation report. - Include Payments with Transfer Mode: When you drill down from a section, you can choose to view transactions with a specific transfer mode.
Pending for Sending to Bank
This section contains transactions that are either ready to be sent to the bank or require action. You can configure this report to view the required information. Moreover, the same configurations are available when you drill down from Incomplete/Incorrect Bank Ledger Master Details, Incomplete/Incorrect Transaction Details, Mismatch in Bank Details (With Masters), and Ready for Sending to Bank.
- Press F12 (Configure).
- Show Instrument Date: Yes.
- Format of Report: Detailed.
- Configure the details that you want to view.
- Show Narrations: Yes.
This displays the narration entered in the voucher. - Show Favouring Name: Yes.
- Show Remarks: Yes.
- Show E-mail ID: Yes.
- Show Party Bank Details: Yes.
- Show Bank References and Status: Yes.

- Show Narrations: Yes.
Incomplete/Incorrect Bank Ledger Master Details
When you do not have the required bank details such as Account No. and IFS Code in the bank ledger, the transaction with the ledger is found in this section.
- In the e-Payments report, drill down from Incomplete/Incorrect Bank Ledger Master Details.
- Select the row and press Enter.
The Bank A/c details screen appears.

- Enter the correct Account No./IFS Code/SWIFT Code or any other missing information.
- Press Ctrl+A to save the details.
The transaction moves to the Ready for Sending to Bank section.
Incomplete/Incorrect Transaction Details
This section contains transactions with missing or incorrect Account No. or IFS Code. You can drill down further and correct the transaction details.
- In the e-Payments report, drill down from Incomplete/Incorrect Transaction Details.
- Select a transaction and press Enter.
The Bank Allocations screen appears. - Enter the correct Account No./IFS Code or both, as applicable.
Alternatively, press Alt+S (Copy Master Info.) to copy the details from the master to the transaction.

Note: If your bank is in UAE, then you need to enter the IBAN No. - Press Ctrl+A to save the details.
While saving the details, you can do one of the following:
- Press A to accept the transaction with the information you entered.
- Press R to replace the bank details in the master with the details specified in the voucher.
The R: Replace button appears if bank details have been specified in the master. - Press D to accept the transaction and also update your ledger.
This option will not appear while you are copying the details from the master. - Press B to make any changes in the Bank Details (Voucher) section.
The transaction moves to the Ready for Sending to Bank section.
Mismatch in Bank Details (With Masters)
If the bank details in the transaction does not match with that specified in the ledger, then the transaction is found in this section.
- In the e-Payments report, drill down from Mismatch in Bank Details (With Masters).
- Select a transaction and press Enter.
- Press Alt+S (Copy Master Info.) to copy the details from the master to the transaction.

If you do not want to make changes in the transaction and accept it as is, then press Alt+J (Access As Is). - Press Ctrl+A to save the details.
The transaction moves to the Ready for Sending to Bank section.
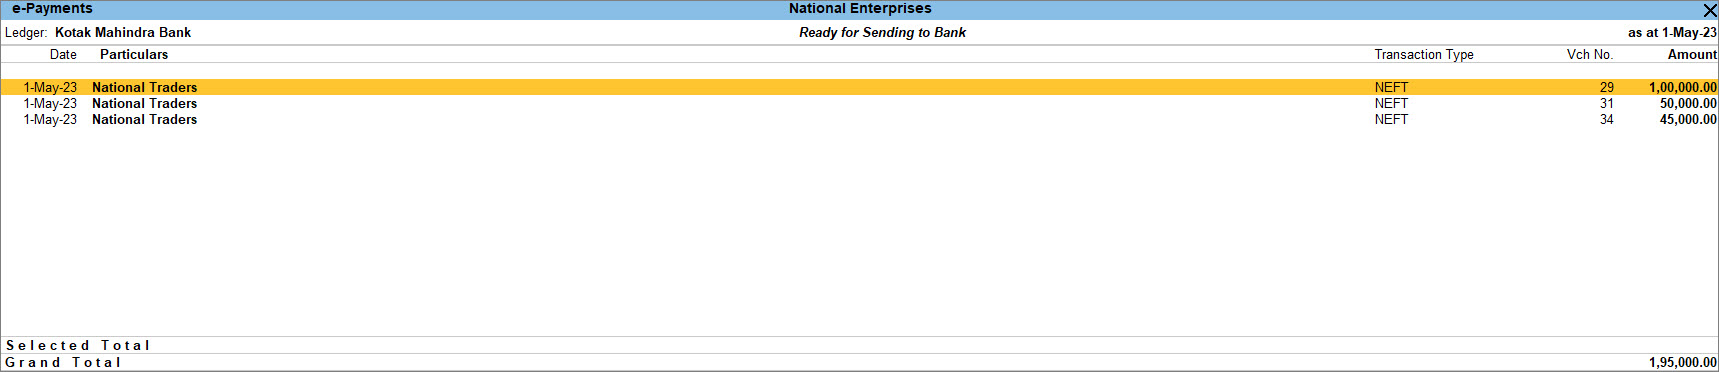
Ready for Sending to Bank
This section contains transactions with all the information required by the bank.
You can send payments to your suppliers by exporting the payment file and uploading on the respective bank portal.
- In the e-Payments report, drill down from Ready for Sending to Bank.
- Press Alt+Z (Exchange) > Send Payments.
To know more, refer to Export/Upload Payment Instructions to the Bank.
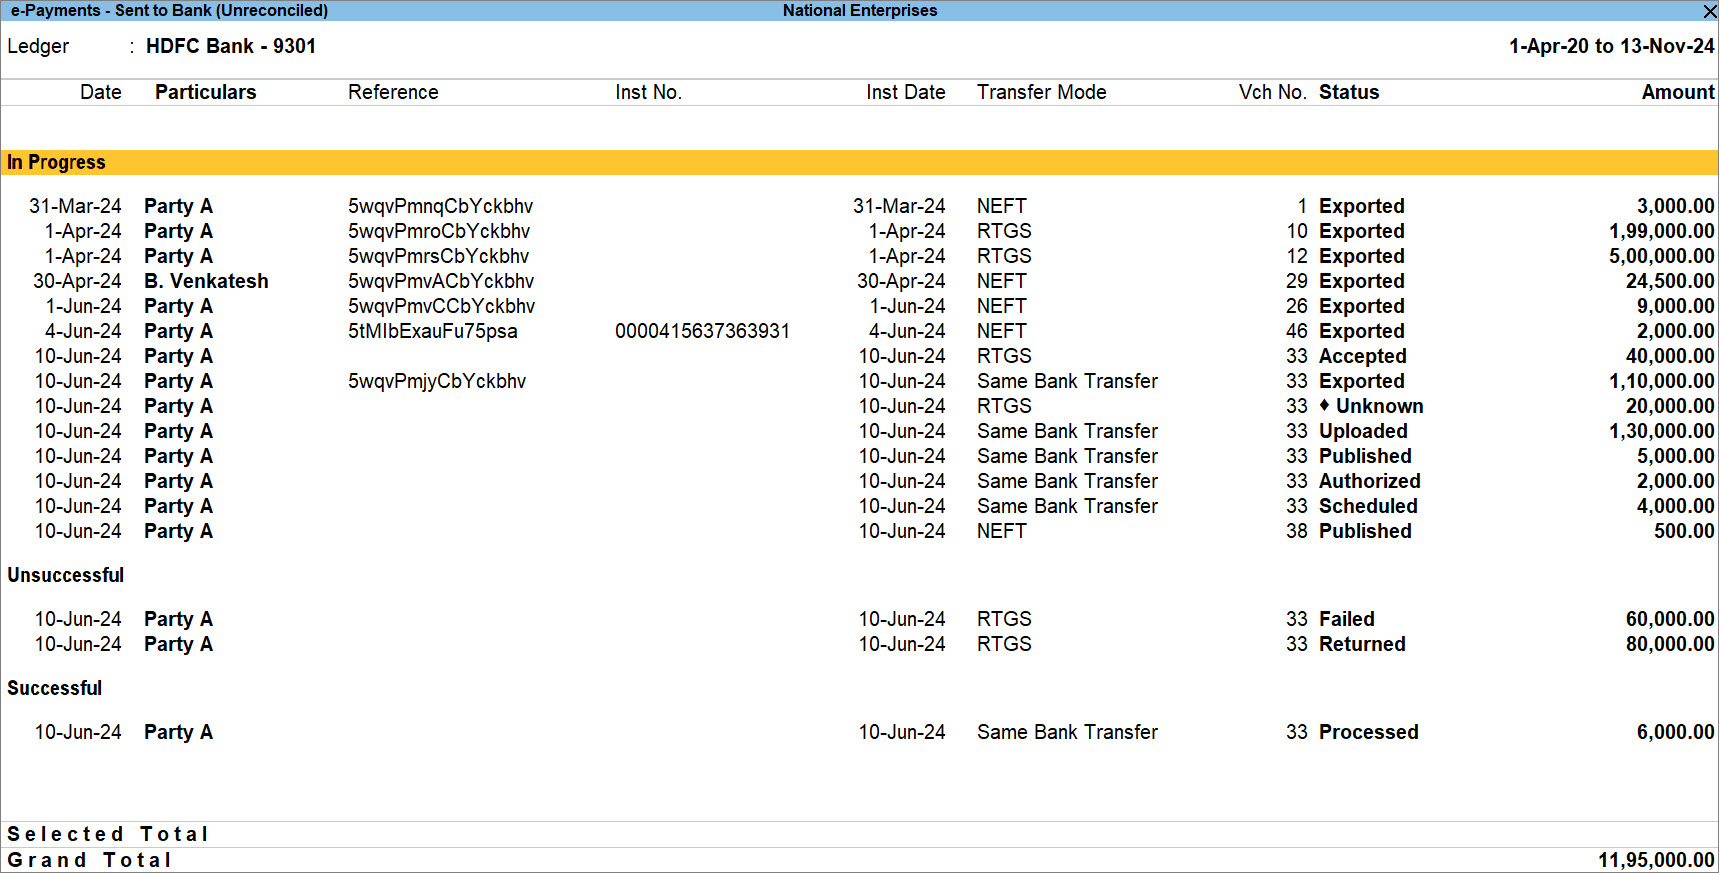
Sent to Bank (Unreconciled)
This section contains the transactions for which you have exported the payment instructions from TallyPrime and uploaded them on the bank portal. However, these payments are yet to be reconciled by importing the reverse file provided by the bank.
The sub-sections are categorized based on the status of the e-Payment – In Progress, Unsuccessful, and Successful.
The transactions in progress or unsuccessful will not have an Instrument No., while the successful ones contain the Instrument No.
You can configure the report to view the details, as needed. Moreover, you can also configure the report after drilling down from In Progress, Unsuccessful, and Successful.
- Press F12 (Configure).
- Show Reference: Yes.
This displays the reference no., if applicable. - Show Instrument No.: Yes.
The Instrument No. gets displayed only when the e-Payment is successful, and the bank reverse file downloaded from the bank portal is imported to TallyPrime.
This does not get displayed for the transactions with the status In Progress and Unsuccessful. - Show Instrument Date: Yes.
- Format of Report: Detailed.
- Configure the details that you want to view.
- Show Narrations: Yes.
This displays the narration entered in the voucher. - Show Favouring Name: Yes.
- Show Remarks: Yes.
- Show E-mail ID: Yes.
- Show Party Bank Details: Yes.
- Show Bank References and Status: Yes.
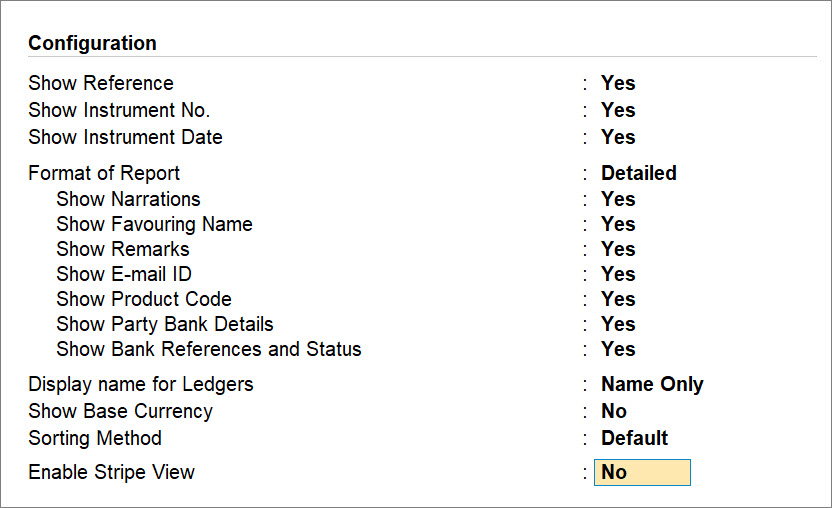
- Show Narrations: Yes.
You can further drill down from the sections under Sent to Bank – Unreconciled.
In Progress
The transactions in this section are exported from TallyPrime, but they are yet to be processed at the bank.
Unsuccessful
These transactions are exported from TallyPrime and uploaded on the bank portal. However, the processing of the transactions is failed at the bank.
Successful
These transactions are successfully processed and contain Instrument No.
Reset e-Payment Status
If you want to add some details to the e-Payment and then export it again later, then you can reset the e-Payment Status.
- Select the transaction and press F8 (Reset Pymt Status).
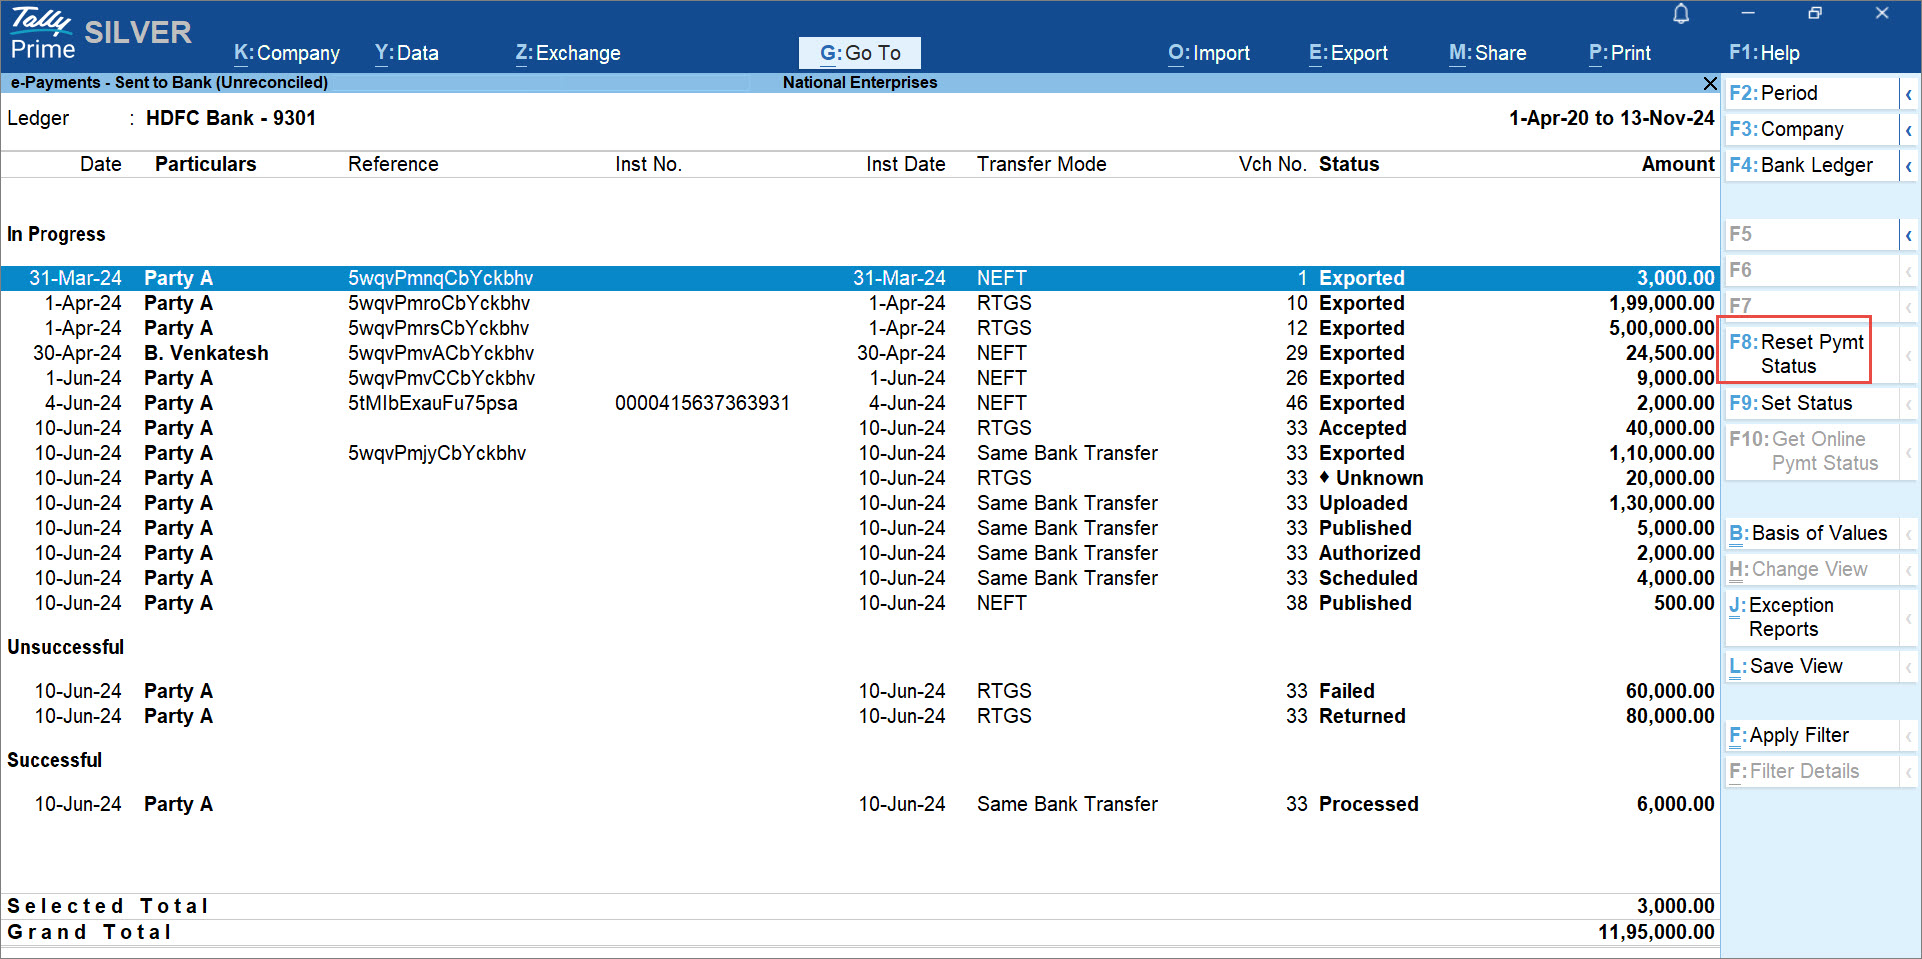
- Press Y to confirm.
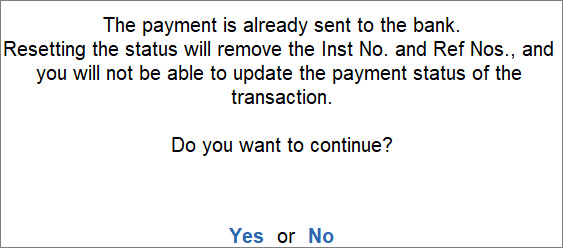
The e-Payment transaction will move to the Ready for Sending to Bank section.
Set Status of e-Payments
There might be scenarios in which the e-Payments are processed. However, in the e-Payments report, the transaction is still in progress. In such cases, you can manually set the status after verifying with the bank.
You can drill down from any of the sections in the e-Payments report and set the status of a transaction.
- Drill down from any of the sections in the e-Payments report, press F9 (Set Status).
- Select the Transaction Status and press Enter.
- On Hold: You can set this option when you want to review a transaction later.
Ensure that you enter an appropriate Comment, as per the reason for which you are putting the transaction on hold.
This comes in handy for reference and makes the subsequent action intuitive when you open the transaction again. - Processed: Enter the Inst No.
- Reconciled: Enter the Inst No. and Bank Date.
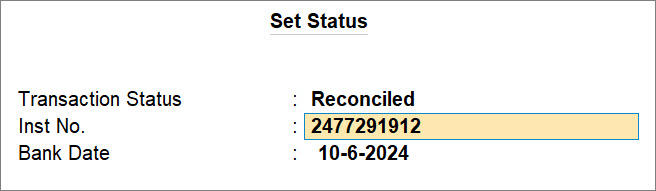
- On Hold: You can set this option when you want to review a transaction later.
- Press Ctrl+A to save.
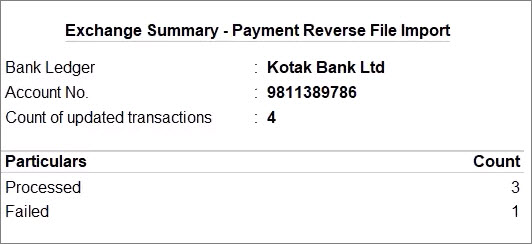
You can also update the status of the e-Payments by importing the Bank Reverse File.
To know more, refer to e-Payment Reconciliation.
In case of DBS Bank, you can select a transaction that is sent to the bank and press F10 (Update Status).
If you are using TallyPrime Release 5.1 or earlier versions, then click here
Import Payment Reverse File to Update e-Payment Status
- Press Alt+G (Go To) > type or select Banking Activities, press Enter, and then drill down from the e-Payments column for a specific Bank ledger.
Alternatively, Gateway of Tally > Banking > Banking Activities, and then drill down from the e-Payments column for a specific Bank ledger. - Drill down from the Sent to Bank (Unreconciled) section.
- Import Payment Reverse File.
- Press Alt+O (Import) > Payment Reverse File.
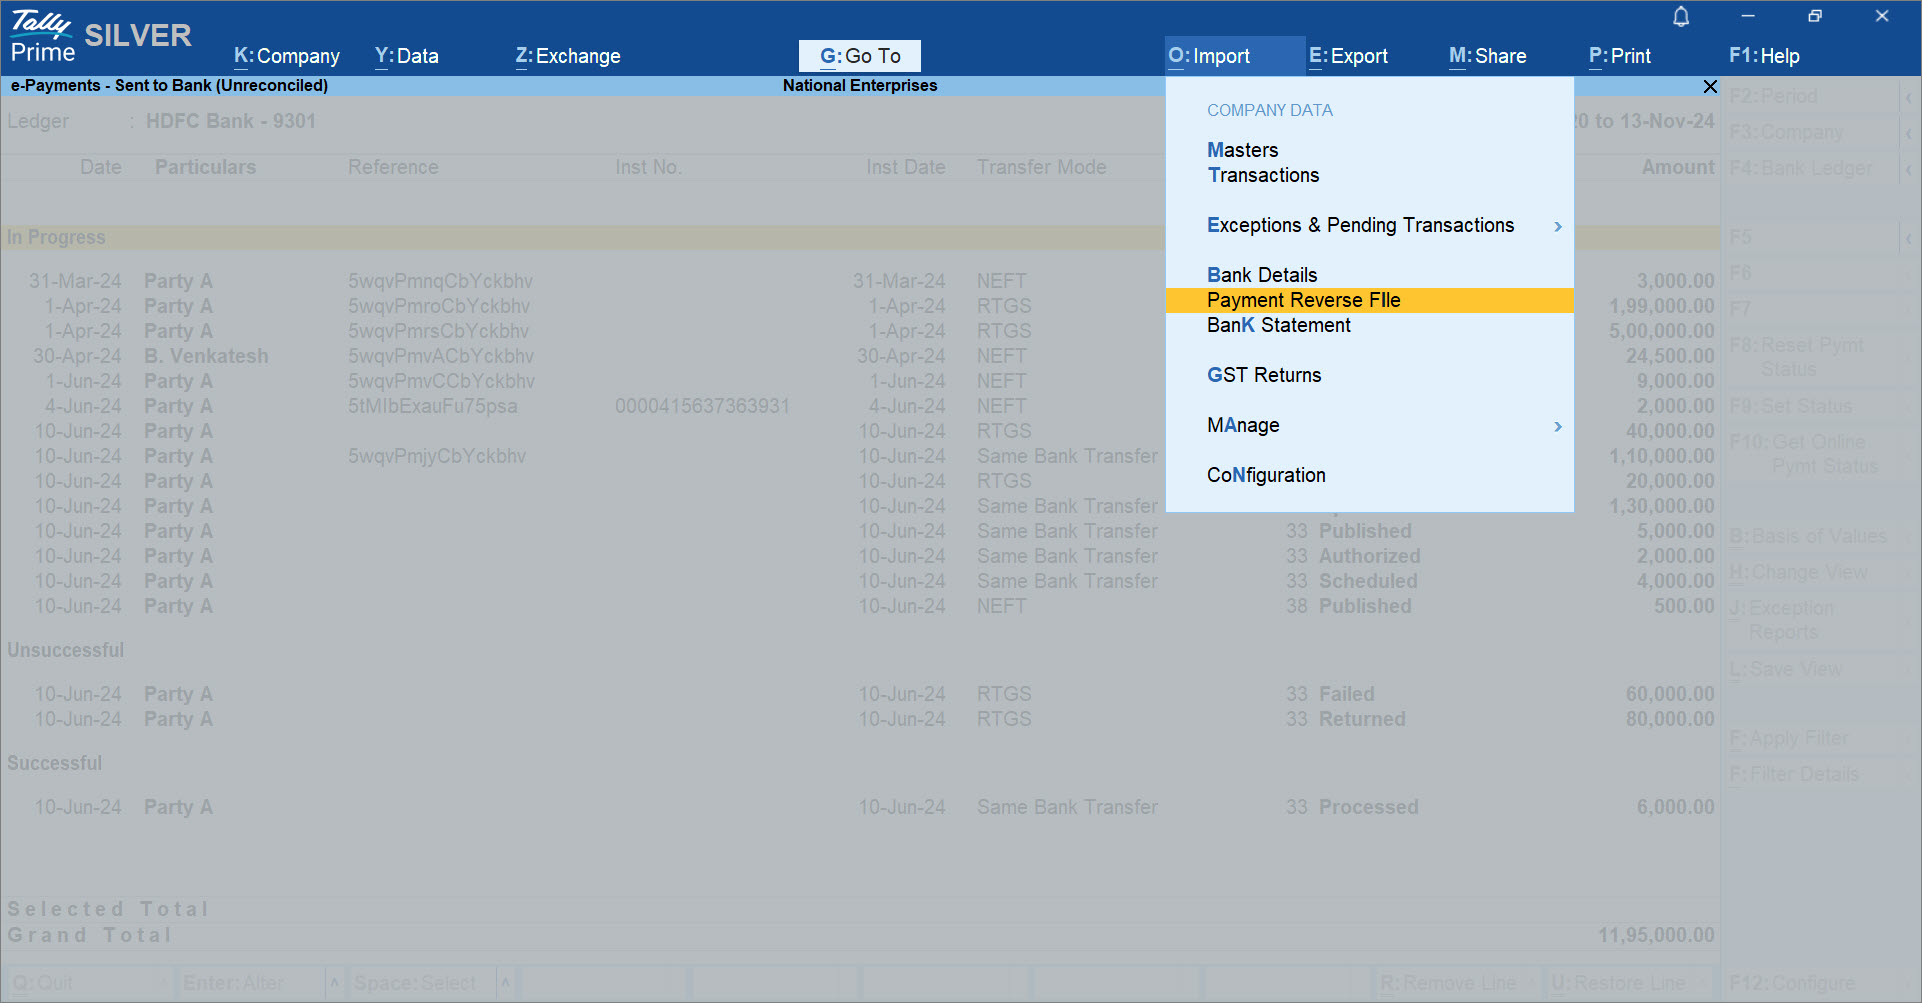
The Import Payment Reverse File screen appears. - Select the File Path and File to Import (Delimited), and press Enter.
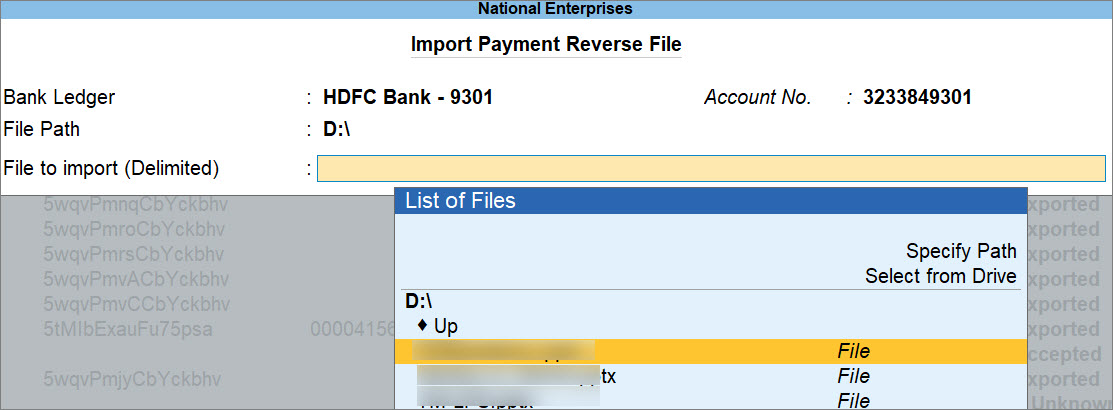
The following success message will appear after the file is imported, and the status of the transactions get updated along with the Instrument No.
- Press Alt+O (Import) > Payment Reverse File.
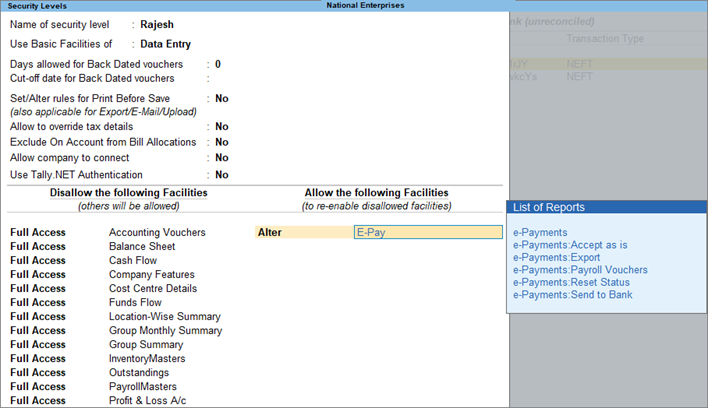
Security for e-Payments
You can provide additional security for your banking details and e-payments by creating users with special rights and authorising them for specific operations. You can use the Security Control feature to set up the required security levels. For example, if you want your data entry operator to have access only for e-Payments related reports, then you can allow full access or access to alter for the List of Reports related to e-Payments.
![]()
- Press Alt+K (Company) > User Roles.
- Select the security level (for example, Data Entry) from the List of Security Levels, and press Enter.
- Under Allow the following Facilities, select from the List of Reports as e-Payments.
- Under Allow the following Facilities, select from the List of Reports as e-Payments.
- Accept the security settings. As always, you can press Ctrl+A to save the screen.