Author: Tally Academy
How to Upload Vouchers to GSTR-1 under IFF Scheme Directly from TallyPrime 5.0
How to File GSTR-1 from TallyPrime 5.0
How to Download GST Returns in TallyPrime 5.0 for Reconciliation
How to Upload GSTR-1 Returns Directly from TallyPrime 5.0
How to Enable API Access for Connected GST from TallyPrime 5.0
TallyPrime and TallyPrime Edit Log Release 4.1
Release Notes for TallyPrime and TallyPrime Edit Log Release 4.1 | What’s New!
TallyPrime and TallyPrime Edit Log Release 4.1 bring great delight to you with the following offerings:
- The provision to update MSME UDYAM number for a company and its MSME suppliers. You also have the option to quickly gather details of all unpaid bills to MSME suppliers, and easily comply with section 43b(h) of the Income Tax Act.
- The facility to generate the list of all online sales in a return period, as per the changes introduced in GSTR-1.
MSME
With the new MSME feature, both MSMEs and businesses trading with MSMEs can identify MSME status and track pending bills for timely payments. Moreover, buyers from MSMEs can quickly file their Form MSME 1 with complete details of overdue MSME payments. Further to comply with 43b(h) of income tax act, a buyer can instantly generate the list of bills.
Registered MSME Businesses can:
- Set up UDYAM Registration Details received from the department. They can also alter the details and keep track of all such alterations along with the applicable dates.
- Print invoices with UDYAM Registration Details, to inform buyers about your MSME status.
- Get details of due or overdue receivables quickly and send reminders to receive payments on time.
Businesses trading with MSMEs can:
- Set up MSME status of suppliers.
- Identify bills related to MSMEs and make payments before the due date to avoid interest.
- Get information related to MSMEs with overdue payments readily and report the same in Form MSME-1.
- Get details of all unpaid bills to MSMEs to arrive at the deductions not allowed as per 43b(h) of income tax act.
Details of Online Sales Through e-Commerce Summary Report
For businesses doing online sales through e-Commerce operators, such as Amazon, Myntra and Flipkart, some changes have been introduced in GSTR-1, related to the reporting of online sales.
To support these changes, TallyPrime Release 4.1 has come up with an e-Commerce Summary to highlight:
- Taxable values and breakup of tax amounts, such as IGST, CGST, SGST, and Cess
- GSTIN-wise sales for the e-Commerce operators
Thereby, this report will help you in easily entering the relevant details on the GST portal.
Click here for release notes
Click here for download
Allow Back-Dated Transaction Entries | Update Financial Year in TallyPrime
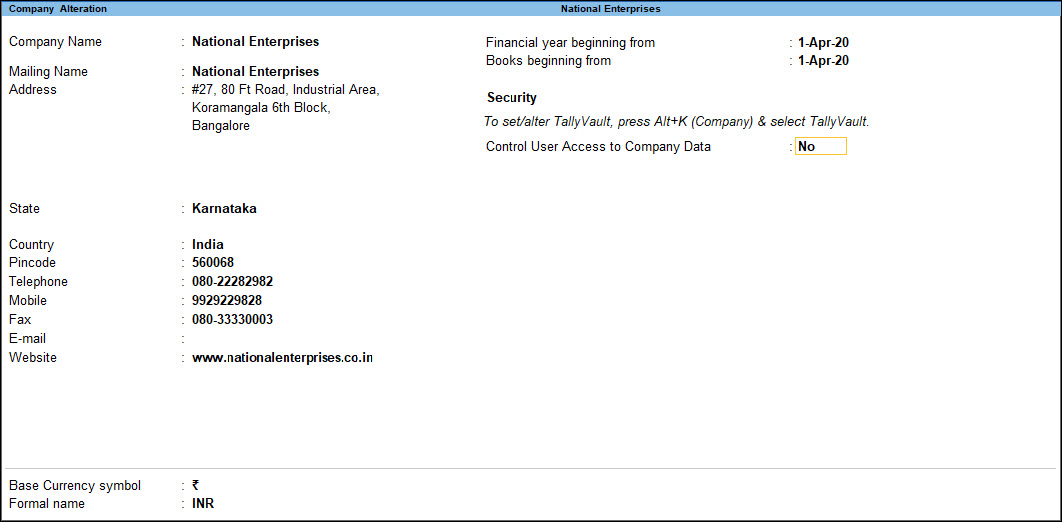
If you have maintained your books of accounts prior to the current financial year, you can add all of the back-dated transactions to your company in TallyPrime. Let us assume that you started your business in 1-Jun-2019 and have maintained your business transactions since then. However, you created a company in TallyPrime on 1-May-2019. By default, the books and financial years in TallyPrime are both set to 1-Apr-2020.
To allow entries of transactions in TallyPrime starting 1-Jun-2019, you will need to update the financial year information of the company.
- Press Alt+K (Company) > Alter.
- In the Company Alteration screen, update the Financial year beginning from as 1-Apr-2019 and the Books beginning from date as 1-Jun-2019.

- Accept the screen. As always, you can press Ctrl+A to save.
You can change the Books beginning date in the Company Alteration screen anytime to make back-dated entries up to 1-Apr-2019 for the financial year 2019-2020.
Update Company Details | Alter Company in TallyPrime
If your company address, phone number, or any other contact information was not provided earlier or has changed, you can update such details in TallyPrime. Any changes made to these details will be reflected accordingly in your reports and printed invoices.
- Press Alt+K (Company) > Alter.
- In the Company Alteration screen, make the necessary changes.
- Accept the screen. As always, you can press Ctrl+A to save.
If you do not need the company anymore, you can delete the company as well.
- Press Alt+K (Company) > Alter.
- In the Company Alteration screen, press Alt+D. The company will be deleted permanently.
If you want to access the business transactions recorded in the company at a later time, you can take a backup of the company before you delete it. Note that once you delete the company, you cannot retrieve it, and therefore keeping a back up of the company data is recommended.
Load company on startup in TallyPrime
If you wish to load one or more companies by default, whenever you open TallyPrime, you can configure the same.
- Open the Startup Settings screen: Press F1 (Help) > Settings > Startup.
- Set the option Load companies on startup to Yes, and press Enter on Companies to load.
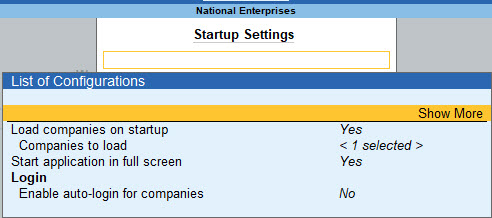
- In the List of Companies to Load on Startup screen, select one or more companies, based on your need.
- Select End of List, after your have selected the companies to be loaded on startup.
The companies that you select here will be loaded by default next time you open TallyPrime.