TallyPrime Release 2.0

Release Notes – What’s New in TallyPrime

You can count on us for a delightful journey with TallyPrime as we work to enhance the product with new features and fix issues, which will make your experience even simpler and more seamless.

Highlights – TallyPrime Release 2.0

Connected experience for e-Way Bill

With the connected experience for e-Way Bill, TallyPrime enables you to –

  • Generate e-Way Bill online at the time of voucher creation.
  • Generate multiple e-Way Bills online at one shot.
  • Cancel e-Way Bill, update Part B & Transporter ID, and extend validity for transactions in bulk.
  • Print e-Way Bill for invoices with e-Way Bill number and QR Code as per the government’s requirements.
  • Track the status of e-Way Bills using the e-Way Bill report and e-Way Bill Register.
  • Get the latest e-Way Bill information and status from the e-Way Bill system to a transaction using e-Way Bill report and e-Way Bill Register.

As a result, you need not juggle between TallyPrime and the e-Way Bill system for various e-Way Bill activities, as everything can be done from within the product.


Save View for reports

The Save View feature will delight you with a personalized experience for viewing reports in TallyPrime.

You can now:

  • Save a preferred view for a report with your desired configurations.
  • Save a view for a report for a specific period.
  • Save a view for a report opened for a particular master such as Party ledger, Stock Item, and others.
  • Save views, as per your requirement, for:
    • All companies on a particular computer
    • A specific company
  • Set a saved view as the default view.
    Henceforth, the report will always open as per the configurations applied in the saved view.
  • Change the default view, whenever needed.
  • Delete a saved view or all the views from all companies or a specific company, as needed.
  • Restrict users from saving views for reports or deleting views saved in a specific company.

Saving your preferred views saves a great deal of time as you need not apply the configurations time and again.


Online GSTIN/UIN and HSN/SAC validation

TallyPrime is here with a quick and simple process to validate:

  • GSTIN/UIN information for single and multiple Parties.
  • HSN/SAC information for single and multiple Stock Items.

As a result, you get to know if the information entered in your books is authentic and update it, if needed.


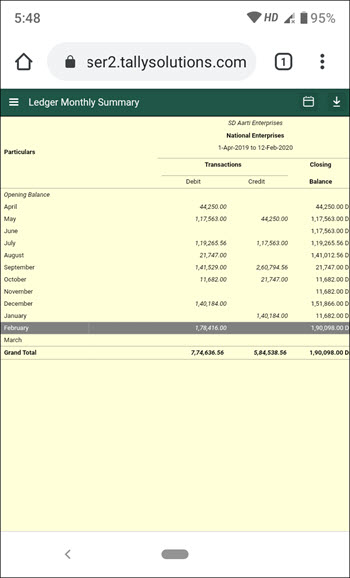
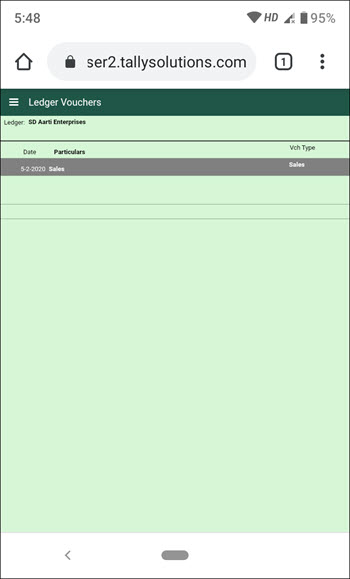
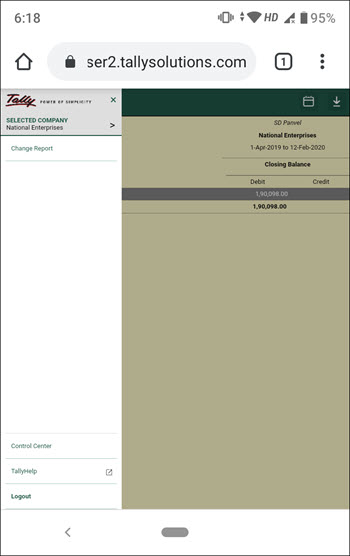
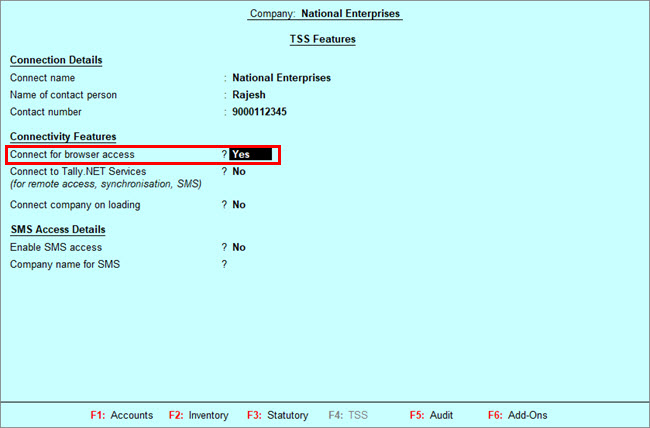
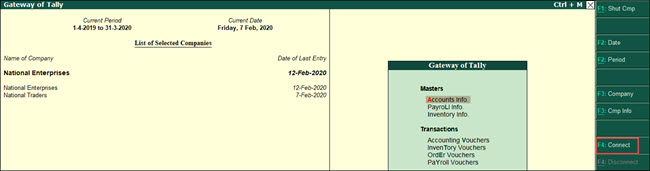
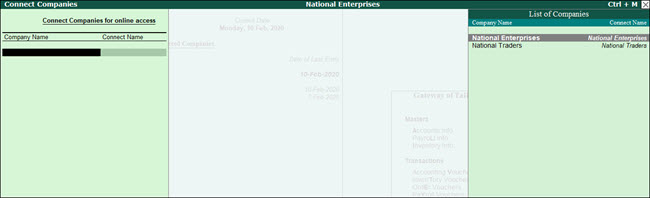
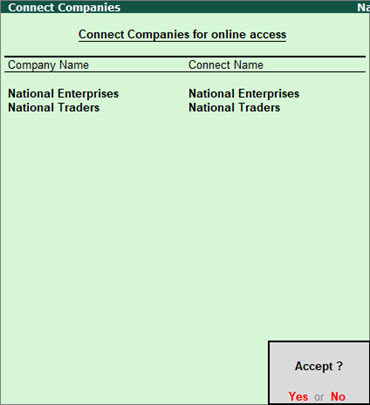
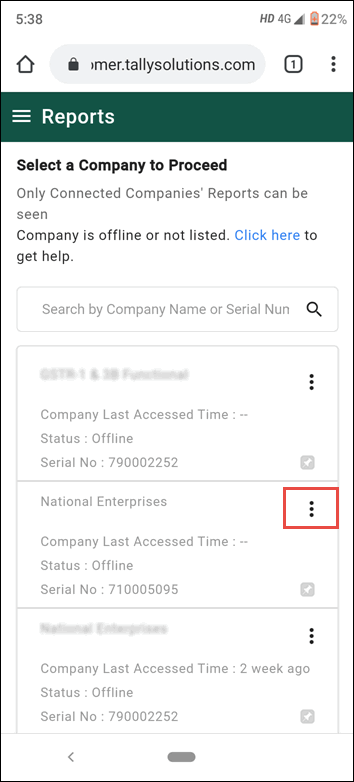
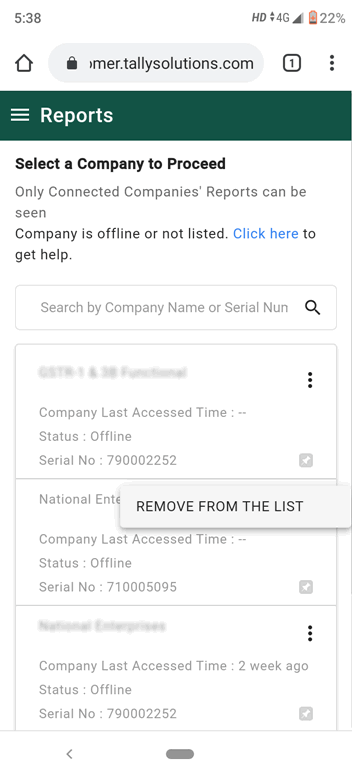
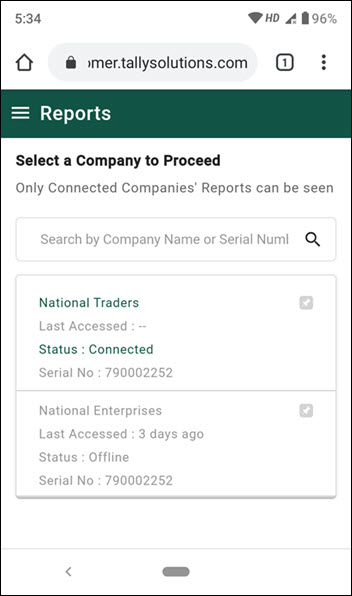
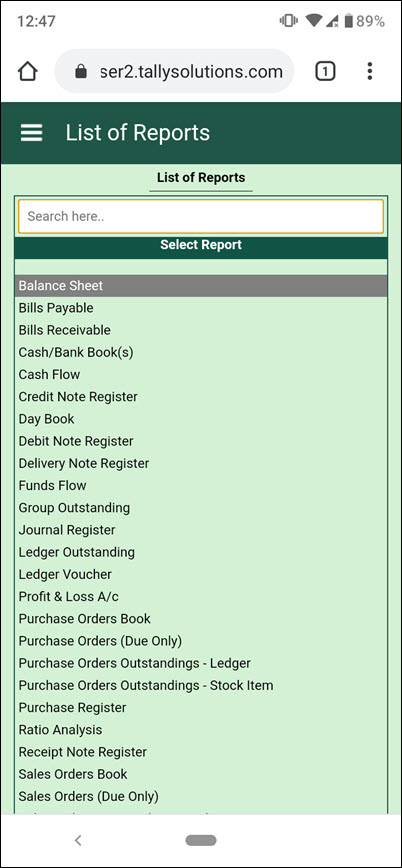
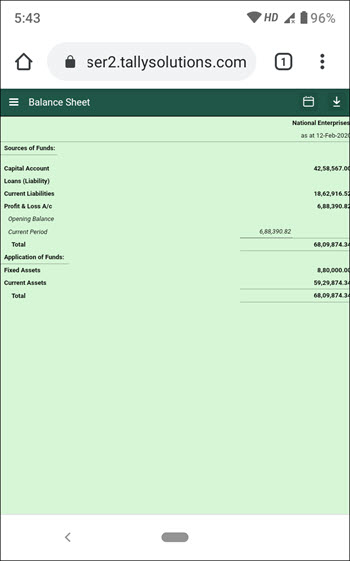
TallyPrime Reports in browsers

Mobile-responsive design

The all-new mobile-responsive design provides you with an intuitive experience right from company selection to downloading a voucher.

Additionally, you can now enjoy the benefits of the following features:

Quick access to change date in Day Book

You can now view Day Book for the previous and next dates by tapping on the left and right arrow keys, respectively.

Scale Factor in selected reports

You can now apply Scale Factor in a report to view the values in hundreds, lakhs, and so on.

Introduction of Show Details

You can now view additional information in selected reports by tapping on Show Details.

Simpler way to change period

You now have a better experience in changing the period of reports in browsers.

File Name of Report downloaded from browser

The file name of the report downloaded from the browser will now have an underscore, which will separate the date and timestamp for easy identification of the date and time of the download.

Furthermore, if the hour, minute, or second is in single digit, it will be preceded by 0.


e-Payments in TallyPrime

TallyPrime’s easy-to-use e-payment feature is now extended to RazorpayX Bank and Axis Bank.

Product Improvements – TallyPrime Release 2.0

File your GSTR-1 returns with HSN Summary as per the latest change

As per the latest amendments, in Table 12 of GSTR-1 (HSN Summary) the column Total Value is replaced with the column Rate of Tax. This release of TallyPrime enables you to file your returns with this change.

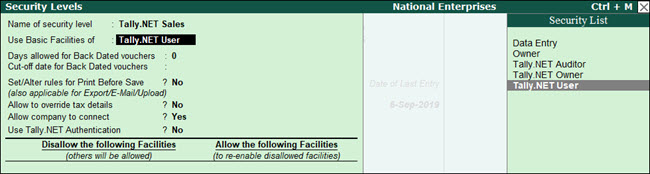
Party details in exported Ledger Group Outstandings

When you exported the Ledger Group Outstandings report to an MS Excel file, the details of some Parties were missing.
This issue is resolved.

Voucher Register with Verification Status

In the Voucher Register under Verification of Vouchers, the transactions did not appear for the selected Verification Status.
This issue is resolved.

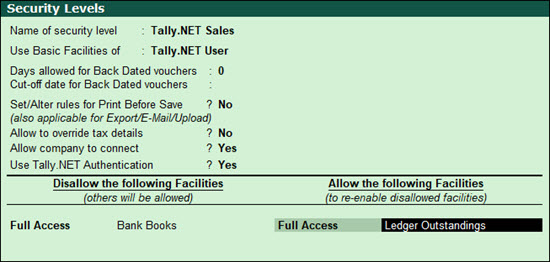
e-Mailing Ledger and Group Outstandings

When you sent Ledger and Group Outstandings to parties via e-mail, the parties that did not have any outstanding amount received a blank report.
This issue is resolved.

GST calculation in sales transactions

When you recorded a sales transaction using Voucher Class, TallyPrime rounded off the tax value with three decimals to two decimals. Consequently, the calculated tax amount was lesser by 1 paisa.
This issue is resolved.

Terms of Delivery in Sales Invoice

Only the first line was visible in Terms of Delivery when you altered a Sales Invoice and provided the Order No.
This issue is resolved.

Performance enhancements in navigation

The performance enhancements in navigation will make your experience with TallyPrime all the more delightful. It will take fewer seconds to:

  • Navigate to Credit Note voucher from Gateway of Tally
  • Switch between Voucher Types
  • Display the List of Ledgers
  • Change Buyer Name
  • Accept the Supplier Details screen

TCS transactions and reports

The TDL storage error appeared in the TCS transactions and reports, when Use TCS Allocations was enabled in the sales transaction.
This issue is resolved.

Error while uploading Delivery Note on the e-Way Bill system

An error appeared while uploading a Delivery Note on the e-Way Bill system. This happened when you had selected Others as Sub Type while recording the Delivery Note.
This issue is resolved.

Change of ledger in a columnar report

The report details were not getting refreshed when you changed the ledger in a columnar report.
This issue is resolved.

e-Way Bill Number in Multi-Voucher Printing

In multi-voucher printing, the last e-Way Bill number was printed in all the invoices.
This issue is fixed.

TCS Debit Note not linked to TCS Receipt voucher

TCS Debit Notes were not getting linked to TCS Receipt vouchers.
This issue is resolved.

TRN in Sales invoice printed in Arabic

The TRN did not appear when you printed a sales invoice in Arabic.
This issue is resolved.

e-Way Bill number in altered invoice

The e-Way Bill number did not appear in the print when the invoice was altered.


Click here for release notes

Click here for download


How to Download, Install and Activate TallyPrime

You can start using the TallyPrime features in a matter of minutes. All you need to do is download the setup file, install TallyPrime, and activate the license.

If you are a new user, create a company, and start recording your transactions. You can create all ledgers needed to maintain your accounts while recording transactions. In case you want to try TallyPrime before buying it, or you are a student, you can use the Educational version.

If you are using an earlier version of Tally, upgrade to TallyPrime, and continue your business as usual.


Download and Install TallyPrime

You can download the application setup from Tally Solutions website. After downloading the setup files, install the application on your computer. Installation steps remain the same regardless of the TallyPrime edition you have purchased.

You can install TallyPrime on any computer with 64-bit edition of Microsoft Windows 7 or later.

  1. Download the setup files.
    1. Go to https://tallysolutions.com/download/.
    2. Click Download.
    3. Select the folder where you want to save the setup.exe file.
    4. Click Save.
  2. Install TallyPrime.
    1. Double-click setup.exe.
    2. Double-click Install New.
      Install new TallyPrime
    3. Configure Application Path, if needed.
      By default, the application will be installed at C:\Program Files\TallyPrime.

      • Click Configure.
      • Double-click Application Path.
      • Click … and change the path as needed.
        Note: If you are already using Tally.ERP 9, it is recommended that you install TallyPrime in a different folder. This will allow you to use both the products simultaneously, if needed.

        List of configurations for installation of TallyPrime

      • Close the List of Configurations window.
    4. Click Install.
      The application gets installed, and the following window opens.
    5. Click Start TallyPrime to launch TallyPrime.

You can activate the license and start using TallyPrime.

New Users – Activate License

If you have purchased a single user Silver License, you can activate the license on one computer. If you have a multiuser Gold License, you need to activate the license on one computer on the LAN, and configure all other installations using the same license.

Activate New License

  1. Start your TallyPrime. The Welcome to TallyPrime screen appears.
    Activate TallyPrime license
  2. Click Activate New License.
  3. If you have a Single-Site license, enter your Serial Number, Activation Key, and Administrator e-mail ID.Activate TallyPrime license
    Note: The e-mail ID provided here will be linked to your account, and used for all future communication and licensing activities.
  4. Press Enter to proceed. The Unlock License screen appears.
    Unlock TallyPrime license
  5. Enter the Unlock Key sent to your e-mail ID.
    Note: If you have not received the unlock key, press F2 (Get Unlock Key).
  6. Press Enter to unlock your license.
    After your license is unlocked, the following message appears.

After activating the license, you can create your first Company and start using TallyPrime for business transactions.

Depending on the size and scale of your business, you can have different setups.

Try it for free | Educational version

If you want to try TallyPrime before you buy, or just want to learn how to use the product, you can use the Educational version for free. You can try all features in the product, just with the restriction that voucher dates are limited to 1, 2 and 31.

  1. Start your TallyPrime. The Welcome to TallyPrime screen appears.
  2. Click Try It For Free.
    Use Educational mode

You can start using TallyPrime in Educational mode. The window title will be in dark green colour and will show EDU under the product name.

View Tally.ERP 9 Reports in Browser

Experience the freedom of viewing your Tally.ERP 9 reports from anywhere, on any device, in a browser, securely. All you need is Tally.ERP 9 Release 6.6, and a device with a web browser and internet connection.

Anywhere, Any device : You can access Tally.ERP 9 reports from anywhere using any device such as, laptop, smartphone, tablet, and so on, with a web browser, and an active internet connection.

Security and Control : You have complete control on who views the reports, and which reports are available to a user. Further, your data will always be in your machine. Whenever a user views a report in a browser, only the data required for that report is fetched from your Tally.ERP 9.

Reports in a web browser : Select the company, then select the report from the list shown once you log in to the Tally portal. The report with the latest data is fetched and displayed. You can drill down to the next levels of the report to get further details. You can change the period of the report as well. Refresh the page to get the updated information.

Download Reports and Invoices : You can open a report and download it as a PDF document. You can drill down up to the voucher level. You can also download invoices and vouchers.

Easy Setup : Update to Tally.ERP 9 Release 6.6, connect your company, and allow users to view reports from anywhere. Note that only users with valid Tally.NET IDs are allowed to view reports in browser. Your account ID (e-mail ID used to activate your license) is a valid Tally.NET ID. You can also create Tally.NET IDs for users who need to view reports in browser.

Connect Company to view reports in browser

You can decide when to connect your company for users to view reports and disconnect the same when it is not needed. You need to have internet connection on the computer where Tally.ERP 9 is installed.

1. Go to Gateway of Tally , click F4: Connect .

a. If you have enabled security control for your company, move to step 2.

In case you have not enabled security control for your company, Tally.ERP 9 will prompt you for the same.

o In the Security Control screen, the option Use security control is set to Yes .

o Provide the administrator details. This login credential is for the company data.

2. Provide report access to Tally.NET users.

a. Click Yes to add Tally.NET users and allow browser access.

b. Select the Security Level as Tally.NET Owner .

c. In Username/Tally.NET ID , enter a valid Tally.NET ID for which you want to give access.

Note: You can check for valid Tally.NET IDs on the Tally portal , by logging in with account administrator’s e-mail ID. You can also create more Tally.NET IDs, if needed.

Now that the company is connected, a sign (c) appears against the company name in the List of Selected Companies in the Gateway of Tally.

When an authorised user logs in to the Tally portal, the connected company appears in the List of Companies with the status as Connected .

View Tally.ERP 9 reports from anywhere using browser

1. Open www.tallysolutions.com and log in using your Tally.NET ID and password. All the companies that you can access are listed with the status as Connected or Offline .

2. Select a connected company. The List of Reports is displayed.

3. Select the report that you want to view. A request is sent to Tally.ERP 9, and the selected report is fetched to display in the browser. You can download the report as a PDF document by clicking  , and change the report period by clicking  on the top-right corner of the screen.

4. To get further details of any value, you can drill down up to the voucher level in many reports. You can also download the voucher as a PDF document.


Use the Back button of the browser to go back to the previous screen. In case you are accessing from a phone, the phone back button does the same.

5. To change the report, you can use  on the top left of the screen, and click Change Report .

6. To change company, you can use  on the top left of the screen, to view the List of Companies, and click SELECTED COMPANY .

Manage Access Rights of Users

You can add many Tally.NET users, and allow them to view reports in browser. You can also decide who can access which report.

In this section

● Create Tally.NET IDs

● Allow users to view reports in browser

● Create Security Levels to provide limited access to reports

Create Tally.NET IDs

You can create Tally.NET IDs directly on the Tally portal. Alternatively, you can create using Control Centre in Tally.ERP 9.

1. Go to Tally portal , log in using your account administrator’s e-mail ID.

2. On the left pane, click Control Centre > User Management > Manage Users .

3. In the Manage Users screen, click CREATE USER .

4. In the Create New User section, select the required Security Level as Standard User or Owner .

5. In the Tally.NET ID field, enter a valid e-mail ID. The password for the Tally.NET ID is sent to the email ID provided.

6. Select the option Enable Tally.NET Services to give access to Tally.NET features and browser reports.

7. In case you have multiple branches, select the branch for which the user is allowed to access reports in browser.

8. Click CREATE .

Tally.NET IDs are created. You need to allow browser access to these users, in Tally.ERP 9, so that they can view reports in browsers.

Allow users to view reports in browser

You can allow many users to view reports in browser.

1. Go to Gateway of Tally > F3 : Cmp Info > Security Control > Users and Passwords .

2. Select the Security Level as Tally.NET Owner , Tally.NET User , or Tally.NET Auditor . You can also create Security Levels, if needed.

3. In Username/Tally.NET ID , enter the required Tally.NET ID.

4. Set the option Allow Browser Access to Yes , and accept.

Note: By default, the security level Tally.NET Owner and Tally.NET Auditor provide access to view all the reports available for viewing in browsers. But the security level Tally.NET User has access to only a few reports. The reports that are not available to the security level Tally.NET User are given here .

● In case you need to disallow viewing reports for this company in browsers for a user, set Allow Browser Access to No .

These users can view reports in browsers, whenever the companies are connected.

Create Security Levels to provide limited access to reports

You can create multiple Security Levels to manage user access to different reports in Tally.ERP 9. If Tally.NET IDs are added under such Security Levels, you can control who can view which report in browser.

1. Go to Gateway of Tally > F3 : Cmp Info > Security Control .

2. Select Types of Security and press Enter .

3. In the Security Levels screen, move to the end of the entries in List of Security Levels to get a blank row.

4. Enter the name for the new security level and press Enter to drill down.

5. In the Use Basic Facilities of field, select Tally.NET User .

6. Ensure that the option Use Tally.NET Authentication is set to Yes . This will enable you to change the configuration of Allow Browser Access option while adding a user.

7. In the Disallow the following Facilities column, select Full Access from the Type of Access list and press Enter .

8. Select the name of the report you want to disallow. For example, if you want to disallow access to Bank Books , select it and press Enter . Full access to Bank Books is disallowed for this security level and for all users added under this security level.

9. In the Allow the following Facilities column, select Full Access from the Type of Access list and press Enter .

10. Select the name of the reports you want to allow access. For example, if you want to allow access to Ledger Outstanding , then select it and press Enter .

11. Similarly, allow access to other reports, Group Outstandings and save.

You have created a new security level with access to all reports available for a Tally.NET User except Bank Books and additionally allowed access to Ledger Outstandings and Group Outstandings .

12. Add Tally.NET IDs under this Security Level to allow these users to view the limited set of reports in browser.

Manage Company for Browser Access

You have complete control and flexibility on the company setting for report access, including when the access is needed.

● Enable/Disable browser access for your Company

● Disconnect Company

● Connect/Disconnect multiple companies

● Connectivity Status report in Tally.ERP 9

● Remove names of Offline Companies not used from the list in browser

Enable/Disable browser access for your Company

When you update your Tally.ERP 9 to Release 6.6, browser access is enabled for the company. However, you can disable it when no users are expected to view the reports.

● Go to F11: Features > F4: TSS Features to check your settings. You will see that Connect for browser access is set to Yes .

● If you need to disable browser access, set the option to No .

Disconnect Company

When there is no need for users to access reports in browser you can disconnect the company.

● Click F4: Disconnect .

When you disconnect a company in Tally.ERP 9, the status of the company changes to offline on the Tally portal.

Connect/Disconnect multiple companies

When you have more than one company open in Tally.ERP 9, you can connect any or all of these companies at once. Ensure that the companies have security enabled and Tally.NET IDs are added to give access to reports in browser before using multiple company connect functionality. You need to have internet connection on the computer where Tally.ERP 9 is installed.

1. Open all the required companies.

2. Click F4: Connect .

3. In the Connect Companies screen, select the companies one by one.

4. Press Enter to connect. You can see the connection success message for each company in the calculator panel.

When multiple companies are connected, you can disconnect many connected companies at once.

● Press Alt+F4 to disconnect the companies.

● In the Disconnect Companies screen, select the companies to disconnect and accept.

Connectivity Status report in Tally.ERP 9

This report gives you details of all the companies connected for Browser Access and Tally.NET Services. This report is active when at least one company is connected.

1. Go to Gateway of Tally > F3 : Cmp Info .

2. Select Connectivity Status .

The Connectivity Status report displays the company name, the company’s connect name, and the status of connection for Browser Access and Tally.NET Services.

Remove names of Offline Companies not used from the list in Browser

When a company is connected for browser access the name of company continues to be shown in the browser list for ever. In case you are not connecting that company anymore the name will continue to appear but with connection status as offline. You would want to remove all such names from the list of companies in the browser which are no more connected and only appear as offline. You can do so using the Remove from the list option.

1. Open www.tallysolutions.com and log in using your Tally.NET ID and password. All the companies that you can access are listed with the status as Connected or Offline .

2. Click the three dots provided next to the offline company.

3. Click the option REMOVE FROM THE LIST .

4. A message Are you sure you want to remove the company from the list? to confirm . click Remove .

5. A confirmation message is displayed once the company is removed successfully. click Ok .

Tally.ERP 9 Release 6.6

Highlights

The latest release brings to you a simple, secure, and swift way to view Tally.ERP 9 reports on the go using any device. Login to Tally portal in a web browser and get frequently used business reports from Tally.ERP 9 on demand.
This release also provides:

    • For India: GST reports for Jammu & Kashmir and Ladakh – You can now generate GSTR-1, GSTR-3B, GST CMP-08, and GST Annual Computation to help file GST returns for the periods before and after 1-Jan-2020.
    • For UAE: New Invoice Format 2 to allow you to print VAT invoices (in English) as required by FTA.

Product Improvements

    • In the Export for e-Way Bill report, the exported e-Way Bills appeared under Invoice Ready for Export section. This issue is resolved. Now the exported e-Way Bills are appearing under Invoices Exported section.
    • Provision to record transfer of Input Tax Credit from SGST to UTGST is now supported for Ladakh.
    • The message that appeared in the calculator panel while navigating to the ledger display screen (Gateway of Tally > Accounts Info. > Ledger >Display > select any ledger) is now taken care of.
    • Total Invoice Value appearing in GST Returns when transaction was booked in accounting voucher mode has been corrected.
    • The crash which occurred in a particular case of opening or saving an accounting voucher is resolved.

Click here for release notes

Click here for download

Tally.ERP 9 Release 6.4.7

The latest version under Tally.ERP 9 Release 6 series is Release 6.4.7, launched on 2nd August, 2018.

Below are the key enhancements of Tally.ERP 9 Release 6.4.7:

Enhanced GSTIN validation

Earlier for few taxpayer types, GSTIN validation was failing in Tally.ERP 9. Now, with this new Release, GSTIN will get validated for all taxpayer types

Option to avail Input Credit under Reverse Charge in current or future period 

  • If your business needs to avail input credit using reverse charge mechanism, you will find it delightfully useful and flexible to take credit on reverse charges in current or future periods
  • If you wish to keep track of total liability towards reverse charges or input credit availed, you can easily do so now with the new report, “Input Credit to be booked”


Highlights of Tally.ERP 9 Release 6 series.

Record Fixed Asset purchases in account invoice mode 

For your convenience, you can now record Fixed Assets purchases in account invoice mode as well. This was earlier possible only in the voucher mode.

Automatic rounding off invoice amountsCreate a Round off Ledger and select Invoice Rounding as the type of ledger. While creating invoice and upon selecting this ledger, Tally.ERP9 will auto calculate the difference value.

Manage e-Way Bills using Tally.ERP 9When you create the invoice before transporting goods, Tally.ERP 9 captures all the necessary details required to capture e-Way Bill. You need not re-enter these details in the e-Way Bill portal again. Just export the invoice in JSON format and upload to the portal for generating e-Way Bill.

  • Enter e-Way Bill Number (EBN) in its corresponding invoice, print the invoice and hand it over to the transporter.
  • You can export JSON file for a single invoice or for multiple invoices together in one go.
  • If the mode of transport, vehicle no., place of supply and State are same for a given set of invoices, you can group invoices accordingly and generate a single JSON file for a consolidated e-Way Bill. But first, you must generate e-Way Bills for each invoice as a prerequisite.
  • Tally.ERP 9 identifies invoices for which e-Way Bills are yet to be generated. You can add, modify, delete, consolidate and track e-Way Bills against invoices.Tally.ERP9 also shows which details are missing in the invoice for the purpose of generating e-Way Bills.
  • You can generate e-Way Bills on behalf of your supplier or transporter; or in cases of purchases and also for credit notes, delivery notes and receipt notes as well.

Click here for release notes

Click here for download

How Tally.ERP 9 Helps Tax Consultants to Generate E-way Bills

Why-Tax-Consultants-should-use-TE9-for-Generating-e–Way-Bills

Note: This blogpost is intended for tax consultants. Business owners will also find this interesting to read.

As a tax consultant, you deal with different types of clients. For some, you provide end-to-end accounting services, while for others you must be providing services up to the extent of filing GST returns. More recently, you must have come across requests to generate and manage e-Way Bills as well from those clients to whom you provide end-to-end services.

As part of GST compliance, Tally.ERP 9 can be used to manage e-Way Bills efficiently. In this blogpost, we would like to highlight how Tally.ERP 9 can be best used to your advantage for managing e-Way Bills for all your clients easily.

Avoid repetitive work while generating e-Way Bills

Clients for whom you provide end-to-end services request you to generate e-Way Bills on a continuous basis. How will you execute these requests?

One way to do this is to visit the e-Way Bill portal, provide invoice level details and transportation level details, and generate e-Way Bills.

However, in this method, you will end up spending twice the effort. Firstly, you have to provide all the details on the portal. Secondly, you have to enter these details again in your accounting software for the purpose of bookkeeping and compliance.

Another way to generate e-Way Bills is to directly record the sales entry in Tally.ERP 9. While recording the entry, you can also provide additional details that are required to generate e-Way Bills. The transaction entry can be exported as a JSON file and uploaded on the e-Way Bill portal. The portal will generate your client’s e-Way Bill. Not only for sales, you can generate e-Way Bills even for purchases and sales returns using Tally.ERP 9.

By using Tally.ERP 9, you are avoiding the repetitive activity of entering same information twice.
You get to save time and ensure that the records reflect the same values as in the transaction information used for generating e-Way Bills. This reduces the chances of manual errors as well.

Identify transactions for generating consolidated e-Way Bills

If your client wants to dispatch multiple consignments in a single vehicle to the same State, then you can generate a single consolidated e-Way Bill. If the State, place of supply, vehicle number and mode of transport are the same, then you can generate e-Way Bills for each of the invoices individually, then combine these e-Way Bills to finally generate a single consolidated e-Way Bill with Tally.ERP 9.

Tally.ERP 9 makes it even easier for you. It groups invoices based on the criteria mentioned above so that you don’t have to manually select the invoices. A consolidated bill eases the life of the transporter.

Generate e-Way Bills faster for multiple invoices

Suppose you get request to generate 10 e-Way Bills from a client. It sure is a big hassle to export data of each and every invoice in JSON format and upload them individually to the portal for generating e-Way Bills.

Tally.ERP 9 makes this easier. You can export the data of all the invoices together in a single JSON file and upload the file to the e-Way Bill portal for generating e-Way Bills. This saves your time significantly and once again helps avoid manual errors.

Update your Tally.ERP 9 to Release 6.4 for latest enhancements

Tally.ERP 9 Release 6.4 is our latest product for businesses, launched on 23rd Feb. 2018.

If you are a business owner, do you need to upgrade to this release? If you are a tax consultant, must you ask your clients to upgrade?  These are some obvious questions in your minds.

In this blogpost, we will take you through the benefits of using Release 6.4. We are confident that by the time you have finished reading this blogpost, you will have all your doubts cleared.

Release 6.4 addresses two important needs of our customers. E-Way Bill management and GST compliance for composite dealers.

Enhancements in Tally.ERP 9 Release 6.4

1. e-Way Bill Management

If you are a business owner, e-Way Bills are going to become bigger part of your daily life sooner than you expect. If you are transporting goods worth Rs. 50,000 or more and beyond the distance of 10 kms or more, you can do so only with an e-Way Bill.

As enablers of GST compliance for businesses, we have introduced e-Way Bill Management in Tally.ERP 9. Let’s walk through the important benefits of using Tally.ERP 9 for managing your e-Way Bills.

Generate e-Way Bills quickly

Tally.ERP 9 makes your life simpler! While creating an invoice, as soon as you start keying in the details, Release 6.4 allows you to capture additional transportation related details at the same time. You can export the invoice in a JSON file and upload it on the e-Way Bill portal to generate the e-Way Bill. The e-Way Bill Number (EBN) appears on the e-Way Bill along with other details.

You can enter the EBN against the corresponding invoice in Tally.ERP 9, take a print and hand it over to your transporter.

With Tally.ERP 9, you don’t have to re-enter all the invoice details again on the e-Way Bill portal for the purpose of generating e-Way Bill and save valuable time while reducing operational effort.

Create e-Way Bills for single or multiple invoices

Let’s take a case where you have received multiple orders and prefer to dispatch them together. Tally.ERP 9 allows you to easily generate e-way bills for all these invoices in one go. With latest version of Tally.ERP 9, you can export for all these invoices together at one go, rather than generating individual JSON files for each single invoice.

Tally.ERP 9 gives you the flexibility to generate e-Way Bills as per your business behaviour.

Create e-Way bills for different business scenarios

As a business, you come across different scenarios on a day-to-day basis. Sometimes, your supplier may not be able to generate an e-Way Bill. You might have made a purchase from an unregistered dealer who is unable to generate the e-Way Bill. If you are returning back some goods to your supplier, then you must have an e-Way Bill. Tally.ERP 9 gives you the flexibility to deal with all such scenarios and generate e-Way Bills under any circumstances.

You can also export JSON files of purchases, credit notes, delivery notes and receipt notes to generate e-Way Bills.
Track and manage transactions which need e-Way Bills
If you have hundreds of transactions, it can be difficult to keep a track of all those which qualify for e-Way Bills. No more worries! Tally.ERP 9 identifies transactions for which e-Way Bills are yet to be generated.

You can also find out invoices with missing information from the e-Way Bill Report and fill in the necessary information. You can update transactions with missing EBNs under Update e-Way Bill Information tab.

Generate Consolidated e-Way Bill

The e-Way Bill portal allow you to generate a consolidated e-Way Bill if the place of supply, State, mode of transport and vehicle number are the same. You can group invoices accordingly in Tally.ERP 9, generate a consolidated JSON and upload the same to the portal for generating a consolidated e-Way Bill. However, before doing this, ensure that you have generated e-Way Bills for each invoice individually which is a prerequisite.

Another important need that we addressed in latest version of Tally.ERP 9 is GST compliance for Composite Dealers.

2. GST Compliance for Composite Dealers

If your business turnover is equal to or less than Rs.1.5 crores, then you can opt for the Composition Scheme. Although the burden of tax compliance is lesser if you are a composite dealer, you still have to file GSTR-4 on a quarterly basis and follow some simple steps for compliance.

Tally.ERP Release 6.4 is a seamless GST solution for composite dealers. You can maintain books, configure tax rates, generate Bill of Supply, manage reverse charge transactions and generate GSTR-4 in JSON for filing. Below are the business benefits of using Tally.ERP 9 Release 6.4 for Composite dealers.

Configure tax rate in a single step

A flat tax rate of 1% is applicable for manufacturers and traders under the Composition Scheme. It takes just a step to configure the tax rate in your Tally.ERP 9 at the company level. Tally.ERP 9 calculates tax liability on your total taxable turnover.

We all know that tax rates can change under the GST regime. In such cases, you can apply the new applicable tax rate and maintain earlier transactions with their tax history in Tally.ERP 9. Let us understand this better by way of an example.

Assume that a tax rate of 2% is applicable from 1st April to 20th May, while 1% tax rate will be applicable from 21st May to 30th June. Tally.ERP 9 will automatically consider both the tax rates along with their applicable dates in your GSTR-4.

Segregate taxable, nil rated and exempted sales

As per the latest notification of CBEC (Central Board of Excise & Customs), composite dealers have to pay tax on their taxable turnover. To arrive at the right amount of taxable turnover, as a composite dealer, you must segregate the sales into taxable, nil rated and exempted sales. Tally.ERP 9 takes care of this when calculating tax liability on taxable turnover.

Record your purchases in the right manner

As a composite dealer you cannot claim any Input Tax Credit on purchases, yet have to pay taxes. Now these taxes have to be factored in under purchase cost.

With Tally.ERP 9 Release 6.4, firstly you can define the amount of tax in the Item Master. Secondly, this tax amount gets allocated to your purchase cost. This reflects in your Stock Summary Cost under the Stock Summary Report. Although the tax rates are configured for each item, Tally.ERP 9 ensures that the rates get applied only when you make purchases and not when you engage in any sales.

Manage reverse charge transactions

A composite dealer is liable to pay reverse charges in case of specified purchases and import of services. With Tally.ERP 9 Release 6.4, you can record such transactions easily and their impact reflects in your GSTR-4, provided you raise tax liability using the Stat Adjustment feature.

Generate and print Bill of Supply

Composite dealers have to issue Bill of Supply instead of invoices for all their sales.  With Tally.ERP 9 latest version, you can prepare Bill of Supply as per GST defined format and issue them for sales.

File GSTR-4 using Tally.ERP 9

Composite dealers have to file GSTR-4 on a quarterly basis. If there are any errors in transactions, Tally.ERP 9 detects and helps you to correct them while you prepare the data for GSTR-4. You can easily generate GSTR-4 in a JSON format, which can be uploaded on GST Portal to file the returns.
Release 6.4 has many more rich capabilities to help you manage your GST compliance better. We would like to hear from you, especially your experience of this release. Do upgrade, use the latest version and also share with your business colleagues so that everyone is able to make use of the benefits of our latest Tally.ERP 9 Release 6.4.

Click here for release notes

Click here for download

Tally.ERP 9 Series A Release 6.0.2, July, 2017

Highlights

Printing HSN/SAC code on the invoice

Some customers faced issues while printing the HSN/SAC on their invoices. We have solved this problem.

Customers can define HSN/SAC at any level as needed and Tally.ERP 9 will take care of printing the HSN/SAC code on the invoices.

See this help topic or watch this video to understand how the codes and rates are processed by Tally.ERP 9. This will also help you make use of the powerful flexibility offered in setting rates at different levels.

Viewing existing data in the previous release after upgrade

Some customers want to view their data in their old release of Tally.ERP 9 after upgrading to Release 6.

With this upgrade, Tally.ERP 9 Release 6.0.2 will be installed in a new folder. Restore backed up data in a different folder, and open the company in the previous release of Tally.ERP 9. The Tally.ERP 9 license will work for both releases seamlessly.

Note: Always remember to restore your backed up data in a different folder to prevent overwriting the upgraded data.

VAT – Jammu and Kashmir

Exporting VAT Annexure 49 to MS Excel was taking an extremely long time.

This has been addressed. You will find that exporting is much quicker now.

GST

●     You can set up GST rates for a particular price range/slab for multiple stock items from GST Rate Setup screen.

●     The company’s GSTIN/UIN was not displayed in the invoice printout when the secondary address of the company was selected for printing. This issue is resolved.

●     If you enabled the option Print company logo? in the Receipt Printing Configuration screen, the company’s GSTIN/UIN was not displayed in the printed advance receipt. This issue is resolved.

●     In the GST sales invoice printout, the state codes of consignor and consignee were printed incorrectly in neat mode when:

o     Multiple addresses were enabled for the party.

o     The option Allow separate buyer and consignee names? was enabled in the Voucher Configuration screen.

This issue is resolved.

●     The address details in the Buyer section of the invoice printout was shrinking when the options Print State Name & State Code? and Print Place of Supply? were set to Yes in the Invoice Print Configuration screen. This issue is resolved.

●     The HSN/SAC was not displayed in the printed invoice when it was recorded with:

o     Stock items predefined with HSN/SAC.

o     Sales/purchase ledgers predefined only with tax rate and not the HSN/SAC.

This issue is resolved. Now, if the HSN/SAC is not defined in the sales/purchase ledger, but is available in any of the masters linked to the transaction, the same will be printed in the invoice.

●     When the sales invoice or delivery note was printed from voucher display mode, the Place of Supply was not displayed. This occurred even when the option Print Place of Supply? was set to Yes in the Invoice Print Configuration screen. This issue is resolved.

VAT

Jammu and Kashmir

●     The data export to MS Excel templates is enhanced as given below:

o     Values are exported invoice-wise in a single row, with values of each tax rate displayed in respective columns. When there is more than one tax rate belonging to the Other % column of the template, the column will be left blank. The values of both tax rates will be consolidated and displayed in Amount (Other %) column. This is provided in Annexure 48, 48C, 48I, 48IS, 48L, 48S, 49, 49I, and 49S.

o     The Commodity name predefined for the stock item with the highest value in the invoice is captured in the Nature of Goods column of Annexure 48IS, 48L, 48S and 49S.

●     Exporting data to the MS Excel template of Annexure 49 was taking too long. This issue is resolved.

Rajasthan

●     Data export to the latest template of Form 10 is supported for filing e-returns. The details of VAT/CST payment vouchers are captured from row 33 instead of row 27 of the Details of Tax Due sheet of the template VATForm10_2015.xls.

TDS/TCS

●     The latest File Validation Utility (FVU) tool version 5.5 is supported to validate the forms for E-TDS/TCS before filing returns.

The following changes are supported as per the latest FVU tool version 5.5:

o     The nature of payment Payment of Cash Consideration by Real Estate Developer to Property Owner has been renamed as Payment Under Specified Agreement with the Payment code of 41C.

o     As per the changes in section code 206CC, in the party ledger, when PAN/IT No. is defined as PANAPPLIED or PANINVALID or PANNOTAVBL for sales made with the nature of goods Timber Obtained by Any Mode Other Than Forest Lease, the transaction will be marked as C in the data exported to the text file for filing e-returns.

Licensing

●     Tally.ERP 9 Release 6 moved to educational mode without any notification when there were incompatible Account TDLs or Addons. Tally.ERP 9 Release 6.0.2 does not move to educational mode, and allows you continue to use Tally.ERP 9.

However, you need to contact your Tally Partner to make your customisations compatible with Release 6 or later.

Data Management

●     The installation path of Tally.ERP 9 has been changed to C:\Program Files\Tally\Tally.ERP9 to avoid overriding of installation of releases prior to 6.0.2.

●     When the data backup failed, the messages displayed were incomplete as the next course of action was not mentioned in them. The issue is resolved.

Now, the error messages display the corrective course of action such that you can resolve the problem yourself.

Click here for release notes

Click here for download

GST- Ready Tally.ERP 9 Release 6

GST is India’s single largest tax reform since independence. GST aims to help replace the federal tax structure with a more unified one to help reduce the cascading tax on tax impact, and remove the barriers to trade across state boundaries.

gst-ready-tally

Highlights

You can quickly get started with GST in a few easy steps

Start Using Tally.ERP 9 for GST Compliance

To record a GST transaction, you have to activate GST and also update or create the required ledgers.

To use Tally.ERP 9 for GST compliance,

1.    Activate GST

2.    Set up tax rates

Note: You can find the list of HSN codes/SAC on the website of the department of revenue.

3.    Update or create ledgers as required.

Depending on the business requirements you will need to update the following ledgers, either immediately or later.

●     Update stock items, and stock groups to include GST details.

●     Update sales and purchase ledgers to use in GST transactions.

●     It is recommended that you restart voucher numbering for GST transactions to ensure that unique voucher numbers are used for all your vouchers. If Automatic (Manual Override) is set as the method of voucher numbering, it ensures that unique voucher numbers are set for your vouchers.

●     Update party GSTIN/UIN for parties buying from you or selling items to you.

●     Create GST tax ledgers to calculate taxes in transactions.

●     Create income and expense ledgers to distribute the expenses and incomes against items appropriately.

Your company is ready with all the masters. You can use TE9 for transactions.

●     Recording Sales

●     Recording Purchases

Click here for release notes

Click here for download